小 (→步兵武器) |
(→步兵武器) |
||
| 第5行: | 第5行: | ||
{{anchor|Infantry research tree}} | {{anchor|Infantry research tree}} | ||
<div style="align-center; text-align:center;"><!--Interactive-->步兵科技科研树<br>[[File:Infantry research tree.png|center|1225px|link=|]]</div> | <div style="align-center; text-align:center;"><!--Interactive-->步兵科技科研树<br>[[File:Infantry research tree.png|center|1225px|link=|]]</div> | ||
== | ==武器和装备== | ||
=== | ===步兵武器=== | ||
{{Sversion|1.9}} | {{Sversion|1.9}} | ||
步兵装备代表步兵的标准武器套件,是任何部队的基础。每个国家都可以使用1918年的基本步兵装备,而所有主要国家和非主要国家都已完成1936年武器的研究。共有四种越来越先进的步兵装备。 | 步兵装备代表步兵的标准武器套件,是任何部队的基础。每个国家都可以使用1918年的基本步兵装备,而所有主要国家和非主要国家都已完成1936年武器的研究。共有四种越来越先进的步兵装备。 | ||
{| class="wikitable" | {| class="wikitable" | ||
|- | |- | ||
! style="width:146px;" | | ! style="width:146px;" | 图标(通用) | ||
! style="width:15em;" | | ! style="width:15em;" | 科技 | ||
! style="width:1px;" | | ! style="width:1px;" | 年份 | ||
! style="width:67px;" | | ! style="width:67px;" | 基础花费 | ||
! style="width:13em;" | | ! style="width:13em;" | 先决条件 | ||
! | ! 描述 | ||
! style="width:526.5px;" | | ! style="width:526.5px;" | 统计 | ||
|- | |- | ||
| style="width:1px; text-align: center;" | [[File:infantry_equipment_0.png|Basic Infantry equipment]] | | style="width:1px; text-align: center;" |[[File:infantry_equipment_0.png|Basic Infantry equipment]] | ||
! | ! 基础步兵装备 | ||
| 1918 | |1918 | ||
| style="text-align: center;" | | | style="text-align: center;" | 自动解锁 | ||
| | | 无 | ||
| | | 第一次世界大战中的发展的初级步兵装备。 | ||
| | | | ||
{| class="wikitable mw-collapsible innercollapse mw-collapsed" style="margin-right:2px" | {| class="wikitable mw-collapsible innercollapse mw-collapsed" style="margin-right:2px" | ||
! style="width:551px; | ! colspan="2" style="width:551px;" | | ||
|- | |- | ||
| colspan="2" style="border: none;" | '''2''' [[File:Steel.png|link=Steel]] | | colspan="2" style="border: none;" |'''2''' [[File:Steel.png|link=Steel]] | ||
|- | |- | ||
| colspan="2" style="text-align: center; border: none;" | [[File:infantry_equipment_0.png|Basic Infantry equipment]] | | colspan="2" style="text-align: center; border: none;" |[[File:infantry_equipment_0.png|Basic Infantry equipment]] | ||
|- | |- | ||
| colspan="2" style="text-align: center; border: none;" | | | colspan="2" style="text-align: center; border: none;" | | ||
| 第38行: | 第38行: | ||
| colspan="2" style="text-align: center; border: none;" | | | colspan="2" style="text-align: center; border: none;" | | ||
|- | |- | ||
| style="border: none; width: 50%; padding-right: 10px;"| ''' | | style="border: none; width: 50%; padding-right: 10px;" |''' 防御:''' <span style="float:right;">20.0</span> | ||
| style="border: none; width: 50%; padding-left: 10px;"| ''' | | style="border: none; width: 50%; padding-left: 10px;" |''' 突破:'''<span style="float:right;"> 2.0</span> | ||
|- | |- | ||
| style="border: none; width: 50%; padding-right: 10px;"| ''' | | style="border: none; width: 50%; padding-right: 10px;" |''' 对人员杀伤:''' <span style="float:right;">3.0</span> | ||
| style="border: none; width: 50%; padding-left: 10px;"| ''' | | style="border: none; width: 50%; padding-left: 10px;" |''' 对装甲杀伤:'''<span style="float:right;"> 0.5</span> | ||
|- | |- | ||
| style="border: none; width: 50%; padding-right: 10px;"| ''' | | style="border: none; width: 50%; padding-right: 10px;" |''' 最大速度:'''<span style="float:right;">4.0 km/h</span> | ||
| style="border: none; width: 50%; padding-left: 10px;"| ''' | | style="border: none; width: 50%; padding-left: 10px;" |''' 穿甲深度:'''<span style="float:right;">1.0</span> | ||
|- | |- | ||
| style="border: none; padding-right: 10px;"| ''' | | style="border: none; padding-right: 10px;" |''' 可靠性:'''<span style="float:right;">90.0%</span> | ||
| style="border: none; padding-left: 10px;"| [[File:Production cost.png|link=Production]] ''' | | style="border: none; padding-left: 10px;" |[[File:Production cost.png|link=Production]] ''' 建造花费:'''<span style="float:right;">0.43</span> | ||
|- | |- | ||
| colspan="2" style="text-align: center; font-size: 150%; border: none;" | <br> | | colspan="2" style="text-align: center; font-size: 150%; border: none;" |<br> 解锁 | ||
|- | |- | ||
| colspan="2" style="text-align: center; border: none;" | [[File:Infantry.png|link=Infantry]] | | colspan="2" style="text-align: center; border: none;" |[[File:Infantry.png|link=Infantry]] 步兵 | ||
|- | |- | ||
| colspan="2" style="text-align: center; border: none;" | | | colspan="2" style="text-align: center; border: none;" | | ||
|- | |- | ||
| style="border: none; width: 50%; padding-right: 10px;"| ''' | | style="border: none; width: 50%; padding-right: 10px;" |''' 人力:'''<span style="float:right;">1000</span> | ||
| style="border: none; width: 50%; padding-left: 10px;"| ''' | | style="border: none; width: 50%; padding-left: 10px;" |''' 训练时间:''' <span style="float:right;">90</span> | ||
|- | |- | ||
| style="border: none; width: 50%; padding-right: 10px;"| ''' | | style="border: none; width: 50%; padding-right: 10px;" |''' 恢复速度'''<span style="float:right;">0.30</span> | ||
| style="border: none; width: 50%; padding-left: 10px;"| ''' | | style="border: none; width: 50%; padding-left: 10px;" |''' 补给速度:'''<span style="float:right;">0.07</span> | ||
|- | |- | ||
| style="border: none; width: 50%; padding-right: 10px;"| ''' | | style="border: none; width: 50%; padding-right: 10px;" |''' 镇压能力:'''<span style="float:right;">1.5</span> | ||
| style="border: none; width: 50%; padding-left: 10px;"| ''' | | style="border: none; width: 50%; padding-left: 10px;" |''' 组织度:''' <span style="float:right;">60</span> | ||
|- | |- | ||
| style="border: none; width: 50%; padding-right: 10px;"| '''HP | | style="border: none; width: 50%; padding-right: 10px;" |'''HP :'''<span style="float:right;">25.0</span> | ||
| style="border: none; width: 50%; padding-left: 10px;"| ''' | | style="border: none; width: 50%; padding-left: 10px;" |''' 运输重量:'''<span style="float:right;">0.5</span> | ||
|} | |} | ||
|- | |- | ||
| style="width:1px; text-align: center;" | [[File:infantry1.png|Infantry Equipment I]] | | style="width:1px; text-align: center;" |[[File:infantry1.png|Infantry Equipment I]] | ||
! | ! 步兵装备 I | ||
| 1936 | |1936 | ||
| style="text-align: center;" | 127 | | style="text-align: center;" |127 天 | ||
| style="text-align: center;" | | | style="text-align: center;" | 基础步兵装备完成研发 | ||
| | | 个人和部队使用的步兵武器,以及士兵所需的其他装备 | ||
| | | | ||
{| class="wikitable mw-collapsible innercollapse mw-collapsed" style="margin-right:2px" | {| class="wikitable mw-collapsible innercollapse mw-collapsed" style="margin-right:2px" | ||
! style="width:551px; | ! colspan="2" style="width:551px;" | | ||
|- | |- | ||
| colspan="2" style="border: none;" | '''2''' [[File:Steel.png|link=Steel]] | | colspan="2" style="border: none;" |'''2''' [[File:Steel.png|link=Steel]] | ||
|- | |- | ||
| colspan="2" style="text-align: center; border: none;" | [[File:infantry1.png|Infantry Equipment I]] | | colspan="2" style="text-align: center; border: none;" |[[File:infantry1.png|Infantry Equipment I]] | ||
|- | |- | ||
| colspan="2" style="text-align: center; border: none;" | | | colspan="2" style="text-align: center; border: none;" | | ||
| 第88行: | 第88行: | ||
| colspan="2" style="text-align: center; border: none;" | | | colspan="2" style="text-align: center; border: none;" | | ||
|- | |- | ||
| style="border: none; width: 50%; padding-right: 10px;"| ''' | | style="border: none; width: 50%; padding-right: 10px;" |''' 防御:'''<span style="float:right;">22.0</span> | ||
| style="border: none; width: 50%; padding-left: 10px;"| ''' | | style="border: none; width: 50%; padding-left: 10px;" |''' 突破:'''<span style="float:right;">3.0</span> | ||
|- | |- | ||
| style="border: none; width: 50%; padding-right: 10px;"| ''' | | style="border: none; width: 50%; padding-right: 10px;" |''' 对人员杀伤:'''<span style="float:right;">6.0</span> | ||
| style="border: none; width: 50%; padding-left: 10px;"| ''' | | style="border: none; width: 50%; padding-left: 10px;" |''' 对装甲杀伤:'''<span style="float:right;">1.0</span> | ||
|- | |- | ||
| style="border: none; width: 50%; padding-right: 10px;"| ''' | | style="border: none; width: 50%; padding-right: 10px;" |''' 最大速度:'''<span style="float:right;">4.0 km/h</span> | ||
| style="border: none; width: 50%; padding-left: 10px;"| ''' | | style="border: none; width: 50%; padding-left: 10px;" |''' 穿甲深度:'''<span style="float:right;">4.0</span> | ||
|- | |- | ||
| style="border: none; padding-right: 10px;"| ''' | | style="border: none; padding-right: 10px;" |''' 可靠性:''' <span style="float:right;">90.0%</span> | ||
| style="border: none; padding-left: 10px;"| [[File:Production cost.png|link=Production]] ''' | | style="border: none; padding-left: 10px;" |[[File:Production cost.png|link=Production]] ''' 建造花费:'''<span style="float:right;">0.5</span> | ||
|} | |} | ||
|- | |- | ||
| style="width:1px; text-align: center;" | [[File:infantry_weapons.png|Improved Infantry Equipment I]] | | style="width:1px; text-align: center;" |[[File:infantry_weapons.png|Improved Infantry Equipment I]] | ||
! Improved Infantry Equipment I | !Improved Infantry Equipment I | ||
| 1938 | |1938 | ||
| style="text-align: center;" | 127 days | | style="text-align: center;" |127 days | ||
| style="text-align: center;" | Infantry Equipment I | | style="text-align: center;" |Infantry Equipment I | ||
| ''Personal and crew served weapons for infantry as well as the various other bits of kit a soldier needs. Improved weapon models and more specialized equipment.'' | |''Personal and crew served weapons for infantry as well as the various other bits of kit a soldier needs. Improved weapon models and more specialized equipment.'' | ||
| | | | ||
{| class="wikitable mw-collapsible innercollapse mw-collapsed" style="margin-right:2px" | {| class="wikitable mw-collapsible innercollapse mw-collapsed" style="margin-right:2px" | ||
! style="width:551px; | ! colspan="2" style="width:551px;" | | ||
|- | |- | ||
| colspan="2" style="text-align: center; font-size: 150%; border: none;" | Upgrades | | colspan="2" style="text-align: center; font-size: 150%; border: none;" |Upgrades | ||
|- | |- | ||
| style="border: none; width: 100%; padding-right: 10px;"| [[File:Cavalry.png|link=Cavalry]] [[File:Motorized.png|link=Motorized]] [[File:Mechanized.png|link=Mechanized]] | | style="border: none; width: 100%; padding-right: 10px;" |[[File:Cavalry.png|link=Cavalry]] [[File:Motorized.png|link=Motorized]] [[File:Mechanized.png|link=Mechanized]] | ||
| style="border: none; width: 100%; padding-left: 10px;"| | | style="border: none; width: 100%; padding-left: 10px;" | | ||
|- | |- | ||
| style="border: none; width: margin:140px; padding-left:4.5em;"| '''Soft attack:''' | | style="border: none; width: margin:140px; padding-left:4.5em;" |'''Soft attack:''' | ||
| style="border: none; width: 50%; padding-left: 10px;"| <span style="float:right;">+5%</span> | | style="border: none; width: 50%; padding-left: 10px;" |<span style="float:right;">+5%</span> | ||
|- | |- | ||
| style="border: none; width: 100%; padding-right: 10px;"| [[File:Infantry.png|link=Infantry]] [[File:Marine.png|link=Marines]] [[File:Mountaineers.png|link=Mountaineers]] [[File:Paratroop.png|link=Paratroopers]] [[File:Bicycle_Battalion.png|link=Bicycle Battalion]] | | style="border: none; width: 100%; padding-right: 10px;" |[[File:Infantry.png|link=Infantry]] [[File:Marine.png|link=Marines]] [[File:Mountaineers.png|link=Mountaineers]] [[File:Paratroop.png|link=Paratroopers]] [[File:Bicycle_Battalion.png|link=Bicycle Battalion]] | ||
| style="border: none; width: 100%; padding-left: 10px;"| | | style="border: none; width: 100%; padding-left: 10px;" | | ||
|- | |- | ||
| style="border: none; width: margin:140px; padding-left:4.5em;"| '''Soft attack:''' | | style="border: none; width: margin:140px; padding-left:4.5em;" |'''Soft attack:''' | ||
| style="border: none; width: 50%; padding-left: 10px;"| <span style="float:right;">+5%</span> | | style="border: none; width: 50%; padding-left: 10px;" |<span style="float:right;">+5%</span> | ||
|} | |} | ||
|- | |- | ||
| style="width:1px; text-align: center;" | [[File:infantry2.png|Infantry Equipment II]] | | style="width:1px; text-align: center;" |[[File:infantry2.png|Infantry Equipment II]] | ||
! Infantry Equipment II | !Infantry Equipment II | ||
| 1939 | |1939 | ||
| style="text-align: center;" | 170 days | | style="text-align: center;" |170 days | ||
| style="text-align: center;" | Improved Infantry Equipment I | | style="text-align: center;" |Improved Infantry Equipment I | ||
| ''Personal and crew served weapons for infantry as well as the various other bits of kit a soldier needs. Modernized to include a great number of sub-machineguns and anti-tank rifles.'' | |''Personal and crew served weapons for infantry as well as the various other bits of kit a soldier needs. Modernized to include a great number of sub-machineguns and anti-tank rifles.'' | ||
| | | | ||
{| class="wikitable mw-collapsible innercollapse mw-collapsed" style="margin-right:2px" | {| class="wikitable mw-collapsible innercollapse mw-collapsed" style="margin-right:2px" | ||
! style="width:551px; | ! colspan="2" style="width:551px;" | | ||
|- | |- | ||
| colspan="2" style="border: none;" | '''3''' [[File:Steel.png|link=Steel]] | | colspan="2" style="border: none;" |'''3''' [[File:Steel.png|link=Steel]] | ||
|- | |- | ||
| colspan="2" style="text-align: center; border: none;" | [[File:infantry2.png|Infantry Equipment II]] | | colspan="2" style="text-align: center; border: none;" |[[File:infantry2.png|Infantry Equipment II]] | ||
|- | |- | ||
| colspan="2" style="text-align: center; border: none;" | | | colspan="2" style="text-align: center; border: none;" | | ||
| 第146行: | 第146行: | ||
| colspan="2" style="text-align: center; border: none;" | | | colspan="2" style="text-align: center; border: none;" | | ||
|- | |- | ||
| style="border: none; width: 50%; padding-right: 10px;"| '''Defense:''' <span style="float:right;">28.0</span> | | style="border: none; width: 50%; padding-right: 10px;" |'''Defense:''' <span style="float:right;">28.0</span> | ||
| style="border: none; width: 50%; padding-left: 10px;"| '''Breakthrough:''' <span style="float:right;">4.0</span> | | style="border: none; width: 50%; padding-left: 10px;" |'''Breakthrough:''' <span style="float:right;">4.0</span> | ||
|- | |- | ||
| style="border: none; width: 50%; padding-right: 10px;"| '''Soft attack:''' <span style="float:right;">9.0</span> | | style="border: none; width: 50%; padding-right: 10px;" |'''Soft attack:''' <span style="float:right;">9.0</span> | ||
| style="border: none; width: 50%; padding-left: 10px;"| '''Hard attack:''' <span style="float:right;">1.5</span> | | style="border: none; width: 50%; padding-left: 10px;" |'''Hard attack:''' <span style="float:right;">1.5</span> | ||
|- | |- | ||
| style="border: none; width: 50%; padding-right: 10px;"| '''Max Speed:''' <span style="float:right;">4.0 km/h</span> | | style="border: none; width: 50%; padding-right: 10px;" |'''Max Speed:''' <span style="float:right;">4.0 km/h</span> | ||
| style="border: none; width: 50%; padding-left: 10px;"| '''Piercing:''' <span style="float:right;">5.0</span> | | style="border: none; width: 50%; padding-left: 10px;" |'''Piercing:''' <span style="float:right;">5.0</span> | ||
|- | |- | ||
| style="border: none; padding-right: 10px;"| '''Reliability:''' <span style="float:right;">90.0%</span> | | style="border: none; padding-right: 10px;" |'''Reliability:''' <span style="float:right;">90.0%</span> | ||
| style="border: none; padding-left: 10px;"| [[File:Production cost.png|link=Production]] '''Production Cost:''' <span style="float:right;">0.58</span> | | style="border: none; padding-left: 10px;" |[[File:Production cost.png|link=Production]] '''Production Cost:''' <span style="float:right;">0.58</span> | ||
|} | |} | ||
|- | |- | ||
| style="width:1px; text-align: center;" | [[File:infantry_weapons2.png|Improved Infantry Equipment II]] | | style="width:1px; text-align: center;" |[[File:infantry_weapons2.png|Improved Infantry Equipment II]] | ||
! Improved Infantry Equipment II | !Improved Infantry Equipment II | ||
| 1940 | |1940 | ||
| style="text-align: center;" | 170 days | | style="text-align: center;" |170 days | ||
| style="text-align: center;" | Infantry Equipment II | | style="text-align: center;" |Infantry Equipment II | ||
| ''Personal and crew served weapons for infantry as well as the various other bits of kit a soldier needs. Improved weapon models and more specialized equipment.'' | |''Personal and crew served weapons for infantry as well as the various other bits of kit a soldier needs. Improved weapon models and more specialized equipment.'' | ||
| | | | ||
{| class="wikitable mw-collapsible innercollapse mw-collapsed" style="margin-right:2px" | {| class="wikitable mw-collapsible innercollapse mw-collapsed" style="margin-right:2px" | ||
! style="width:551px; | ! colspan="2" style="width:551px;" | | ||
|- | |- | ||
| colspan="2" style="text-align: center; font-size: 150%; border: none;" | Upgrades | | colspan="2" style="text-align: center; font-size: 150%; border: none;" |Upgrades | ||
|- | |- | ||
| style="border: none; width: 100%; padding-right: 10px;"| [[File:Cavalry.png|link=Cavalry]] [[File:Motorized.png|link=Motorized]] [[File:Mechanized.png|link=Mechanized]] | | style="border: none; width: 100%; padding-right: 10px;" |[[File:Cavalry.png|link=Cavalry]] [[File:Motorized.png|link=Motorized]] [[File:Mechanized.png|link=Mechanized]] | ||
| style="border: none; width: 100%; padding-left: 10px;"| | | style="border: none; width: 100%; padding-left: 10px;" | | ||
|- | |- | ||
| style="border: none; width: margin:140px; padding-left:4.5em;"| '''Soft attack:''' | | style="border: none; width: margin:140px; padding-left:4.5em;" |'''Soft attack:''' | ||
| style="border: none; width: 50%; padding-left: 10px;"| <span style="float:right;">+5%</span> | | style="border: none; width: 50%; padding-left: 10px;" |<span style="float:right;">+5%</span> | ||
|- | |- | ||
| style="border: none; width: 100%; padding-right: 10px;"| [[File:Infantry.png|link=Infantry]] [[File:Marine.png|link=Marines]] [[File:Mountaineers.png|link=Mountaineers]] [[File:Paratroop.png|link=Paratroopers]] [[File:Bicycle_Battalion.png|link=Bicycle Battalion]] | | style="border: none; width: 100%; padding-right: 10px;" |[[File:Infantry.png|link=Infantry]] [[File:Marine.png|link=Marines]] [[File:Mountaineers.png|link=Mountaineers]] [[File:Paratroop.png|link=Paratroopers]] [[File:Bicycle_Battalion.png|link=Bicycle Battalion]] | ||
| style="border: none; width: 100%; padding-left: 10px;"| | | style="border: none; width: 100%; padding-left: 10px;" | | ||
|- | |- | ||
| style="border: none; width: margin:140px; padding-left:4.5em;"| '''Soft attack:''' | | style="border: none; width: margin:140px; padding-left:4.5em;" |'''Soft attack:''' | ||
| style="border: none; width: 50%; padding-left: 10px; "| <span style="float:right;">+5%</span> | | style="border: none; width: 50%; padding-left: 10px; " |<span style="float:right;">+5%</span> | ||
|} | |} | ||
|- | |- | ||
| style="width:1px; text-align: center;" | [[File:infantry_at.png|Infantry Anti-Tank I]] | | style="width:1px; text-align: center;" |[[File:infantry_at.png|Infantry Anti-Tank I]] | ||
! Infantry Anti-Tank I | !Infantry Anti-Tank I | ||
| 1942 | |1942 | ||
| style="text-align: center;" | 127 days | | style="text-align: center;" |127 days | ||
| style="text-align: center;" | Infantry Equipment II | | style="text-align: center;" |Infantry Equipment II | ||
| ''Arming our infantry with anti-tank rifles will allow them to take out lighter armored vehicles while maintaining mobility.'' | |''Arming our infantry with anti-tank rifles will allow them to take out lighter armored vehicles while maintaining mobility.'' | ||
| | | | ||
{| class="wikitable mw-collapsible innercollapse mw-collapsed" style="margin-right:2px" | {| class="wikitable mw-collapsible innercollapse mw-collapsed" style="margin-right:2px" | ||
! style="width:551px; | ! colspan="2" style="width:551px;" | | ||
|- | |- | ||
| colspan="2" style="text-align: center; font-size: 150%; border: none;" | Upgrades | | colspan="2" style="text-align: center; font-size: 150%; border: none;" |Upgrades | ||
|- | |- | ||
| colspan="2" style="text-align: left; border: none;" | [[File:Infantry.png|link=Infantry]] [[File:Marine.png|link=Marines]] [[File:Mountaineers.png|link=Mountaineers]] [[File:Paratroop.png|link=Paratroopers]] [[File:Motorized.png|link=Motorized]] [[File:Mechanized.png|link=Mechanized]] [[File:Bicycle_Battalion.png|link=Bicycle Battalion]] | | colspan="2" style="text-align: left; border: none;" |[[File:Infantry.png|link=Infantry]] [[File:Marine.png|link=Marines]] [[File:Mountaineers.png|link=Mountaineers]] [[File:Paratroop.png|link=Paratroopers]] [[File:Motorized.png|link=Motorized]] [[File:Mechanized.png|link=Mechanized]] [[File:Bicycle_Battalion.png|link=Bicycle Battalion]] | ||
|- | |- | ||
| style="border: none; width: margin:140px; padding-left:4.5em;"| '''Hard attack:''' | | style="border: none; width: margin:140px; padding-left:4.5em;" |'''Hard attack:''' | ||
| style="border: none; width: 50%; padding-left: 10px;"| <span style="float:right;">+25%</span> | | style="border: none; width: 50%; padding-left: 10px;" |<span style="float:right;">+25%</span> | ||
|- | |- | ||
| style="border: none; width: margin:140px; padding-left:4.5em;"| '''Piercing''' | | style="border: none; width: margin:140px; padding-left:4.5em;" |'''Piercing''' | ||
| style="border: none; width: 50%; padding-left: 10px;"| <span style="float:right;">+100%</span> | | style="border: none; width: 50%; padding-left: 10px;" |<span style="float:right;">+100%</span> | ||
|} | |} | ||
|- | |- | ||
| style="width:1px; text-align: center;" | [[File:infantry_at2.png|Infantry Anti-Tank II]] | | style="width:1px; text-align: center;" |[[File:infantry_at2.png|Infantry Anti-Tank II]] | ||
! Infantry Anti-Tank II | !Infantry Anti-Tank II | ||
| 1943 | |1943 | ||
| style="text-align: center;" | 127 days | | style="text-align: center;" |127 days | ||
| style="text-align: center;" | Infantry Anti-Tank I | | style="text-align: center;" |Infantry Anti-Tank I | ||
| ''For infantry to effectively engage heavier armored units, high-explosive anti-tank weapons need to be made smaller and lighter.'' | |''For infantry to effectively engage heavier armored units, high-explosive anti-tank weapons need to be made smaller and lighter.'' | ||
| | | | ||
{| class="wikitable mw-collapsible innercollapse mw-collapsed" style="margin-right:2px" | {| class="wikitable mw-collapsible innercollapse mw-collapsed" style="margin-right:2px" | ||
! style="width:551px; | ! colspan="2" style="width:551px;" | | ||
|- | |- | ||
| colspan="2" style="text-align: center; font-size: 150%; border: none;" | Upgrades | | colspan="2" style="text-align: center; font-size: 150%; border: none;" |Upgrades | ||
|- | |- | ||
| colspan="2" style="text-align: left; border: none;" | [[File:Infantry.png|link=Infantry]] [[File:Marine.png|link=Marines]] [[File:Mountaineers.png|link=Mountaineers]] [[File:Paratroop.png|link=Paratroopers]] [[File:Motorized.png|link=Motorized]] [[File:Mechanized.png|link=Mechanized]] [[File:Bicycle_Battalion.png|link=Bicycle Battalion]] | | colspan="2" style="text-align: left; border: none;" |[[File:Infantry.png|link=Infantry]] [[File:Marine.png|link=Marines]] [[File:Mountaineers.png|link=Mountaineers]] [[File:Paratroop.png|link=Paratroopers]] [[File:Motorized.png|link=Motorized]] [[File:Mechanized.png|link=Mechanized]] [[File:Bicycle_Battalion.png|link=Bicycle Battalion]] | ||
|- | |- | ||
| style="border: none; width: margin:140px; padding-left:4.5em;"| '''Hard attack:''' | | style="border: none; width: margin:140px; padding-left:4.5em;" |'''Hard attack:''' | ||
| style="border: none; width: 50%; padding-left: 10px;"| <span style="float:right;">+25%</span> | | style="border: none; width: 50%; padding-left: 10px;" |<span style="float:right;">+25%</span> | ||
|- | |- | ||
| style="border: none; width: margin:140px; padding-left:4.5em;"| '''Piercing''' | | style="border: none; width: margin:140px; padding-left:4.5em;" |'''Piercing''' | ||
| style="border: none; width: 50%; padding-left: 10px;"| <span style="float:right;">+100%</span> | | style="border: none; width: 50%; padding-left: 10px;" |<span style="float:right;">+100%</span> | ||
|} | |} | ||
|- | |- | ||
| style="width:1px; text-align: center;" | [[File:infantry3.png|Infantry Equipment III]] | | style="width:1px; text-align: center;" |[[File:infantry3.png|Infantry Equipment III]] | ||
! Infantry Equipment III | !Infantry Equipment III | ||
| 1942 | |1942 | ||
| style="text-align: center;" | 170 days | | style="text-align: center;" |170 days | ||
| style="text-align: center;" | Improved Infantry Equipment II | | style="text-align: center;" |Improved Infantry Equipment II | ||
| ''Personal and crew served weapons for infantry as well as the various other bits of kit a soldier needs. Further modernized to include personal Assault Rifles and anti-tank rockets.'' | |''Personal and crew served weapons for infantry as well as the various other bits of kit a soldier needs. Further modernized to include personal Assault Rifles and anti-tank rockets.'' | ||
| | | | ||
{| class="wikitable mw-collapsible innercollapse mw-collapsed" style="margin-right:2px" | {| class="wikitable mw-collapsible innercollapse mw-collapsed" style="margin-right:2px" | ||
! style="width:551px; | ! colspan="2" style="width:551px;" | | ||
|- | |- | ||
| colspan="2" style="border: none;" | '''4''' [[File:Steel.png|link=Steel]] | | colspan="2" style="border: none;" |'''4''' [[File:Steel.png|link=Steel]] | ||
|- | |- | ||
| colspan="2" style="text-align: center; border: none;" | [[File:infantry3.png|Infantry Equipment III]] | | colspan="2" style="text-align: center; border: none;" |[[File:infantry3.png|Infantry Equipment III]] | ||
|- | |- | ||
| colspan="2" style="text-align: center; border: none;" | | | colspan="2" style="text-align: center; border: none;" | | ||
| 第248行: | 第248行: | ||
| colspan="2" style="text-align: center; border: none;" | | | colspan="2" style="text-align: center; border: none;" | | ||
|- | |- | ||
| style="border: none; width: 50%; padding-right: 10px;"| '''Defense:''' <span style="float:right;">34.0</span> | | style="border: none; width: 50%; padding-right: 10px;" |'''Defense:''' <span style="float:right;">34.0</span> | ||
| style="border: none; width: 50%; padding-left: 10px;"| '''Breakthrough:''' <span style="float:right;">5.0</span> | | style="border: none; width: 50%; padding-left: 10px;" |'''Breakthrough:''' <span style="float:right;">5.0</span> | ||
|- | |- | ||
| style="border: none; width: 50%; padding-right: 10px;"| '''Soft attack:''' <span style="float:right;">12.0</span> | | style="border: none; width: 50%; padding-right: 10px;" |'''Soft attack:''' <span style="float:right;">12.0</span> | ||
| style="border: none; width: 50%; padding-left: 10px;"| '''Hard attack:''' <span style="float:right;">2.0</span> | | style="border: none; width: 50%; padding-left: 10px;" |'''Hard attack:''' <span style="float:right;">2.0</span> | ||
|- | |- | ||
| style="border: none; width: 50%; padding-right: 10px;"| '''Max Speed:''' <span style="float:right;">4.0 km/h</span> | | style="border: none; width: 50%; padding-right: 10px;" |'''Max Speed:''' <span style="float:right;">4.0 km/h</span> | ||
| style="border: none; width: 50%; padding-left: 10px;"| '''Piercing:''' <span style="float:right;">10.0</span> | | style="border: none; width: 50%; padding-left: 10px;" |'''Piercing:''' <span style="float:right;">10.0</span> | ||
|- | |- | ||
| style="border: none; padding-right: 10px;"| '''Reliability:''' <span style="float:right;">80.0%</span> | | style="border: none; padding-right: 10px;" |'''Reliability:''' <span style="float:right;">80.0%</span> | ||
| style="border: none; padding-left: 10px;"| [[File:Production cost.png|link=Production]] '''Production Cost:''' <span style="float:right;">0.69</span> | | style="border: none; padding-left: 10px;" |[[File:Production cost.png|link=Production]] '''Production Cost:''' <span style="float:right;">0.69</span> | ||
|} | |} | ||
|- | |- | ||
| style="width:1px; text-align: center;" | [[File:infantry_weapons3.png|Improved Infantry Equipment III]] | | style="width:1px; text-align: center;" |[[File:infantry_weapons3.png|Improved Infantry Equipment III]] | ||
! Improved Infantry<br>Equipment III | !Improved Infantry<br>Equipment III | ||
| 1944 | |1944 | ||
| style="text-align: center;" | 127 days | | style="text-align: center;" |127 days | ||
| style="text-align: center;" | Infantry Equipment III | | style="text-align: center;" |Infantry Equipment III | ||
| ''Personal and crew served weapons for infantry as well as the various other bits of kit a soldier needs. Further Modernized to include personal Assault Rifles and anti-tank rockets. Improved availability of weapons previously distributed to a limited extent.'' | |''Personal and crew served weapons for infantry as well as the various other bits of kit a soldier needs. Further Modernized to include personal Assault Rifles and anti-tank rockets. Improved availability of weapons previously distributed to a limited extent.'' | ||
| | | | ||
{| class="wikitable mw-collapsible innercollapse mw-collapsed" style="margin-right:2px" | {| class="wikitable mw-collapsible innercollapse mw-collapsed" style="margin-right:2px" | ||
! style="width:551px; | ! colspan="2" style="width:551px;" | | ||
|- | |- | ||
| colspan="2" style="text-align: center; font-size: 150%; border: none;" | Upgrades | | colspan="2" style="text-align: center; font-size: 150%; border: none;" |Upgrades | ||
|- | |- | ||
| style="border: none; width: 100%; padding-right: 10px;"| [[File:Cavalry.png|link=Cavalry]] [[File:Motorized.png|link=Motorized]] [[File:Mechanized.png|link=Mechanized]] | | style="border: none; width: 100%; padding-right: 10px;" |[[File:Cavalry.png|link=Cavalry]] [[File:Motorized.png|link=Motorized]] [[File:Mechanized.png|link=Mechanized]] | ||
| style="border: none; width: 100%; padding-left: 10px;"| | | style="border: none; width: 100%; padding-left: 10px;" | | ||
|- | |- | ||
| style="border: none; width: margin:140px; padding-left:4.5em;"| '''Soft attack:''' | | style="border: none; width: margin:140px; padding-left:4.5em;" |'''Soft attack:''' | ||
| style="border: none; width: 50%; padding-left: 10px;"| <span style="float:right;">+10%</span> | | style="border: none; width: 50%; padding-left: 10px;" |<span style="float:right;">+10%</span> | ||
|- | |- | ||
| style="border: none; width: 100%; padding-right: 10px;"| [[File:Infantry.png|link=Infantry]] [[File:Marine.png|link=Marines]] [[File:Mountaineers.png|link=Mountaineers]] [[File:Paratroop.png|link=Paratroopers]] [[File:Bicycle_Battalion.png|link=Bicycle Battalion]] | | style="border: none; width: 100%; padding-right: 10px;" |[[File:Infantry.png|link=Infantry]] [[File:Marine.png|link=Marines]] [[File:Mountaineers.png|link=Mountaineers]] [[File:Paratroop.png|link=Paratroopers]] [[File:Bicycle_Battalion.png|link=Bicycle Battalion]] | ||
| style="border: none; width: 100%; padding-left: 10px;"| | | style="border: none; width: 100%; padding-left: 10px;" | | ||
|- | |- | ||
| style="border: none; width: margin:140px; padding-left:4.5em;"| '''Soft attack:''' | | style="border: none; width: margin:140px; padding-left:4.5em;" |'''Soft attack:''' | ||
| style="border: none; width: 50%; padding-left: 10px;"| <span style="float:right;">+5%</span> | | style="border: none; width: 50%; padding-left: 10px;" |<span style="float:right;">+5%</span> | ||
|} | |} | ||
|} | |} | ||
=== Support weapons === | ===Support weapons=== | ||
Support weapons includes crew-served weapons such as medium and heavy machine guns and mortars. These technologies provide bonuses to the defense and breakthrough of cavalry and all types of infantry. | Support weapons includes crew-served weapons such as medium and heavy machine guns and mortars. These technologies provide bonuses to the defense and breakthrough of cavalry and all types of infantry. | ||
{{hatnote|Back to [[#Infantry research tree|Infantry research tree]]}} | {{hatnote|Back to [[#Infantry research tree|Infantry research tree]]}} | ||
{| class="wikitable" | {| class="wikitable" | ||
|- | |- | ||
! style="width:146px;" | Icon (generic) | ! style="width:146px;" |Icon (generic) | ||
! style="width:15em;" | Technology | ! style="width:15em;" |Technology | ||
! style="width:1px;" | Year | ! style="width:1px;" |Year | ||
! style="width:67px;" | Base cost | ! style="width:67px;" |Base cost | ||
! style="width:13em;" | Prerequisites | ! style="width:13em;" |Prerequisites | ||
! Description | !Description | ||
! style="width:526.5px;" | Statistics | ! style="width:526.5px;" |Statistics | ||
|- | |- | ||
| style="width:1px; text-align: center;" | [[File:support_weapons.png|Support Weapons I]] | | style="width:1px; text-align: center;" |[[File:support_weapons.png|Support Weapons I]] | ||
! Support Weapons I | !Support Weapons I | ||
| 1918 | |1918 | ||
| style="text-align: center;" | 127 days | | style="text-align: center;" |127 days | ||
| style="text-align: center;" | | | style="text-align: center;" | | ||
| ''Automatic weapons are becoming more portable. Submachine guns have already proven effective and the development of hand-held support weapons must continue.'' | |''Automatic weapons are becoming more portable. Submachine guns have already proven effective and the development of hand-held support weapons must continue.'' | ||
| | | | ||
{| class="wikitable mw-collapsible innercollapse mw-collapsed" style="margin-right:2px" | {| class="wikitable mw-collapsible innercollapse mw-collapsed" style="margin-right:2px" | ||
! style="width:551px; | ! colspan="2" style="width:551px;" | | ||
|- | |- | ||
| colspan="2" style="text-align: center; font-size: 150%; border: none;" | Upgrades | | colspan="2" style="text-align: center; font-size: 150%; border: none;" |Upgrades | ||
|- | |- | ||
| style="border: none; width: 100%; padding-right: 10px;"| [[File:Infantry.png|link=Infantry]] [[File:Motorized.png|link=Motorized]] [[File:Mechanized.png|link=Mechanized]] | | style="border: none; width: 100%; padding-right: 10px;" |[[File:Infantry.png|link=Infantry]] [[File:Motorized.png|link=Motorized]] [[File:Mechanized.png|link=Mechanized]] | ||
| style="border: none; width: 100%; padding-left: 10px;"| | | style="border: none; width: 100%; padding-left: 10px;" | | ||
|- | |- | ||
| style="border: none; width: margin:140px; padding-left:4.5em;"| '''Defense:''' | | style="border: none; width: margin:140px; padding-left:4.5em;" |'''Defense:''' | ||
| style="border: none; width: 50%; padding-left: 10px;"| <span style="float:right;">+5%</span> | | style="border: none; width: 50%; padding-left: 10px;" |<span style="float:right;">+5%</span> | ||
|- | |- | ||
| style="border: none; width: margin:140px; padding-left:4.5em;"| '''Breakthrough:''' | | style="border: none; width: margin:140px; padding-left:4.5em;" |'''Breakthrough:''' | ||
| style="border: none; width: 50%; padding-left: 10px;"| <span style="float:right;">+5%</span> | | style="border: none; width: 50%; padding-left: 10px;" |<span style="float:right;">+5%</span> | ||
|- | |- | ||
| colspan="2" style="text-align: center; border: none;" | | | colspan="2" style="text-align: center; border: none;" | | ||
| 第326行: | 第327行: | ||
| colspan="2" style="text-align: center; border: none;" | | | colspan="2" style="text-align: center; border: none;" | | ||
|- | |- | ||
| style="border: none; width: 100%; padding-right: 10px;"| [[File:Cavalry.png|link=Cavalry]] | | style="border: none; width: 100%; padding-right: 10px;" |[[File:Cavalry.png|link=Cavalry]] | ||
| style="border: none; width: 100%; padding-left: 10px;"| | | style="border: none; width: 100%; padding-left: 10px;" | | ||
|- | |- | ||
| style="border: none; width: margin:140px; padding-left:4.5em;"| '''Defense:''' | | style="border: none; width: margin:140px; padding-left:4.5em;" |'''Defense:''' | ||
| style="border: none; width: 50%; padding-left: 10px;"| <span style="float:right;">+2%</span> | | style="border: none; width: 50%; padding-left: 10px;" |<span style="float:right;">+2%</span> | ||
|- | |- | ||
| style="border: none; width: margin:140px; padding-left:4.5em;"| '''Breakthrough:''' | | style="border: none; width: margin:140px; padding-left:4.5em;" |'''Breakthrough:''' | ||
| style="border: none; width: 50%; padding-left: 10px;"| <span style="float:right;">+2%</span> | | style="border: none; width: 50%; padding-left: 10px;" |<span style="float:right;">+2%</span> | ||
|- | |- | ||
| colspan="2" style="text-align: center; border: none;" | | | colspan="2" style="text-align: center; border: none;" | | ||
| 第339行: | 第340行: | ||
| colspan="2" style="text-align: center; border: none;" | | | colspan="2" style="text-align: center; border: none;" | | ||
|- | |- | ||
| style="border: none; width: 100%; padding-right: 10px;"| [[File:Mountaineers.png|link=Mountaineers]] [[File:Paratroop.png|link=Paratroopers]] [[File:Marine.png|link=Marines]] | | style="border: none; width: 100%; padding-right: 10px;" |[[File:Mountaineers.png|link=Mountaineers]] [[File:Paratroop.png|link=Paratroopers]] [[File:Marine.png|link=Marines]] | ||
| style="border: none; width: 100%; padding-left: 10px;"| | | style="border: none; width: 100%; padding-left: 10px;" | | ||
|- | |- | ||
| style="border: none; width: margin:140px; padding-left:4.5em;"| '''Defense:''' | | style="border: none; width: margin:140px; padding-left:4.5em;" |'''Defense:''' | ||
| style="border: none; width: 50%; padding-left: 10px;"| <span style="float:right;">+3%</span> | | style="border: none; width: 50%; padding-left: 10px;" |<span style="float:right;">+3%</span> | ||
|- | |- | ||
| style="border: none; width: margin:140px; padding-left:4.5em;"| '''Breakthrough:''' | | style="border: none; width: margin:140px; padding-left:4.5em;" |'''Breakthrough:''' | ||
| style="border: none; width: 50%; padding-left: 10px;"| <span style="float:right;">+3%</span> | | style="border: none; width: 50%; padding-left: 10px;" |<span style="float:right;">+3%</span> | ||
|- | |- | ||
|} | |} | ||
|- | |- | ||
| style="width:1px; text-align: center;" | [[File:support_weapons2.png|Support Weapons II]] | | style="width:1px; text-align: center;" |[[File:support_weapons2.png|Support Weapons II]] | ||
! Support Weapons II | !Support Weapons II | ||
| 1938 | |1938 | ||
| style="text-align: center;" | 127 days | | style="text-align: center;" |127 days | ||
| style="text-align: center;" | Support Weapons I | | style="text-align: center;" |Support Weapons I | ||
| ''The development of automatic weapons which combine the aspects of light and heavy machine guns allows versatility in how our infantry employ their equipment.'' | |''The development of automatic weapons which combine the aspects of light and heavy machine guns allows versatility in how our infantry employ their equipment.'' | ||
| | | | ||
{| class="wikitable mw-collapsible innercollapse mw-collapsed" style="margin-right:2px" | {| class="wikitable mw-collapsible innercollapse mw-collapsed" style="margin-right:2px" | ||
! style="width:551px; | ! colspan="2" style="width:551px;" | | ||
|- | |- | ||
| colspan="2" style="text-align: center; font-size: 150%; border: none;" | Upgrades | | colspan="2" style="text-align: center; font-size: 150%; border: none;" |Upgrades | ||
|- | |- | ||
| style="border: none; width: 100%; padding-right: 10px;"| [[File:Infantry.png|link=Infantry]] [[File:Motorized.png|link=Motorized]] [[File:Mechanized.png|link=Mechanized]] | | style="border: none; width: 100%; padding-right: 10px;" |[[File:Infantry.png|link=Infantry]] [[File:Motorized.png|link=Motorized]] [[File:Mechanized.png|link=Mechanized]] | ||
| style="border: none; width: 100%; padding-left: 10px;"| | | style="border: none; width: 100%; padding-left: 10px;" | | ||
|- | |- | ||
| style="border: none; width: margin:140px; padding-left:4.5em;"| '''Defense:''' | | style="border: none; width: margin:140px; padding-left:4.5em;" |'''Defense:''' | ||
| style="border: none; width: 50%; padding-left: 10px;"| <span style="float:right;">+5%</span> | | style="border: none; width: 50%; padding-left: 10px;" |<span style="float:right;">+5%</span> | ||
|- | |- | ||
| style="border: none; width: margin:140px; padding-left:4.5em;"| '''Breakthrough:''' | | style="border: none; width: margin:140px; padding-left:4.5em;" |'''Breakthrough:''' | ||
| style="border: none; width: 50%; padding-left: 10px;"| <span style="float:right;">+5%</span> | | style="border: none; width: 50%; padding-left: 10px;" |<span style="float:right;">+5%</span> | ||
|- | |- | ||
| colspan="2" style="text-align: center; border: none;" | | | colspan="2" style="text-align: center; border: none;" | | ||
| 第376行: | 第377行: | ||
| colspan="2" style="text-align: center; border: none;" | | | colspan="2" style="text-align: center; border: none;" | | ||
|- | |- | ||
| style="border: none; width: 100%; padding-right: 10px;"| [[File:Cavalry.png|link=Cavalry]] | | style="border: none; width: 100%; padding-right: 10px;" |[[File:Cavalry.png|link=Cavalry]] | ||
| style="border: none; width: 100%; padding-left: 10px;"| | | style="border: none; width: 100%; padding-left: 10px;" | | ||
|- | |- | ||
| style="border: none; width: margin:140px; padding-left:4.5em;"| '''Defense:''' | | style="border: none; width: margin:140px; padding-left:4.5em;" |'''Defense:''' | ||
| style="border: none; width: 50%; padding-left: 10px;"| <span style="float:right;">+2%</span> | | style="border: none; width: 50%; padding-left: 10px;" |<span style="float:right;">+2%</span> | ||
|- | |- | ||
| style="border: none; width: margin:140px; padding-left:4.5em;"| '''Breakthrough:''' | | style="border: none; width: margin:140px; padding-left:4.5em;" |'''Breakthrough:''' | ||
| style="border: none; width: 50%; padding-left: 10px;"| <span style="float:right;">+2%</span> | | style="border: none; width: 50%; padding-left: 10px;" |<span style="float:right;">+2%</span> | ||
|- | |- | ||
| colspan="2" style="text-align: center; border: none;" | | | colspan="2" style="text-align: center; border: none;" | | ||
| 第389行: | 第390行: | ||
| colspan="2" style="text-align: center; border: none;" | | | colspan="2" style="text-align: center; border: none;" | | ||
|- | |- | ||
| style="border: none; width: 100%; padding-right: 10px;"| [[File:Mountaineers.png|link=Mountaineers]] [[File:Paratroop.png|link=Paratroopers]] [[File:Marine.png|link=Marines]] | | style="border: none; width: 100%; padding-right: 10px;" |[[File:Mountaineers.png|link=Mountaineers]] [[File:Paratroop.png|link=Paratroopers]] [[File:Marine.png|link=Marines]] | ||
| style="border: none; width: 100%; padding-left: 10px;"| | | style="border: none; width: 100%; padding-left: 10px;" | | ||
|- | |- | ||
| style="border: none; width: margin:140px; padding-left:4.5em;"| '''Defense:''' | | style="border: none; width: margin:140px; padding-left:4.5em;" |'''Defense:''' | ||
| style="border: none; width: 50%; padding-left: 10px;"| <span style="float:right;">+3%</span> | | style="border: none; width: 50%; padding-left: 10px;" |<span style="float:right;">+3%</span> | ||
|- | |- | ||
| style="border: none; width: margin:140px; padding-left:4.5em;"| '''Breakthrough:''' | | style="border: none; width: margin:140px; padding-left:4.5em;" |'''Breakthrough:''' | ||
| style="border: none; width: 50%; padding-left: 10px;"| <span style="float:right;">+3%</span> | | style="border: none; width: 50%; padding-left: 10px;" |<span style="float:right;">+3%</span> | ||
|- | |- | ||
|} | |} | ||
|- | |- | ||
| style="width:1px; text-align: center;" | [[File:support_weapons3.png|Support Weapons III]] | | style="width:1px; text-align: center;" |[[File:support_weapons3.png|Support Weapons III]] | ||
! Support Weapons III | !Support Weapons III | ||
| 1940 | |1940 | ||
| style="text-align: center;" | 127 days | | style="text-align: center;" |127 days | ||
| style="text-align: center;" | Support Weapons II | | style="text-align: center;" |Support Weapons II | ||
| ''While maintaining and improving reliability of machine guns, we can also experiment with higher firing rates to ensure lethality of the constant stream of bullets.'' | |''While maintaining and improving reliability of machine guns, we can also experiment with higher firing rates to ensure lethality of the constant stream of bullets.'' | ||
| | | | ||
{| class="wikitable mw-collapsible innercollapse mw-collapsed" style="margin-right:2px" | {| class="wikitable mw-collapsible innercollapse mw-collapsed" style="margin-right:2px" | ||
! style="width:551px; | ! colspan="2" style="width:551px;" | | ||
|- | |- | ||
| colspan="2" style="text-align: center; font-size: 150%; border: none;" | Upgrades | | colspan="2" style="text-align: center; font-size: 150%; border: none;" |Upgrades | ||
|- | |- | ||
| style="border: none; width: 100%; padding-right: 10px;"| [[File:Infantry.png|link=Infantry]] [[File:Motorized.png|link=Motorized]] [[File:Mechanized.png|link=Mechanized]] | | style="border: none; width: 100%; padding-right: 10px;" |[[File:Infantry.png|link=Infantry]] [[File:Motorized.png|link=Motorized]] [[File:Mechanized.png|link=Mechanized]] | ||
| style="border: none; width: 100%; padding-left: 10px;"| | | style="border: none; width: 100%; padding-left: 10px;" | | ||
|- | |- | ||
| style="border: none; width: margin:140px; padding-left:4.5em;"| '''Defense:''' | | style="border: none; width: margin:140px; padding-left:4.5em;" |'''Defense:''' | ||
| style="border: none; width: 50%; padding-left: 10px;"| <span style="float:right;">+5%</span> | | style="border: none; width: 50%; padding-left: 10px;" |<span style="float:right;">+5%</span> | ||
|- | |- | ||
| style="border: none; width: margin:140px; padding-left:4.5em;"| '''Breakthrough:''' | | style="border: none; width: margin:140px; padding-left:4.5em;" |'''Breakthrough:''' | ||
| style="border: none; width: 50%; padding-left: 10px;"| <span style="float:right;">+5%</span> | | style="border: none; width: 50%; padding-left: 10px;" |<span style="float:right;">+5%</span> | ||
|- | |- | ||
| colspan="2" style="text-align: center; border: none;" | | | colspan="2" style="text-align: center; border: none;" | | ||
| 第426行: | 第427行: | ||
| colspan="2" style="text-align: center; border: none;" | | | colspan="2" style="text-align: center; border: none;" | | ||
|- | |- | ||
| style="border: none; width: 100%; padding-right: 10px;"| [[File:Cavalry.png|link=Cavalry]] | | style="border: none; width: 100%; padding-right: 10px;" |[[File:Cavalry.png|link=Cavalry]] | ||
| style="border: none; width: 100%; padding-left: 10px;"| | | style="border: none; width: 100%; padding-left: 10px;" | | ||
|- | |- | ||
| style="border: none; width: margin:140px; padding-left:4.5em;"| '''Defense:''' | | style="border: none; width: margin:140px; padding-left:4.5em;" |'''Defense:''' | ||
| style="border: none; width: 50%; padding-left: 10px;"| <span style="float:right;">+2%</span> | | style="border: none; width: 50%; padding-left: 10px;" |<span style="float:right;">+2%</span> | ||
|- | |- | ||
| style="border: none; width: margin:140px; padding-left:4.5em;"| '''Breakthrough:''' | | style="border: none; width: margin:140px; padding-left:4.5em;" |'''Breakthrough:''' | ||
| style="border: none; width: 50%; padding-left: 10px;"| <span style="float:right;">+2%</span> | | style="border: none; width: 50%; padding-left: 10px;" |<span style="float:right;">+2%</span> | ||
|- | |- | ||
| colspan="2" style="text-align: center; border: none;" | | | colspan="2" style="text-align: center; border: none;" | | ||
| 第439行: | 第440行: | ||
| colspan="2" style="text-align: center; border: none;" | | | colspan="2" style="text-align: center; border: none;" | | ||
|- | |- | ||
| style="border: none; width: 100%; padding-right: 10px;"| [[File:Mountaineers.png|link=Mountaineers]] [[File:Paratroop.png|link=Paratroopers]] [[File:Marine.png|link=Marines]] | | style="border: none; width: 100%; padding-right: 10px;" |[[File:Mountaineers.png|link=Mountaineers]] [[File:Paratroop.png|link=Paratroopers]] [[File:Marine.png|link=Marines]] | ||
| style="border: none; width: 100%; padding-left: 10px;"| | | style="border: none; width: 100%; padding-left: 10px;" | | ||
|- | |- | ||
| style="border: none; width: margin:140px; padding-left:4.5em;"| '''Defense:''' | | style="border: none; width: margin:140px; padding-left:4.5em;" |'''Defense:''' | ||
| style="border: none; width: 50%; padding-left: 10px;"| <span style="float:right;">+3%</span> | | style="border: none; width: 50%; padding-left: 10px;" |<span style="float:right;">+3%</span> | ||
|- | |- | ||
| style="border: none; width: margin:140px; padding-left:4.5em;"| '''Breakthrough:''' | | style="border: none; width: margin:140px; padding-left:4.5em;" |'''Breakthrough:''' | ||
| style="border: none; width: 50%; padding-left: 10px;"| <span style="float:right;">+3%</span> | | style="border: none; width: 50%; padding-left: 10px;" |<span style="float:right;">+3%</span> | ||
|- | |- | ||
|} | |} | ||
|- | |- | ||
| style="width:1px; text-align: center;" | [[File:support_weapons4.png|Support Weapons IV]] | | style="width:1px; text-align: center;" |[[File:support_weapons4.png|Support Weapons IV]] | ||
! Support Weapons IV | !Support Weapons IV | ||
| 1942 | |1942 | ||
| style="text-align: center;" | 127 days | | style="text-align: center;" |127 days | ||
| style="text-align: center;" | Support Weapons III | | style="text-align: center;" |Support Weapons III | ||
| ''With the increased use of assault rifles, developing automatic weapons that can be used in any environment by all soldiers is a priority for a modern army.'' | |''With the increased use of assault rifles, developing automatic weapons that can be used in any environment by all soldiers is a priority for a modern army.'' | ||
| | | | ||
{| class="wikitable mw-collapsible innercollapse mw-collapsed" style="margin-right:2px" | {| class="wikitable mw-collapsible innercollapse mw-collapsed" style="margin-right:2px" | ||
! style="width:551px; | ! colspan="2" style="width:551px;" | | ||
|- | |- | ||
| colspan="2" style="text-align: center; font-size: 150%; border: none;" | Upgrades | | colspan="2" style="text-align: center; font-size: 150%; border: none;" |Upgrades | ||
|- | |- | ||
| style="border: none; width: 100%; padding-right: 10px;"| [[File:Infantry.png|link=Infantry]] [[File:Motorized.png|link=Motorized]] [[File:Mechanized.png|link=Mechanized]] | | style="border: none; width: 100%; padding-right: 10px;" |[[File:Infantry.png|link=Infantry]] [[File:Motorized.png|link=Motorized]] [[File:Mechanized.png|link=Mechanized]] | ||
| style="border: none; width: 100%; padding-left: 10px;"| | | style="border: none; width: 100%; padding-left: 10px;" | | ||
|- | |- | ||
| style="border: none; width: margin:140px; padding-left:4.5em;"| '''Defense:''' | | style="border: none; width: margin:140px; padding-left:4.5em;" |'''Defense:''' | ||
| style="border: none; width: 50%; padding-left: 10px;"| <span style="float:right;">+5%</span> | | style="border: none; width: 50%; padding-left: 10px;" |<span style="float:right;">+5%</span> | ||
|- | |- | ||
| style="border: none; width: margin:140px; padding-left:4.5em;"| '''Breakthrough:''' | | style="border: none; width: margin:140px; padding-left:4.5em;" |'''Breakthrough:''' | ||
| style="border: none; width: 50%; padding-left: 10px;"| <span style="float:right;">+5%</span> | | style="border: none; width: 50%; padding-left: 10px;" |<span style="float:right;">+5%</span> | ||
|- | |- | ||
| colspan="2" style="text-align: center; border: none;" | | | colspan="2" style="text-align: center; border: none;" | | ||
| 第476行: | 第477行: | ||
| colspan="2" style="text-align: center; border: none;" | | | colspan="2" style="text-align: center; border: none;" | | ||
|- | |- | ||
| style="border: none; width: 100%; padding-right: 10px;"| [[File:Cavalry.png|link=Cavalry]] | | style="border: none; width: 100%; padding-right: 10px;" |[[File:Cavalry.png|link=Cavalry]] | ||
| style="border: none; width: 100%; padding-left: 10px;"| | | style="border: none; width: 100%; padding-left: 10px;" | | ||
|- | |- | ||
| style="border: none; width: margin:140px; padding-left:4.5em;"| '''Defense:''' | | style="border: none; width: margin:140px; padding-left:4.5em;" |'''Defense:''' | ||
| style="border: none; width: 50%; padding-left: 10px;"| <span style="float:right;">+2%</span> | | style="border: none; width: 50%; padding-left: 10px;" |<span style="float:right;">+2%</span> | ||
|- | |- | ||
| style="border: none; width: margin:140px; padding-left:4.5em;"| '''Breakthrough:''' | | style="border: none; width: margin:140px; padding-left:4.5em;" |'''Breakthrough:''' | ||
| style="border: none; width: 50%; padding-left: 10px;"| <span style="float:right;">+2%</span> | | style="border: none; width: 50%; padding-left: 10px;" |<span style="float:right;">+2%</span> | ||
|- | |- | ||
| colspan="2" style="text-align: center; border: none;" | | | colspan="2" style="text-align: center; border: none;" | | ||
| 第489行: | 第490行: | ||
| colspan="2" style="text-align: center; border: none;" | | | colspan="2" style="text-align: center; border: none;" | | ||
|- | |- | ||
| style="border: none; width: 100%; padding-right: 10px;"| [[File:Mountaineers.png|link=Mountaineers]] [[File:Paratroop.png|link=Paratroopers]] [[File:Marine.png|link=Marines]] | | style="border: none; width: 100%; padding-right: 10px;" |[[File:Mountaineers.png|link=Mountaineers]] [[File:Paratroop.png|link=Paratroopers]] [[File:Marine.png|link=Marines]] | ||
| style="border: none; width: 100%; padding-left: 10px;"| | | style="border: none; width: 100%; padding-left: 10px;" | | ||
|- | |- | ||
| style="border: none; width: margin:140px; padding-left:4.5em;"| '''Defense:''' | | style="border: none; width: margin:140px; padding-left:4.5em;" |'''Defense:''' | ||
| style="border: none; width: 50%; padding-left: 10px;"| <span style="float:right;">+3%</span> | | style="border: none; width: 50%; padding-left: 10px;" |<span style="float:right;">+3%</span> | ||
|- | |- | ||
| style="border: none; width: margin:140px; padding-left:4.5em;"| '''Breakthrough:''' | | style="border: none; width: margin:140px; padding-left:4.5em;" |'''Breakthrough:''' | ||
| style="border: none; width: 50%; padding-left: 10px;"| <span style="float:right;">+3%</span> | | style="border: none; width: 50%; padding-left: 10px;" |<span style="float:right;">+3%</span> | ||
|- | |- | ||
|} | |} | ||
|} | |} | ||
=== Night vision === | ===Night vision=== | ||
Night vision equipment allows soldiers to see even in the dark, offsetting some of the {{red|-50%}} penalty that units receive when fighting at night and giving an edge over enemies who do not have such equipment. | Night vision equipment allows soldiers to see even in the dark, offsetting some of the {{red|-50%}} penalty that units receive when fighting at night and giving an edge over enemies who do not have such equipment. | ||
{{hatnote|Back to [[#Infantry research tree|Infantry research tree]]}} | {{hatnote|Back to [[#Infantry research tree|Infantry research tree]]}} | ||
{| class="wikitable" | {| class="wikitable" | ||
|- | |- | ||
! style="width:146px;" | Icon (generic) | ! style="width:146px;" |Icon (generic) | ||
! style="width:15em;" | Technology | ! style="width:15em;" |Technology | ||
! style="width:1px;" | Year | ! style="width:1px;" |Year | ||
! style="width:67px;" | Base cost | ! style="width:67px;" |Base cost | ||
! style="width:13em;" | Prerequisites | ! style="width:13em;" |Prerequisites | ||
! Description | !Description | ||
! style="width:526.5px;" | Statistics | ! style="width:526.5px;" |Statistics | ||
|- | |- | ||
| style="width:1px; text-align: center;" | [[File:night_vision.png|Night Vision I]] | | style="width:1px; text-align: center;" |[[File:night_vision.png|Night Vision I]] | ||
! Night Vision I | !Night Vision I | ||
| 1943 | |1943 | ||
| style="text-align: center;" | 212 days | | style="text-align: center;" |212 days | ||
| style="text-align: center;" | | | style="text-align: center;" | | ||
| ''Being able to see the enemy without being seen is key to night operations. With the invention of infra-red technology, we can outfit our army with devices which, though unwieldy, make this possible.'' | |''Being able to see the enemy without being seen is key to night operations. With the invention of infra-red technology, we can outfit our army with devices which, though unwieldy, make this possible.'' | ||
| | | | ||
{| class="wikitable mw-collapsible innercollapse mw-collapsed" style="margin-right:2px" | {| class="wikitable mw-collapsible innercollapse mw-collapsed" style="margin-right:2px" | ||
! style="width:551px; | ! colspan="2" style="width:551px;" | | ||
|- | |- | ||
| colspan="2" style="text-align: center; font-size: 150%; border: none;" | Global stats | | colspan="2" style="text-align: center; font-size: 150%; border: none;" |Global stats | ||
|- | |- | ||
| style="border: none; width: margin:140px; padding-left:4.5em;"| '''Land Night Attack:''' | | style="border: none; width: margin:140px; padding-left:4.5em;" |'''Land Night Attack:''' | ||
| style="border: none; width: 50%; padding-left: 10px;"| <span style="float:right;">+10%</span> | | style="border: none; width: 50%; padding-left: 10px;" |<span style="float:right;">+10%</span> | ||
|} | |} | ||
|- | |- | ||
| style="width:1px; text-align: center;" | [[File:night_vision2.png|Night Vision II]] | | style="width:1px; text-align: center;" |[[File:night_vision2.png|Night Vision II]] | ||
! Night Vision II | !Night Vision II | ||
| 1946 | |1946 | ||
| style="text-align: center;" | 170 days | | style="text-align: center;" |170 days | ||
| style="text-align: center;" | | | style="text-align: center;" | | ||
| ''Early infra-red scopes, although initially intended for use by snipers, had a limited vision range. As both the portability and vision improves, these devices can be used by more troops operating at night.'' | |''Early infra-red scopes, although initially intended for use by snipers, had a limited vision range. As both the portability and vision improves, these devices can be used by more troops operating at night.'' | ||
| | | | ||
{| class="wikitable mw-collapsible innercollapse mw-collapsed" style="margin-right:2px" | {| class="wikitable mw-collapsible innercollapse mw-collapsed" style="margin-right:2px" | ||
! style="width:551px; | ! colspan="2" style="width:551px;" | | ||
|- | |- | ||
| colspan="2" style="text-align: center; font-size: 150%; border: none;" | Global stats | | colspan="2" style="text-align: center; font-size: 150%; border: none;" |Global stats | ||
|- | |- | ||
| style="border: none; width: margin:140px; padding-left:4.5em;"| '''Land Night Attack:''' | | style="border: none; width: margin:140px; padding-left:4.5em;" |'''Land Night Attack:''' | ||
| style="border: none; width: 50%; padding-left: 10px;"| <span style="float:right;">+15%</span> | | style="border: none; width: 50%; padding-left: 10px;" |<span style="float:right;">+15%</span> | ||
|} | |} | ||
|} | |} | ||
== {{anchor|Motorized}}Motorized == | =={{anchor|Motorized}}Motorized== | ||
{{hatnote|Back to [[#Infantry research tree|Infantry research tree]]}} | {{hatnote|Back to [[#Infantry research tree|Infantry research tree]]}} | ||
Motorized infantry is a somewhat harder and much faster version of infantry, but is more expensive and less reliable. It represents infantry outfitted with "soft-skinned—unarmored or lightly armored—vehicles (Jeeps, trucks, etc.). It provides infantry with more strategic (deploying to the area of operations, though state infrastructure is the primary strategic mover) and operational (moving along the front line) mobility and is suitable to accompany armored forces. | Motorized infantry is a somewhat harder and much faster version of infantry, but is more expensive and less reliable. It represents infantry outfitted with "soft-skinned—unarmored or lightly armored—vehicles (Jeeps, trucks, etc.). It provides infantry with more strategic (deploying to the area of operations, though state infrastructure is the primary strategic mover) and operational (moving along the front line) mobility and is suitable to accompany armored forces. | ||
| 第555行: | 第558行: | ||
{| class="wikitable" | {| class="wikitable" | ||
|- | |- | ||
! style="width:146px;" | Icon (generic) | ! style="width:146px;" |Icon (generic) | ||
! style="width:15em;" | Technology | ! style="width:15em;" |Technology | ||
! style="width:1px;" | Year | ! style="width:1px;" |Year | ||
! style="width:67px;" | Base cost | ! style="width:67px;" |Base cost | ||
! style="width:13em;" | Prerequisites | ! style="width:13em;" |Prerequisites | ||
! Description | !Description | ||
! style="width:526.5px;" | Statistics | ! style="width:526.5px;" |Statistics | ||
|- id="Motorized" | |- id="Motorized" | ||
| style="width:1px; text-align: center;" | [[File:motorized_equipment_1.png|Motorized]] | | style="width:1px; text-align: center;" |[[File:motorized_equipment_1.png|Motorized]] | ||
! Motorized | !Motorized | ||
| 1936 | |1936 | ||
| style="text-align: center;" | 170 days | | style="text-align: center;" |170 days | ||
| | | | ||
| ''Motorizing infantry is the first stage to mechanizing an army. Civilian trucks are readily adapted to military uses of transporting soldiers, towing guns, and carrying equipment and supplies. This greatly increases the strategic mobility of infantry units, which would otherwise rely on marching.'' | |''Motorizing infantry is the first stage to mechanizing an army. Civilian trucks are readily adapted to military uses of transporting soldiers, towing guns, and carrying equipment and supplies. This greatly increases the strategic mobility of infantry units, which would otherwise rely on marching.'' | ||
| | | | ||
{| class="wikitable mw-collapsible innercollapse mw-collapsed" style="margin-right:2px" | {| class="wikitable mw-collapsible innercollapse mw-collapsed" style="margin-right:2px" | ||
! style="width:551px; | ! colspan="2" style="width:551px;" | | ||
|- | |- | ||
| colspan="2" style="border: none;" | '''1''' [[File:Rubber.png|link=Rubber]] '''1''' [[File:Steel.png|link=Steel]] | | colspan="2" style="border: none;" |'''1''' [[File:Rubber.png|link=Rubber]] '''1''' [[File:Steel.png|link=Steel]] | ||
|- | |- | ||
| colspan="2" style="text-align: center; border: none;" | [[File:motorized_equipment_1.png|Motorized]] | | colspan="2" style="text-align: center; border: none;" |[[File:motorized_equipment_1.png|Motorized]] | ||
|- | |- | ||
| colspan="2" style="text-align: center; border: none;" | | | colspan="2" style="text-align: center; border: none;" | | ||
| 第581行: | 第584行: | ||
| colspan="2" style="text-align: center; border: none;" | | | colspan="2" style="text-align: center; border: none;" | | ||
|- | |- | ||
| style="border: none; width: 50%; padding-right: 10px;"| '''Hardness:''' <span style="float:right;">10.0%</span> | | style="border: none; width: 50%; padding-right: 10px;" |'''Hardness:''' <span style="float:right;">10.0%</span> | ||
| style="border: none; width: 50%; padding-left: 10px;"| '''Max Speed:''' <span style="float:right;">12.0 km/h</span> | | style="border: none; width: 50%; padding-left: 10px;" |'''Max Speed:''' <span style="float:right;">12.0 km/h</span> | ||
|- | |- | ||
| style="border: none; width: 50%; padding-right: 10px;"| '''Reliability:''' <span style="float:right;">80.0%</span> | | style="border: none; width: 50%; padding-right: 10px;" |'''Reliability:''' <span style="float:right;">80.0%</span> | ||
| style="border: none; width: 50%; padding-left: 10px;"| '''Fuel Usage:''' <span style="float:right;">1.2</span> | | style="border: none; width: 50%; padding-left: 10px;" |'''Fuel Usage:''' <span style="float:right;">1.2</span> | ||
|- | |- | ||
| style="border: none; width: 50%; padding-right: 10px;"| [[File:Production cost.png|link=Production]] '''Production Cost:''' <span style="float:right;">2.50</span> | | style="border: none; width: 50%; padding-right: 10px;" |[[File:Production cost.png|link=Production]] '''Production Cost:''' <span style="float:right;">2.50</span> | ||
|- | |- | ||
| colspan="2" style="text-align: center; font-size: 150%; border: none;" | <br>Unlocks | | colspan="2" style="text-align: center; font-size: 150%; border: none;" |<br>Unlocks | ||
|- | |- | ||
| colspan="2" style="border: none; text-align: center;" | [[File:Motorized.png|link=Motorized]] Motorized Infantry | | colspan="2" style="border: none; text-align: center;" |[[File:Motorized.png|link=Motorized]] Motorized Infantry | ||
|- | |- | ||
| colspan="2" style="text-align: center; border: none;" | | | colspan="2" style="text-align: center; border: none;" | | ||
|- | |- | ||
| style="border: none; width: 50%; padding-right: 10px;"| '''Manpower:''' <span style="float:right;">1200</span> | | style="border: none; width: 50%; padding-right: 10px;" |'''Manpower:''' <span style="float:right;">1200</span> | ||
| style="border: none; width: 50%; padding-left: 10px;"| '''Training time:''' <span style="float:right;">90</span> | | style="border: none; width: 50%; padding-left: 10px;" |'''Training time:''' <span style="float:right;">90</span> | ||
|- | |- | ||
| style="border: none; width: 50%; padding-right: 10px;"| '''Recovery Rate:''' <span style="float:right;">0.30</span> | | style="border: none; width: 50%; padding-right: 10px;" |'''Recovery Rate:''' <span style="float:right;">0.30</span> | ||
| style="border: none; width: 50%; padding-left: 10px;"| '''Supply use:''' <span style="float:right;">0.11</span> | | style="border: none; width: 50%; padding-left: 10px;" |'''Supply use:''' <span style="float:right;">0.11</span> | ||
|- | |- | ||
| style="border: none; width: 50%; padding-right: 10px;"| '''Suppression:''' <span style="float:right;">2.2</span> | | style="border: none; width: 50%; padding-right: 10px;" |'''Suppression:''' <span style="float:right;">2.2</span> | ||
| style="border: none; width: 50%; padding-left: 10px;"| '''Organization:''' <span style="float:right;">60</span> | | style="border: none; width: 50%; padding-left: 10px;" |'''Organization:''' <span style="float:right;">60</span> | ||
|- | |- | ||
| style="border: none; width: 50%; padding-right: 10px;"| '''HP:''' <span style="float:right;">25.0</span> | | style="border: none; width: 50%; padding-right: 10px;" |'''HP:''' <span style="float:right;">25.0</span> | ||
| style="border: none; width: 50%; padding-left: 10px;"| '''Weight:''' <span style="float:right;">0.7</span> | | style="border: none; width: 50%; padding-left: 10px;" |'''Weight:''' <span style="float:right;">0.7</span> | ||
|} | |} | ||
|- | |- | ||
| style="width:1px; text-align: center;" | [[File:motorized_rocket_unit.png|Motorized Rocket Artillery]] | | style="width:1px; text-align: center;" |[[File:motorized_rocket_unit.png|Motorized Rocket Artillery]] | ||
! Motorized Rocket Artillery | !Motorized Rocket Artillery | ||
| 1939 | |1939 | ||
| style="text-align: center;" | 127 days | | style="text-align: center;" |127 days | ||
| style="text-align: center;" | Motorized | | style="text-align: center;" |Motorized | ||
| ''Multiple rocket launchers such as these deliver explosives to a target area more quickly than conventional artillery, but with lower accuracy and requiring a longer time to reload. Being mounted on trucks, this version is able to launch attacks and change positions before the enemy can return fire.'' | |''Multiple rocket launchers such as these deliver explosives to a target area more quickly than conventional artillery, but with lower accuracy and requiring a longer time to reload. Being mounted on trucks, this version is able to launch attacks and change positions before the enemy can return fire.'' | ||
| | | | ||
{| class="wikitable mw-collapsible innercollapse mw-collapsed" style="margin-right:2px" | {| class="wikitable mw-collapsible innercollapse mw-collapsed" style="margin-right:2px" | ||
! style="width:551px; | ! colspan="2" style="width:551px;" | | ||
|- | |- | ||
| colspan="2" style="border: none;" | '''1''' [[File:Rubber.png|link=Rubber]] '''1''' [[File:Steel.png|link=Steel]] | | colspan="2" style="border: none;" |'''1''' [[File:Rubber.png|link=Rubber]] '''1''' [[File:Steel.png|link=Steel]] | ||
|- | |- | ||
| colspan="2" style="text-align: center; border: none;" | [[File:motorized_rocket_unit.png|Motorized Rocket Artillery]] | | colspan="2" style="text-align: center; border: none;" |[[File:motorized_rocket_unit.png|Motorized Rocket Artillery]] | ||
|- | |- | ||
| colspan="2" style="text-align: center; border: none;" | | | colspan="2" style="text-align: center; border: none;" | | ||
| 第627行: | 第630行: | ||
| colspan="2" style="text-align: center; border: none;" | | | colspan="2" style="text-align: center; border: none;" | | ||
|- | |- | ||
| style="border: none; width: 50%; padding-right: 10px;"| '''Defense:''' <span style="float:right;">15.0</span> | | style="border: none; width: 50%; padding-right: 10px;" |'''Defense:''' <span style="float:right;">15.0</span> | ||
| style="border: none; width: 50%; padding-left: 10px;"| '''Breakthrough:''' <span style="float:right;">12.0</span> | | style="border: none; width: 50%; padding-left: 10px;" |'''Breakthrough:''' <span style="float:right;">12.0</span> | ||
|- | |- | ||
| style="border: none; width: 50%; padding-right: 10px;"| '''Soft Attack:''' <span style="float:right;">36.0</span> | | style="border: none; width: 50%; padding-right: 10px;" |'''Soft Attack:''' <span style="float:right;">36.0</span> | ||
| style="border: none; width: 50%; padding-left: 10px;"| '''Hard Attack:''' <span style="float:right;">1.0</span> | | style="border: none; width: 50%; padding-left: 10px;" |'''Hard Attack:''' <span style="float:right;">1.0</span> | ||
|- | |- | ||
| style="border: none; width: 50%; padding-right: 10px;"| '''Piercing:''' <span style="float:right;">2.0</span> | | style="border: none; width: 50%; padding-right: 10px;" |'''Piercing:''' <span style="float:right;">2.0</span> | ||
| style="border: none; width: 50%; padding-left: 10px;"| '''Reliability:''' <span style="float:right;">80.0%</span> | | style="border: none; width: 50%; padding-left: 10px;" |'''Reliability:''' <span style="float:right;">80.0%</span> | ||
|- | |- | ||
| style="border: none; width: 50%; padding-right: 10px;"| '''Fuel Usage:''' <span style="float:right;">0.1</span> | | style="border: none; width: 50%; padding-right: 10px;" |'''Fuel Usage:''' <span style="float:right;">0.1</span> | ||
| style="border: none; width: 50%; padding-left: 10px;"| [[File:Production cost.png|link=Production]] '''Production Cost:''' <span style="float:right;">12.0</span> | | style="border: none; width: 50%; padding-left: 10px;" |[[File:Production cost.png|link=Production]] '''Production Cost:''' <span style="float:right;">12.0</span> | ||
|- | |- | ||
| colspan="2" style="text-align: center; font-size: 150%; border: none;" | <br>Unlocks | | colspan="2" style="text-align: center; font-size: 150%; border: none;" |<br>Unlocks | ||
|- | |- | ||
| colspan="2" style="text-align: center; border: none;" | [[File:Motorized rocket brigade.png|link=Motorized Rocket Artillery]] Motorized Rocket Artillery | | colspan="2" style="text-align: center; border: none;" |[[File:Motorized rocket brigade.png|link=Motorized Rocket Artillery]] Motorized Rocket Artillery | ||
|- | |- | ||
| colspan="2" style="text-align: center; border: none;" | | | colspan="2" style="text-align: center; border: none;" | | ||
|- | |- | ||
| style="border: none; width: 50%; padding-right: 10px;"| '''Manpower:''' <span style="float:right;">500</span> | | style="border: none; width: 50%; padding-right: 10px;" |'''Manpower:''' <span style="float:right;">500</span> | ||
| style="border: none; width: 50%; padding-left: 10px;"| '''Training time:''' <span style="float:right;">120</span> | | style="border: none; width: 50%; padding-left: 10px;" |'''Training time:''' <span style="float:right;">120</span> | ||
|- | |- | ||
| style="border: none; width: 50%; padding-right: 10px;"| '''Recovery Rate:''' <span style="float:right;">0.10</span> | | style="border: none; width: 50%; padding-right: 10px;" |'''Recovery Rate:''' <span style="float:right;">0.10</span> | ||
| style="border: none; width: 50%; padding-left: 10px;"| '''Supply use:''' <span style="float:right;">0.28</span> | | style="border: none; width: 50%; padding-left: 10px;" |'''Supply use:''' <span style="float:right;">0.28</span> | ||
|- | |- | ||
| style="border: none; width: 50%; padding-right: 10px;"| '''HP:''' <span style="float:right;">0.6</span> | | style="border: none; width: 50%; padding-right: 10px;" |'''HP:''' <span style="float:right;">0.6</span> | ||
| style="border: none; width: 50%; padding-left: 10px;"| '''Weight:''' <span style="float:right;">0.5</span> | | style="border: none; width: 50%; padding-left: 10px;" |'''Weight:''' <span style="float:right;">0.5</span> | ||
|} | |} | ||
|- | |- | ||
| style="width:1px; text-align: center;" | [[File:mechanized_equipment_1.png|Mechanized Equipment I]] | | style="width:1px; text-align: center;" |[[File:mechanized_equipment_1.png|Mechanized Equipment I]] | ||
! Mechanized Equipment I | !Mechanized Equipment I | ||
| 1940 | |1940 | ||
| style="text-align: center;" | 170 days | | style="text-align: center;" |170 days | ||
| style="text-align: center;" | Motorized | | style="text-align: center;" |Motorized | ||
| ''Mechanized infantry is infantry equipped with armored personnel carriers (APCs) or infantry fighting vehicles (IFVs) for transport and combat. Mechanized infantry is distinguished from motorized infantry in that its vehicles provide a degree of protection from hostile fire, as opposed to soft-skinned wheeled vehicles (trucks or jeeps) for motorized infantry.'' | |''Mechanized infantry is infantry equipped with armored personnel carriers (APCs) or infantry fighting vehicles (IFVs) for transport and combat. Mechanized infantry is distinguished from motorized infantry in that its vehicles provide a degree of protection from hostile fire, as opposed to soft-skinned wheeled vehicles (trucks or jeeps) for motorized infantry.'' | ||
| | | | ||
{| class="wikitable mw-collapsible innercollapse mw-collapsed" style="margin-right:2px" | {| class="wikitable mw-collapsible innercollapse mw-collapsed" style="margin-right:2px" | ||
! style="width:551px; | ! colspan="2" style="width:551px;" | | ||
|- | |- | ||
| colspan="2" style="border: none;" | '''2''' [[File:Steel.png|link=Steel]] '''1''' [[File:Rubber.png|link=Rubber]] | | colspan="2" style="border: none;" |'''2''' [[File:Steel.png|link=Steel]] '''1''' [[File:Rubber.png|link=Rubber]] | ||
|- | |- | ||
| colspan="2" style="text-align: center; border: none;" | [[File:mechanized_equipment_1.png|Mechanized Equipment I]] | | colspan="2" style="text-align: center; border: none;" |[[File:mechanized_equipment_1.png|Mechanized Equipment I]] | ||
|- | |- | ||
| colspan="2" style="text-align: center; border: none;" | | | colspan="2" style="text-align: center; border: none;" | | ||
| 第674行: | 第677行: | ||
| colspan="2" style="text-align: center; border: none;" | | | colspan="2" style="text-align: center; border: none;" | | ||
|- | |- | ||
| style="border: none; width: 50%; padding-right: 10px;"| '''Defense:''' <span style="float:right;">26.0</span> | | style="border: none; width: 50%; padding-right: 10px;" |'''Defense:''' <span style="float:right;">26.0</span> | ||
| style="border: none; width: 50%; padding-left: 10px;"| '''Breakthrough:''' <span style="float:right;">4.0</span> | | style="border: none; width: 50%; padding-left: 10px;" |'''Breakthrough:''' <span style="float:right;">4.0</span> | ||
|- | |- | ||
| style="border: none; width: 50%; padding-right: 10px;"| '''Hardness:''' <span style="float:right;">60.0%</span> | | style="border: none; width: 50%; padding-right: 10px;" |'''Hardness:''' <span style="float:right;">60.0%</span> | ||
| style="border: none; width: 50%; padding-left: 10px;"| '''Max Speed:''' <span style="float:right;">8.0 km/h</span> | | style="border: none; width: 50%; padding-left: 10px;" |'''Max Speed:''' <span style="float:right;">8.0 km/h</span> | ||
|- | |- | ||
| style="border: none; width: 50%; padding-right: 10px;"| '''Armor:''' <span style="float:right;">10.0</span> | | style="border: none; width: 50%; padding-right: 10px;" |'''Armor:''' <span style="float:right;">10.0</span> | ||
| style="border: none; width: 50%; padding-left: 10px;"| '''Piercing:''' <span style="float:right;">11.0</span> | | style="border: none; width: 50%; padding-left: 10px;" |'''Piercing:''' <span style="float:right;">11.0</span> | ||
|- | |- | ||
| style="border: none; width: 50%; padding-right: 10px;"| '''Reliability:''' <span style="float:right;">80.0%</span> | | style="border: none; width: 50%; padding-right: 10px;" |'''Reliability:''' <span style="float:right;">80.0%</span> | ||
| style="border: none; width: 50%; padding-left: 10px;"| '''Fuel Usage:''' <span style="float:right;">2.4</span> | | style="border: none; width: 50%; padding-left: 10px;" |'''Fuel Usage:''' <span style="float:right;">2.4</span> | ||
|- | |- | ||
| style="border: none; width: 50%; padding-right: 10px;"| [[File:Production cost.png|link=Production]] '''Production Cost:''' <span style="float:right;">8.00</span> | | style="border: none; width: 50%; padding-right: 10px;" |[[File:Production cost.png|link=Production]] '''Production Cost:''' <span style="float:right;">8.00</span> | ||
|- | |- | ||
| colspan="2" style="text-align: center; font-size: 150%; border: none;" | <br>Upgrades | | colspan="2" style="text-align: center; font-size: 150%; border: none;" |<br>Upgrades | ||
|- | |- | ||
| colspan="2" style="border: none;" | [[File:Motorized.png|link=Motorized]] [[File:Motorized artillery.png|link=Motorized artillery]] [[File:Motorized anti-tank.png|link=Motorized anti-tank]] [[File:Motorized anti-air.png|link=Motorized anti-air]] [[File:Motorized rocket artillery.png|link=Motorized rocket artillery]] | | colspan="2" style="border: none;" |[[File:Motorized.png|link=Motorized]] [[File:Motorized artillery.png|link=Motorized artillery]] [[File:Motorized anti-tank.png|link=Motorized anti-tank]] [[File:Motorized anti-air.png|link=Motorized anti-air]] [[File:Motorized rocket artillery.png|link=Motorized rocket artillery]] | ||
|- | |- | ||
| style="border: none; width: margin:140px; padding-left:4.5em;"| '''Hardness:''' | | style="border: none; width: margin:140px; padding-left:4.5em;" |'''Hardness:''' | ||
| style="border: none; width: 50%; padding-left: 10px;"| <span style="float:right;">+100%</span> | | style="border: none; width: 50%; padding-left: 10px;" |<span style="float:right;">+100%</span> | ||
|} | |} | ||
|- | |- | ||
| style="width:1px; text-align: center;" | [[File:mechanized_equipment_2.png|Mechanized Equipment II]] | | style="width:1px; text-align: center;" |[[File:mechanized_equipment_2.png|Mechanized Equipment II]] | ||
! Mechanized Equipment II | !Mechanized Equipment II | ||
| 1942 | |1942 | ||
| style="text-align: center;" | 170 days | | style="text-align: center;" |170 days | ||
| style="text-align: center;" | Mechanized Equipment I | | style="text-align: center;" |Mechanized Equipment I | ||
| ''Mechanized infantry is infantry equipped with armored personnel carriers (APCs) or infantry fighting vehicles (IFVs) for transport and combat. Mechanized infantry is distinguished from motorized infantry in that its vehicles provide a degree of protection from hostile fire, as opposed to soft-skinned wheeled vehicles (trucks or jeeps) for motorized infantry.'' | |''Mechanized infantry is infantry equipped with armored personnel carriers (APCs) or infantry fighting vehicles (IFVs) for transport and combat. Mechanized infantry is distinguished from motorized infantry in that its vehicles provide a degree of protection from hostile fire, as opposed to soft-skinned wheeled vehicles (trucks or jeeps) for motorized infantry.'' | ||
| | | | ||
{| class="wikitable mw-collapsible innercollapse mw-collapsed" style="margin-right:2px" | {| class="wikitable mw-collapsible innercollapse mw-collapsed" style="margin-right:2px" | ||
! style="width:551px; | ! colspan="2" style="width:551px;" | | ||
|- | |- | ||
| colspan="2" style="border: none;" | '''3''' [[File:Steel.png|link=Steel]] '''1''' [[File:Rubber.png|link=Rubber]] | | colspan="2" style="border: none;" |'''3''' [[File:Steel.png|link=Steel]] '''1''' [[File:Rubber.png|link=Rubber]] | ||
|- | |- | ||
| colspan="2" style="text-align: center; border: none;" | [[File:mechanized_equipment_2.png|Mechanized Equipment II]] | | colspan="2" style="text-align: center; border: none;" |[[File:mechanized_equipment_2.png|Mechanized Equipment II]] | ||
|- | |- | ||
| colspan="2" style="text-align: center; border: none;" | | | colspan="2" style="text-align: center; border: none;" | | ||
| 第715行: | 第718行: | ||
| colspan="2" style="text-align: center; border: none;" | | | colspan="2" style="text-align: center; border: none;" | | ||
|- | |- | ||
| style="border: none; width: 50%; padding-right: 10px;"| '''Defense:''' <span style="float:right;">30.0</span> | | style="border: none; width: 50%; padding-right: 10px;" |'''Defense:''' <span style="float:right;">30.0</span> | ||
| style="border: none; width: 50%; padding-left: 10px;"| '''Breakthrough:''' <span style="float:right;">5.0</span> | | style="border: none; width: 50%; padding-left: 10px;" |'''Breakthrough:''' <span style="float:right;">5.0</span> | ||
|- | |- | ||
| style="border: none; width: 50%; padding-right: 10px;"| '''Hardness:''' <span style="float:right;">70.0%</span> | | style="border: none; width: 50%; padding-right: 10px;" |'''Hardness:''' <span style="float:right;">70.0%</span> | ||
| style="border: none; width: 50%; padding-left: 10px;"| '''Max Speed:''' <span style="float:right;">10.0 km/h</span> | | style="border: none; width: 50%; padding-left: 10px;" |'''Max Speed:''' <span style="float:right;">10.0 km/h</span> | ||
|- | |- | ||
| style="border: none; width: 50%; padding-right: 10px;"| '''Armor:''' <span style="float:right;">15.0</span> | | style="border: none; width: 50%; padding-right: 10px;" |'''Armor:''' <span style="float:right;">15.0</span> | ||
| style="border: none; width: 50%; padding-left: 10px;"| '''Piercing:''' <span style="float:right;">16.0</span> | | style="border: none; width: 50%; padding-left: 10px;" |'''Piercing:''' <span style="float:right;">16.0</span> | ||
|- | |- | ||
| style="border: none; width: 50%; padding-right: 10px;"| '''Reliability:''' <span style="float:right;">80.0%</span> | | style="border: none; width: 50%; padding-right: 10px;" |'''Reliability:''' <span style="float:right;">80.0%</span> | ||
| style="border: none; width: 50%; padding-left: 10px;"| '''Fuel Usage:''' <span style="float:right;">2.4</span> | | style="border: none; width: 50%; padding-left: 10px;" |'''Fuel Usage:''' <span style="float:right;">2.4</span> | ||
|- | |- | ||
| style="border: none; width: 50%; padding-right: 10px;"| [[File:Production cost.png|link=Production]] '''Production Cost:''' <span style="float:right;">10.00</span> | | style="border: none; width: 50%; padding-right: 10px;" |[[File:Production cost.png|link=Production]] '''Production Cost:''' <span style="float:right;">10.00</span> | ||
|} | |} | ||
|- | |- | ||
| style="width:1px; text-align: center;" | [[File:mechanized_equipment_3.png|Mechanized Equipment III]] | | style="width:1px; text-align: center;" |[[File:mechanized_equipment_3.png|Mechanized Equipment III]] | ||
! Mechanized Equipment III | !Mechanized Equipment III | ||
| 1944 | |1944 | ||
| style="text-align: center;" | 255 days | | style="text-align: center;" |255 days | ||
| style="text-align: center;" | Mechanized Equipment II | | style="text-align: center;" |Mechanized Equipment II | ||
| ''Mechanized infantry is infantry equipped with armored personnel carriers (APCs) or infantry fighting vehicles (IFVs) for transport and combat. Mechanized infantry is distinguished from motorized infantry in that its vehicles provide a degree of protection from hostile fire, as opposed to soft-skinned wheeled vehicles (trucks or jeeps) for motorized infantry.'' | |''Mechanized infantry is infantry equipped with armored personnel carriers (APCs) or infantry fighting vehicles (IFVs) for transport and combat. Mechanized infantry is distinguished from motorized infantry in that its vehicles provide a degree of protection from hostile fire, as opposed to soft-skinned wheeled vehicles (trucks or jeeps) for motorized infantry.'' | ||
| | | | ||
{| class="wikitable mw-collapsible innercollapse mw-collapsed" style="margin-right:2px" | {| class="wikitable mw-collapsible innercollapse mw-collapsed" style="margin-right:2px" | ||
! style="width:551px; | ! colspan="2" style="width:551px;" | | ||
|- | |- | ||
| colspan="2" style="border: none;" | '''4''' [[File:Steel.png|link=Steel]] '''1''' [[File:Rubber.png|link=Rubber]] | | colspan="2" style="border: none;" |'''4''' [[File:Steel.png|link=Steel]] '''1''' [[File:Rubber.png|link=Rubber]] | ||
|- | |- | ||
| colspan="2" style="text-align: center; border: none;" | [[File:mechanized_equipment_3.png|Mechanized Equipment III]] | | colspan="2" style="text-align: center; border: none;" |[[File:mechanized_equipment_3.png|Mechanized Equipment III]] | ||
|- | |- | ||
| colspan="2" style="text-align: center; border: none;" | | | colspan="2" style="text-align: center; border: none;" | | ||
| 第749行: | 第752行: | ||
| colspan="2" style="text-align: center; border: none;" | | | colspan="2" style="text-align: center; border: none;" | | ||
|- | |- | ||
| style="border: none; width: 50%; padding-right: 10px;"| '''Defense:''' <span style="float:right;">34.0</span> | | style="border: none; width: 50%; padding-right: 10px;" |'''Defense:''' <span style="float:right;">34.0</span> | ||
| style="border: none; width: 50%; padding-left: 10px;"| '''Breakthrough:''' <span style="float:right;">6.0</span> | | style="border: none; width: 50%; padding-left: 10px;" |'''Breakthrough:''' <span style="float:right;">6.0</span> | ||
|- | |- | ||
| style="border: none; width: 50%; padding-right: 10px;"| '''Hardness:''' <span style="float:right;">80.0%</span> | | style="border: none; width: 50%; padding-right: 10px;" |'''Hardness:''' <span style="float:right;">80.0%</span> | ||
| style="border: none; width: 50%; padding-left: 10px;"| '''Max Speed:''' <span style="float:right;">12.0 km/h</span> | | style="border: none; width: 50%; padding-left: 10px;" |'''Max Speed:''' <span style="float:right;">12.0 km/h</span> | ||
|- | |- | ||
| style="border: none; width: 50%; padding-right: 10px;"| '''Armor:''' <span style="float:right;">20.0</span> | | style="border: none; width: 50%; padding-right: 10px;" |'''Armor:''' <span style="float:right;">20.0</span> | ||
| style="border: none; width: 50%; padding-left: 10px;"| '''Piercing:''' <span style="float:right;">21.0</span> | | style="border: none; width: 50%; padding-left: 10px;" |'''Piercing:''' <span style="float:right;">21.0</span> | ||
|- | |- | ||
| style="border: none; width: 50%; padding-right: 10px;"| '''Reliability:''' <span style="float:right;">80.0%</span> | | style="border: none; width: 50%; padding-right: 10px;" |'''Reliability:''' <span style="float:right;">80.0%</span> | ||
| style="border: none; width: 50%; padding-left: 10px;"| '''Fuel Usage:''' <span style="float:right;">2.4</span> | | style="border: none; width: 50%; padding-left: 10px;" |'''Fuel Usage:''' <span style="float:right;">2.4</span> | ||
|- | |- | ||
| style="border: none; width: 50%; padding-right: 10px;"| [[File:Production cost.png|link=Production]] '''Production Cost:''' <span style="float:right;">12.00</span> | | style="border: none; width: 50%; padding-right: 10px;" |[[File:Production cost.png|link=Production]] '''Production Cost:''' <span style="float:right;">12.00</span> | ||
|- | |- | ||
| colspan="2" style="text-align: center; font-size: 150%; border: none;" | <br>Upgrades | | colspan="2" style="text-align: center; font-size: 150%; border: none;" |<br>Upgrades | ||
|- | |- | ||
| colspan="2" style="border: none;" | [[File:Mechanized.png|link=Mechanized]] | | colspan="2" style="border: none;" |[[File:Mechanized.png|link=Mechanized]] | ||
|- | |- | ||
| style="border: none; width: margin:140px; padding-left:4.5em;"| '''Soft Attack:''' | | style="border: none; width: margin:140px; padding-left:4.5em;" |'''Soft Attack:''' | ||
| style="border: none; width: 50%; padding-left: 10px;"| <span style="float:right;">+15%</span> | | style="border: none; width: 50%; padding-left: 10px;" |<span style="float:right;">+15%</span> | ||
|- | |- | ||
| style="border: none; width: margin:140px; padding-left:4.5em;"| '''Hard Attack:''' | | style="border: none; width: margin:140px; padding-left:4.5em;" |'''Hard Attack:''' | ||
| style="border: none; width: 50%; padding-left: 10px;"| <span style="float:right;">+15%</span> | | style="border: none; width: 50%; padding-left: 10px;" |<span style="float:right;">+15%</span> | ||
|} | |} | ||
|- | |- | ||
| style="width:1px; text-align: center;" | [[File:Generic_amphibious_mech_1.png|Basic Amphibious Tractor]] | | style="width:1px; text-align: center;" |[[File:Generic_amphibious_mech_1.png|Basic Amphibious Tractor]] | ||
! Basic Amphibious Tractor <br> {{expansion|mtg}} | !Basic Amphibious Tractor <br> {{expansion|mtg}} | ||
| 1941 | |1941 | ||
| style="text-align: center;" | 170 days | | style="text-align: center;" |170 days | ||
| style="text-align: center;" | Mechanized Equipment I | | style="text-align: center;" |Mechanized Equipment I | ||
| ''Amphibious Tractors, or Amtracs, allow Marines to be landed on a beach under armored protection. However, this comes at the cost of poor fuel efficiency.'' | |''Amphibious Tractors, or Amtracs, allow Marines to be landed on a beach under armored protection. However, this comes at the cost of poor fuel efficiency.'' | ||
| | | | ||
{| class="wikitable mw-collapsible innercollapse mw-collapsed" style="margin-right:2px" | {| class="wikitable mw-collapsible innercollapse mw-collapsed" style="margin-right:2px" | ||
! style="width:551px; | ! colspan="2" style="width:551px;" | | ||
|- | |- | ||
| colspan="2" style="border: none;" | '''2''' [[File:Steel.png|link=Steel]] '''1''' [[File:Rubber.png|link=Rubber]] | | colspan="2" style="border: none;" |'''2''' [[File:Steel.png|link=Steel]] '''1''' [[File:Rubber.png|link=Rubber]] | ||
|- | |- | ||
| colspan="2" style="text-align: center; border: none;" | [[File:Generic_amphibious_mech_1.png|Basic Amphibious Tractor]] | | colspan="2" style="text-align: center; border: none;" |[[File:Generic_amphibious_mech_1.png|Basic Amphibious Tractor]] | ||
|- | |- | ||
| colspan="2" style="text-align: center; border: none;" | | | colspan="2" style="text-align: center; border: none;" | | ||
| 第793行: | 第796行: | ||
| colspan="2" style="text-align: center; border: none;" | | | colspan="2" style="text-align: center; border: none;" | | ||
|- | |- | ||
| style="border: none; width: 50%; padding-right: 10px;"| '''Defense:''' <span style="float:right;">26.0</span> | | style="border: none; width: 50%; padding-right: 10px;" |'''Defense:''' <span style="float:right;">26.0</span> | ||
| style="border: none; width: 50%; padding-left: 10px;"| '''Breakthrough:''' <span style="float:right;">4.0</span> | | style="border: none; width: 50%; padding-left: 10px;" |'''Breakthrough:''' <span style="float:right;">4.0</span> | ||
|- | |- | ||
| style="border: none; width: 50%; padding-right: 10px;"| '''Hardness:''' <span style="float:right;">60.0%</span> | | style="border: none; width: 50%; padding-right: 10px;" |'''Hardness:''' <span style="float:right;">60.0%</span> | ||
| style="border: none; width: 50%; padding-left: 10px;"| '''Max Speed:''' <span style="float:right;">7.0 km/h</span> | | style="border: none; width: 50%; padding-left: 10px;" |'''Max Speed:''' <span style="float:right;">7.0 km/h</span> | ||
|- | |- | ||
| style="border: none; width: 50%; padding-right: 10px;"| '''Armor:''' <span style="float:right;">10.0</span> | | style="border: none; width: 50%; padding-right: 10px;" |'''Armor:''' <span style="float:right;">10.0</span> | ||
| style="border: none; width: 50%; padding-left: 10px;"| '''Piercing:''' <span style="float:right;">11.0</span> | | style="border: none; width: 50%; padding-left: 10px;" |'''Piercing:''' <span style="float:right;">11.0</span> | ||
|- | |- | ||
| style="border: none; width: 50%; padding-right: 10px;"| '''Reliability:''' <span style="float:right;">80.0%</span> | | style="border: none; width: 50%; padding-right: 10px;" |'''Reliability:''' <span style="float:right;">80.0%</span> | ||
| style="border: none; width: 50%; padding-left: 10px;"| '''Fuel Usage:''' <span style="float:right;">4.0</span> | | style="border: none; width: 50%; padding-left: 10px;" |'''Fuel Usage:''' <span style="float:right;">4.0</span> | ||
|- | |- | ||
| style="border: none; width: 50%; padding-right: 10px;"| [[File:Production cost.png|link=Production]] '''Production Cost:''' <span style="float:right;">8.00</span> | | style="border: none; width: 50%; padding-right: 10px;" |[[File:Production cost.png|link=Production]] '''Production Cost:''' <span style="float:right;">8.00</span> | ||
|- | |- | ||
| colspan="2" style="text-align: center; font-size: 150%; border: none;" | <br>Unlocks | | colspan="2" style="text-align: center; font-size: 150%; border: none;" |<br>Unlocks | ||
|- | |- | ||
| colspan="2" style="text-align: center; border: none;" | [[File:Amtrac.png|link=Amtrac]] Amtrac Batallion | | colspan="2" style="text-align: center; border: none;" |[[File:Amtrac.png|link=Amtrac]] Amtrac Batallion | ||
|- | |- | ||
| colspan="2" style="text-align: center; border: none;" | | | colspan="2" style="text-align: center; border: none;" | | ||
|- | |- | ||
| style="border: none; width: 50%; padding-right: 10px;"| '''Manpower:''' <span style="float:right;">1200</span> | | style="border: none; width: 50%; padding-right: 10px;" |'''Manpower:''' <span style="float:right;">1200</span> | ||
| style="border: none; width: 50%; padding-left: 10px;"| '''Training time:''' <span style="float:right;">120</span> | | style="border: none; width: 50%; padding-left: 10px;" |'''Training time:''' <span style="float:right;">120</span> | ||
|- | |- | ||
| style="border: none; width: 50%; padding-right: 10px;"| '''Recovery Rate:''' <span style="float:right;">0.30</span> | | style="border: none; width: 50%; padding-right: 10px;" |'''Recovery Rate:''' <span style="float:right;">0.30</span> | ||
| style="border: none; width: 50%; padding-left: 10px;"| '''Soft Attack:''' <span style="float:right;">0.1</span> | | style="border: none; width: 50%; padding-left: 10px;" |'''Soft Attack:''' <span style="float:right;">0.1</span> | ||
|- | |- | ||
| style="border: none; width: 50%; padding-right: 10px;"| '''Hard Attack:''' <span style="float:right;">0.5</span> | | style="border: none; width: 50%; padding-right: 10px;" |'''Hard Attack:''' <span style="float:right;">0.5</span> | ||
| style="border: none; width: 50%; padding-left: 10px;"| '''Supply use:''' <span style="float:right;">0.18</span> | | style="border: none; width: 50%; padding-left: 10px;" |'''Supply use:''' <span style="float:right;">0.18</span> | ||
|- | |- | ||
| style="border: none; width: 50%; padding-right: 10px;"| '''Suppression:''' <span style="float:right;">1.0</span> | | style="border: none; width: 50%; padding-right: 10px;" |'''Suppression:''' <span style="float:right;">1.0</span> | ||
| style="border: none; width: 50%; padding-left: 10px;"| '''Organization:''' <span style="float:right;">60</span> | | style="border: none; width: 50%; padding-left: 10px;" |'''Organization:''' <span style="float:right;">60</span> | ||
|- | |- | ||
| style="border: none; width: 50%; padding-right: 10px;"| '''HP:''' <span style="float:right;">30.0</span> | | style="border: none; width: 50%; padding-right: 10px;" |'''HP:''' <span style="float:right;">30.0</span> | ||
| style="border: none; width: 50%; padding-left: 10px;"| '''Weight:''' <span style="float:right;">1.0</span> | | style="border: none; width: 50%; padding-left: 10px;" |'''Weight:''' <span style="float:right;">1.0</span> | ||
|} | |} | ||
|- | |- | ||
| style="width:1px; text-align: center;" | [[File:Generic_amphibious_mech_2.png|Improved Amphibious Tractor]] | | style="width:1px; text-align: center;" |[[File:Generic_amphibious_mech_2.png|Improved Amphibious Tractor]] | ||
! Improved Amphibious Tractor <br> {{expansion|mtg}} | !Improved Amphibious Tractor <br> {{expansion|mtg}} | ||
| 1943 | |1943 | ||
| style="text-align: center;" | 170 days | | style="text-align: center;" |170 days | ||
| style="text-align: center;" | Basic Amphibious Tractor | | style="text-align: center;" |Basic Amphibious Tractor | ||
| ''These Amtracs feature several improvements over the base version, such as rear loading ramp for easier unloading on the beach.'' | |''These Amtracs feature several improvements over the base version, such as rear loading ramp for easier unloading on the beach.'' | ||
| | | | ||
{| class="wikitable mw-collapsible innercollapse mw-collapsed" style="margin-right:2px" | {| class="wikitable mw-collapsible innercollapse mw-collapsed" style="margin-right:2px" | ||
! style="width:551px; | ! colspan="2" style="width:551px;" | | ||
|- | |- | ||
| colspan="2" style="border: none;" | '''3''' [[File:Steel.png|link=Steel]] '''1''' [[File:Rubber.png|link=Rubber]] | | colspan="2" style="border: none;" |'''3''' [[File:Steel.png|link=Steel]] '''1''' [[File:Rubber.png|link=Rubber]] | ||
|- | |- | ||
| colspan="2" style="text-align: center; border: none;" | [[File:Generic_amphibious_mech_2.png|Improved Amphibious Tractor]] | | colspan="2" style="text-align: center; border: none;" |[[File:Generic_amphibious_mech_2.png|Improved Amphibious Tractor]] | ||
|- | |- | ||
| colspan="2" style="text-align: center; border: none;" | | | colspan="2" style="text-align: center; border: none;" | | ||
| 第848行: | 第851行: | ||
| colspan="2" style="text-align: center; border: none;" | | | colspan="2" style="text-align: center; border: none;" | | ||
|- | |- | ||
| style="border: none; width: 50%; padding-right: 10px;"| '''Defense:''' <span style="float:right;">30.0</span> | | style="border: none; width: 50%; padding-right: 10px;" |'''Defense:''' <span style="float:right;">30.0</span> | ||
| style="border: none; width: 50%; padding-left: 10px;"| '''Breakthrough:''' <span style="float:right;">5.0</span> | | style="border: none; width: 50%; padding-left: 10px;" |'''Breakthrough:''' <span style="float:right;">5.0</span> | ||
|- | |- | ||
| style="border: none; width: 50%; padding-right: 10px;"| '''Hardness:''' <span style="float:right;">70.0%</span> | | style="border: none; width: 50%; padding-right: 10px;" |'''Hardness:''' <span style="float:right;">70.0%</span> | ||
| style="border: none; width: 50%; padding-left: 10px;"| '''Max Speed:''' <span style="float:right;">10.0 km/h</span> | | style="border: none; width: 50%; padding-left: 10px;" |'''Max Speed:''' <span style="float:right;">10.0 km/h</span> | ||
|- | |- | ||
| style="border: none; width: 50%; padding-right: 10px;"| '''Armor:''' <span style="float:right;">15.0</span> | | style="border: none; width: 50%; padding-right: 10px;" |'''Armor:''' <span style="float:right;">15.0</span> | ||
| style="border: none; width: 50%; padding-left: 10px;"| '''Piercing:''' <span style="float:right;">16.0</span> | | style="border: none; width: 50%; padding-left: 10px;" |'''Piercing:''' <span style="float:right;">16.0</span> | ||
|- | |- | ||
| style="border: none; width: 50%; padding-right: 10px;"| '''Reliability:''' <span style="float:right;">80.0%</span> | | style="border: none; width: 50%; padding-right: 10px;" |'''Reliability:''' <span style="float:right;">80.0%</span> | ||
| style="border: none; width: 50%; padding-left: 10px;"| '''Fuel Usage:''' <span style="float:right;">4.0</span> | | style="border: none; width: 50%; padding-left: 10px;" |'''Fuel Usage:''' <span style="float:right;">4.0</span> | ||
|- | |- | ||
| style="border: none; width: 50%; padding-right: 10px;"| [[File:Production cost.png|link=Production]] '''Production Cost:''' <span style="float:right;">10.00</span> | | style="border: none; width: 50%; padding-right: 10px;" |[[File:Production cost.png|link=Production]] '''Production Cost:''' <span style="float:right;">10.00</span> | ||
|} | |} | ||
|- | |- | ||
| style="width:1px; text-align: center;" | [[File:Armored car equipment 1.png|Interwar Armored Car]] | | style="width:1px; text-align: center;" |[[File:Armored car equipment 1.png|Interwar Armored Car]] | ||
! Interwar Armored Car <br> {{expansion|lar}} | !Interwar Armored Car <br> {{expansion|lar}} | ||
| 1936 | |1936 | ||
| style="text-align: center;" | 170 days | | style="text-align: center;" |170 days | ||
| style="text-align: center;" | Motorized | | style="text-align: center;" |Motorized | ||
| ''Where previous armored cars were simply commercial models with thin steel plating, this model was designed from the ground up to carry armor and light armament.'' | |''Where previous armored cars were simply commercial models with thin steel plating, this model was designed from the ground up to carry armor and light armament.'' | ||
| | | | ||
{| class="wikitable mw-collapsible innercollapse mw-collapsed" style="margin-right:2px" | {| class="wikitable mw-collapsible innercollapse mw-collapsed" style="margin-right:2px" | ||
! style="width:551px; | ! colspan="2" style="width:551px;" | | ||
|- | |- | ||
| colspan="2" style="border: none;" | '''2''' [[File:Steel.png|link=Steel]] | | colspan="2" style="border: none;" |'''2''' [[File:Steel.png|link=Steel]] | ||
|- | |- | ||
| colspan="2" style="text-align: center; border: none;" | [[File:Armored car equipment 1.png|Interwar Armored Car]] | | colspan="2" style="text-align: center; border: none;" |[[File:Armored car equipment 1.png|Interwar Armored Car]] | ||
|- | |- | ||
| colspan="2" style="text-align: center; border: none;" | | | colspan="2" style="text-align: center; border: none;" | | ||
| 第882行: | 第885行: | ||
| colspan="2" style="text-align: center; border: none;" | | | colspan="2" style="text-align: center; border: none;" | | ||
|- | |- | ||
| style="border: none; width: 50%; padding-right: 10px;"| '''Defense:''' <span style="float:right;">2.0</span> | | style="border: none; width: 50%; padding-right: 10px;" |'''Defense:''' <span style="float:right;">2.0</span> | ||
| style="border: none; width: 50%; padding-left: 10px;"| '''Breakthrough:''' <span style="float:right;">12.0</span> | | style="border: none; width: 50%; padding-left: 10px;" |'''Breakthrough:''' <span style="float:right;">12.0</span> | ||
|- | |- | ||
| style="border: none; width: 50%; padding-right: 10px;"| '''Hardness:''' <span style="float:right;">65.0%</span> | | style="border: none; width: 50%; padding-right: 10px;" |'''Hardness:''' <span style="float:right;">65.0%</span> | ||
| style="border: none; width: 50%; padding-left: 10px;"| '''Soft Attack:''' <span style="float:right;">6.0</span> | | style="border: none; width: 50%; padding-left: 10px;" |'''Soft Attack:''' <span style="float:right;">6.0</span> | ||
|- | |- | ||
| style="border: none; width: 50%; padding-right: 10px;"| '''Hard Attack:''' <span style="float:right;">2.0</span> | | style="border: none; width: 50%; padding-right: 10px;" |'''Hard Attack:''' <span style="float:right;">2.0</span> | ||
| style="border: none; width: 50%; padding-left: 10px;"| '''Max Speed:''' <span style="float:right;">9.0 km/h</span> | | style="border: none; width: 50%; padding-left: 10px;" |'''Max Speed:''' <span style="float:right;">9.0 km/h</span> | ||
|- | |- | ||
| style="border: none; width: 50%; padding-right: 10px;"| '''Armor:''' <span style="float:right;">3.0</span> | | style="border: none; width: 50%; padding-right: 10px;" |'''Armor:''' <span style="float:right;">3.0</span> | ||
| style="border: none; width: 50%; padding-left: 10px;"| '''Piercing:''' <span style="float:right;">6.0</span> | | style="border: none; width: 50%; padding-left: 10px;" |'''Piercing:''' <span style="float:right;">6.0</span> | ||
|- | |- | ||
| style="border: none; width: 50%; padding-right: 10px;"| '''Reliability:''' <span style="float:right;">80.0%</span> | | style="border: none; width: 50%; padding-right: 10px;" |'''Reliability:''' <span style="float:right;">80.0%</span> | ||
| style="border: none; width: 50%; padding-left: 10px;"| '''Fuel Usage:''' <span style="float:right;">0.8</span> | | style="border: none; width: 50%; padding-left: 10px;" |'''Fuel Usage:''' <span style="float:right;">0.8</span> | ||
|- | |- | ||
| style="border: none; width: 50%; padding-right: 10px;"| [[File:Production cost.png|link=Production]] '''Production Cost:''' <span style="float:right;">4.00</span> | | style="border: none; width: 50%; padding-right: 10px;" |[[File:Production cost.png|link=Production]] '''Production Cost:''' <span style="float:right;">4.00</span> | ||
|- | |- | ||
| colspan="2" style="text-align: center; font-size: 150%; border: none;" | <br>Unlocks | | colspan="2" style="text-align: center; font-size: 150%; border: none;" |<br>Unlocks | ||
|- | |- | ||
| colspan="2" style="border: none; text-align: center;" | [[File:Armored Car.png|link=Armored Car]] Armored Car | | colspan="2" style="border: none; text-align: center;" |[[File:Armored Car.png|link=Armored Car]] Armored Car | ||
|- | |- | ||
| colspan="2" style="text-align: center; border: none;" | | | colspan="2" style="text-align: center; border: none;" | | ||
|- | |- | ||
| style="border: none; width: 50%; padding-right: 10px;"| '''Manpower:''' <span style="float:right;">500</span> | | style="border: none; width: 50%; padding-right: 10px;" |'''Manpower:''' <span style="float:right;">500</span> | ||
| style="border: none; width: 50%; padding-left: 10px;"| '''Training time:''' <span style="float:right;">180</span> | | style="border: none; width: 50%; padding-left: 10px;" |'''Training time:''' <span style="float:right;">180</span> | ||
|- | |- | ||
| style="border: none; width: 50%; padding-right: 10px;"| '''Recovery Rate:''' <span style="float:right;">0.30</span> | | style="border: none; width: 50%; padding-right: 10px;" |'''Recovery Rate:''' <span style="float:right;">0.30</span> | ||
| style="border: none; width: 50%; padding-left: 10px;"| '''Supply use:''' <span style="float:right;">0.14</span> | | style="border: none; width: 50%; padding-left: 10px;" |'''Supply use:''' <span style="float:right;">0.14</span> | ||
|- | |- | ||
| style="border: none; width: 50%; padding-right: 10px;"| '''Suppression:''' <span style="float:right;">2.5</span> | | style="border: none; width: 50%; padding-right: 10px;" |'''Suppression:''' <span style="float:right;">2.5</span> | ||
| style="border: none; width: 50%; padding-left: 10px;"| '''Organization:''' <span style="float:right;">10</span> | | style="border: none; width: 50%; padding-left: 10px;" |'''Organization:''' <span style="float:right;">10</span> | ||
|- | |- | ||
| style="border: none; width: 50%; padding-right: 10px;"| '''HP:''' <span style="float:right;">2.0</span> | | style="border: none; width: 50%; padding-right: 10px;" |'''HP:''' <span style="float:right;">2.0</span> | ||
| style="border: none; width: 50%; padding-left: 10px;"| '''Weight:''' <span style="float:right;">0.8</span> | | style="border: none; width: 50%; padding-left: 10px;" |'''Weight:''' <span style="float:right;">0.8</span> | ||
|} | |} | ||
|- | |- | ||
| style="width:1px; text-align: center;" | [[File:Armored car equipment 2.png|Basic Armored Car]] | | style="width:1px; text-align: center;" |[[File:Armored car equipment 2.png|Basic Armored Car]] | ||
! Basic Armored Car <br> {{expansion|lar}} | !Basic Armored Car <br> {{expansion|lar}} | ||
| 1940 | |1940 | ||
| style="text-align: center;" | 170 days | | style="text-align: center;" |170 days | ||
| style="text-align: center;" | Interwar Armored Car | | style="text-align: center;" |Interwar Armored Car | ||
| ''An improved internal layout and additional ammunition storage creates a more effective armored car.'' | |''An improved internal layout and additional ammunition storage creates a more effective armored car.'' | ||
| | | | ||
{| class="wikitable mw-collapsible innercollapse mw-collapsed" style="margin-right:2px" | {| class="wikitable mw-collapsible innercollapse mw-collapsed" style="margin-right:2px" | ||
! style="width:551px; | ! colspan="2" style="width:551px;" | | ||
|- | |- | ||
| colspan="2" style="border: none;" | '''2''' [[File:Steel.png|link=Steel]] | | colspan="2" style="border: none;" |'''2''' [[File:Steel.png|link=Steel]] | ||
|- | |- | ||
| colspan="2" style="text-align: center; border: none;" | [[File:Armored car equipment 2.png|Basic Armored Car]] | | colspan="2" style="text-align: center; border: none;" |[[File:Armored car equipment 2.png|Basic Armored Car]] | ||
|- | |- | ||
| colspan="2" style="text-align: center; border: none;" | | | colspan="2" style="text-align: center; border: none;" | | ||
| 第937行: | 第940行: | ||
| colspan="2" style="text-align: center; border: none;" | | | colspan="2" style="text-align: center; border: none;" | | ||
|- | |- | ||
| style="border: none; width: 50%; padding-right: 10px;"| '''Defense:''' <span style="float:right;">3.0</span> | | style="border: none; width: 50%; padding-right: 10px;" |'''Defense:''' <span style="float:right;">3.0</span> | ||
| style="border: none; width: 50%; padding-left: 10px;"| '''Breakthrough:''' <span style="float:right;">16.0</span> | | style="border: none; width: 50%; padding-left: 10px;" |'''Breakthrough:''' <span style="float:right;">16.0</span> | ||
|- | |- | ||
| style="border: none; width: 50%; padding-right: 10px;"| '''Hardness:''' <span style="float:right;">65.0%</span> | | style="border: none; width: 50%; padding-right: 10px;" |'''Hardness:''' <span style="float:right;">65.0%</span> | ||
| style="border: none; width: 50%; padding-left: 10px;"| '''Soft Attack:''' <span style="float:right;">13.0</span> | | style="border: none; width: 50%; padding-left: 10px;" |'''Soft Attack:''' <span style="float:right;">13.0</span> | ||
|- | |- | ||
| style="border: none; width: 50%; padding-right: 10px;"| '''Hard Attack:''' <span style="float:right;">4.0</span> | | style="border: none; width: 50%; padding-right: 10px;" |'''Hard Attack:''' <span style="float:right;">4.0</span> | ||
| style="border: none; width: 50%; padding-left: 10px;"| '''Max Speed:''' <span style="float:right;">12.0 km/h</span> | | style="border: none; width: 50%; padding-left: 10px;" |'''Max Speed:''' <span style="float:right;">12.0 km/h</span> | ||
|- | |- | ||
| style="border: none; width: 50%; padding-right: 10px;"| '''Armor:''' <span style="float:right;">10.0</span> | | style="border: none; width: 50%; padding-right: 10px;" |'''Armor:''' <span style="float:right;">10.0</span> | ||
| style="border: none; width: 50%; padding-left: 10px;"| '''Piercing:''' <span style="float:right;">8.0</span> | | style="border: none; width: 50%; padding-left: 10px;" |'''Piercing:''' <span style="float:right;">8.0</span> | ||
|- | |- | ||
| style="border: none; width: 50%; padding-right: 10px;"| '''Reliability:''' <span style="float:right;">80.0%</span> | | style="border: none; width: 50%; padding-right: 10px;" |'''Reliability:''' <span style="float:right;">80.0%</span> | ||
| style="border: none; width: 50%; padding-left: 10px;"| '''Fuel Usage:''' <span style="float:right;">1.8</span> | | style="border: none; width: 50%; padding-left: 10px;" |'''Fuel Usage:''' <span style="float:right;">1.8</span> | ||
|- | |- | ||
| style="border: none; width: 50%; padding-right: 10px;"| [[File:Production cost.png|link=Production]] '''Production Cost:''' <span style="float:right;">6.00</span> | | style="border: none; width: 50%; padding-right: 10px;" |[[File:Production cost.png|link=Production]] '''Production Cost:''' <span style="float:right;">6.00</span> | ||
|} | |} | ||
|- | |- | ||
| style="width:1px; text-align: center;" | [[File:Armored car equipment 3.png|Improved Armored Car]] | | style="width:1px; text-align: center;" |[[File:Armored car equipment 3.png|Improved Armored Car]] | ||
! Improved Armored Car <br> {{expansion|lar}} | !Improved Armored Car <br> {{expansion|lar}} | ||
| 1942 | |1942 | ||
| style="text-align: center;" | 170 days | | style="text-align: center;" |170 days | ||
| style="text-align: center;" | Basic Armored Car | | style="text-align: center;" |Basic Armored Car | ||
| ''Changes on the battlefield require a much heavier armament and thicker armor to defeat enemy light untis and survive to report back.'' | |''Changes on the battlefield require a much heavier armament and thicker armor to defeat enemy light untis and survive to report back.'' | ||
| | | | ||
{| class="wikitable mw-collapsible innercollapse mw-collapsed" style="margin-right:2px" | {| class="wikitable mw-collapsible innercollapse mw-collapsed" style="margin-right:2px" | ||
! style="width:551px; | ! colspan="2" style="width:551px;" | | ||
|- | |- | ||
| colspan="2" style="border: none;" | '''2''' [[File:Steel.png|link=Steel]] '''1''' [[File:Tungsten.png|link=Tungsten]] | | colspan="2" style="border: none;" |'''2''' [[File:Steel.png|link=Steel]] '''1''' [[File:Tungsten.png|link=Tungsten]] | ||
|- | |- | ||
| colspan="2" style="text-align: center; border: none;" | [[File:Armored car equipment 3.png|Improved Armored Car]] | | colspan="2" style="text-align: center; border: none;" |[[File:Armored car equipment 3.png|Improved Armored Car]] | ||
|- | |- | ||
| colspan="2" style="text-align: center; border: none;" | | | colspan="2" style="text-align: center; border: none;" | | ||
| 第974行: | 第977行: | ||
| colspan="2" style="text-align: center; border: none;" | | | colspan="2" style="text-align: center; border: none;" | | ||
|- | |- | ||
| style="border: none; width: 50%; padding-right: 10px;"| '''Defense:''' <span style="float:right;">5.0</span> | | style="border: none; width: 50%; padding-right: 10px;" |'''Defense:''' <span style="float:right;">5.0</span> | ||
| style="border: none; width: 50%; padding-left: 10px;"| '''Breakthrough:''' <span style="float:right;">28.0</span> | | style="border: none; width: 50%; padding-left: 10px;" |'''Breakthrough:''' <span style="float:right;">28.0</span> | ||
|- | |- | ||
| style="border: none; width: 50%; padding-right: 10px;"| '''Hardness:''' <span style="float:right;">70.0%</span> | | style="border: none; width: 50%; padding-right: 10px;" |'''Hardness:''' <span style="float:right;">70.0%</span> | ||
| style="border: none; width: 50%; padding-left: 10px;"| '''Soft Attack:''' <span style="float:right;">16.0</span> | | style="border: none; width: 50%; padding-left: 10px;" |'''Soft Attack:''' <span style="float:right;">16.0</span> | ||
|- | |- | ||
| style="border: none; width: 50%; padding-right: 10px;"| '''Hard Attack:''' <span style="float:right;">8.0</span> | | style="border: none; width: 50%; padding-right: 10px;" |'''Hard Attack:''' <span style="float:right;">8.0</span> | ||
| style="border: none; width: 50%; padding-left: 10px;"| '''Max Speed:''' <span style="float:right;">15.0 km/h</span> | | style="border: none; width: 50%; padding-left: 10px;" |'''Max Speed:''' <span style="float:right;">15.0 km/h</span> | ||
|- | |- | ||
| style="border: none; width: 50%; padding-right: 10px;"| '''Armor:''' <span style="float:right;">20.0</span> | | style="border: none; width: 50%; padding-right: 10px;" |'''Armor:''' <span style="float:right;">20.0</span> | ||
| style="border: none; width: 50%; padding-left: 10px;"| '''Piercing:''' <span style="float:right;">36.0</span> | | style="border: none; width: 50%; padding-left: 10px;" |'''Piercing:''' <span style="float:right;">36.0</span> | ||
|- | |- | ||
| style="border: none; width: 50%; padding-right: 10px;"| '''Reliability:''' <span style="float:right;">80.0%</span> | | style="border: none; width: 50%; padding-right: 10px;" |'''Reliability:''' <span style="float:right;">80.0%</span> | ||
| style="border: none; width: 50%; padding-left: 10px;"| '''Fuel Usage:''' <span style="float:right;">1.8</span> | | style="border: none; width: 50%; padding-left: 10px;" |'''Fuel Usage:''' <span style="float:right;">1.8</span> | ||
|- | |- | ||
| style="border: none; width: 50%; padding-right: 10px;"| [[File:Production cost.png|link=Production]] '''Production Cost:''' <span style="float:right;">8.00</span> | | style="border: none; width: 50%; padding-right: 10px;" |[[File:Production cost.png|link=Production]] '''Production Cost:''' <span style="float:right;">8.00</span> | ||
|} | |} | ||
|- | |- | ||
| style="width:1px; text-align: center;" | [[File:Armored car equipment 3.png|Anti-Tank Armored Car]] | | style="width:1px; text-align: center;" |[[File:Armored car equipment 3.png|Anti-Tank Armored Car]] | ||
! Anti-Tank Armored Car <br> {{expansion|lar}} | !Anti-Tank Armored Car <br> {{expansion|lar}} | ||
| 1942 | |1942 | ||
| style="text-align: center;" | 85 days | | style="text-align: center;" |85 days | ||
| style="text-align: center;" | Improved Armored Car | | style="text-align: center;" |Improved Armored Car | ||
| ''Our light mechanized units will come into contact with enemy tank forces at some point. Developing a special anti-tank variant would give them a fighting chance.'' | |''Our light mechanized units will come into contact with enemy tank forces at some point. Developing a special anti-tank variant would give them a fighting chance.'' | ||
| | | | ||
{| class="wikitable mw-collapsible innercollapse mw-collapsed" style="margin-right:2px" | {| class="wikitable mw-collapsible innercollapse mw-collapsed" style="margin-right:2px" | ||
! style="width:551px; | ! colspan="2" style="width:551px;" | | ||
|- | |- | ||
| colspan="2" style="border: none;" | '''2''' [[File:Steel.png|link=Steel]] '''1''' [[File:Tungsten.png|link=Tungsten]] | | colspan="2" style="border: none;" |'''2''' [[File:Steel.png|link=Steel]] '''1''' [[File:Tungsten.png|link=Tungsten]] | ||
|- | |- | ||
| colspan="2" style="text-align: center; border: none;" | [[File:Armored car equipment 3.png|Anti-Tank Armored Car]] | | colspan="2" style="text-align: center; border: none;" |[[File:Armored car equipment 3.png|Anti-Tank Armored Car]] | ||
|- | |- | ||
| colspan="2" style="text-align: center; border: none;" | | | colspan="2" style="text-align: center; border: none;" | | ||
| 第1,011行: | 第1,014行: | ||
| colspan="2" style="text-align: center; border: none;" | | | colspan="2" style="text-align: center; border: none;" | | ||
|- | |- | ||
| style="border: none; width: 50%; padding-right: 10px;"| '''Defense:''' <span style="float:right;">6.0</span> | | style="border: none; width: 50%; padding-right: 10px;" |'''Defense:''' <span style="float:right;">6.0</span> | ||
| style="border: none; width: 50%; padding-left: 10px;"| '''Breakthrough:''' <span style="float:right;">28.0</span> | | style="border: none; width: 50%; padding-left: 10px;" |'''Breakthrough:''' <span style="float:right;">28.0</span> | ||
|- | |- | ||
| style="border: none; width: 50%; padding-right: 10px;"| '''Hardness:''' <span style="float:right;">70.0%</span> | | style="border: none; width: 50%; padding-right: 10px;" |'''Hardness:''' <span style="float:right;">70.0%</span> | ||
| style="border: none; width: 50%; padding-left: 10px;"| '''Soft Attack:''' <span style="float:right;">12.0</span> | | style="border: none; width: 50%; padding-left: 10px;" |'''Soft Attack:''' <span style="float:right;">12.0</span> | ||
|- | |- | ||
| style="border: none; width: 50%; padding-right: 10px;"| '''Hard Attack:''' <span style="float:right;">14.0</span> | | style="border: none; width: 50%; padding-right: 10px;" |'''Hard Attack:''' <span style="float:right;">14.0</span> | ||
| style="border: none; width: 50%; padding-left: 10px;"| '''Reconnaissance:''' <span style="float:right;">1.0</span> | | style="border: none; width: 50%; padding-left: 10px;" |'''Reconnaissance:''' <span style="float:right;">1.0</span> | ||
|- | |- | ||
| style="border: none; width: 50%; padding-right: 10px;"| '''Max Speed:''' <span style="float:right;">16.0 km/h</span> | | style="border: none; width: 50%; padding-right: 10px;" |'''Max Speed:''' <span style="float:right;">16.0 km/h</span> | ||
| style="border: none; width: 50%; padding-left: 10px;"| '''Armor:''' <span style="float:right;">20.0</span> | | style="border: none; width: 50%; padding-left: 10px;" |'''Armor:''' <span style="float:right;">20.0</span> | ||
|- | |- | ||
| style="border: none; width: 50%; padding-right: 10px;"| '''Piercing:''' <span style="float:right;">62.0</span> | | style="border: none; width: 50%; padding-right: 10px;" |'''Piercing:''' <span style="float:right;">62.0</span> | ||
| style="border: none; width: 50%; padding-left: 10px;"| '''Reliability:''' <span style="float:right;">80.0%</span> | | style="border: none; width: 50%; padding-left: 10px;" |'''Reliability:''' <span style="float:right;">80.0%</span> | ||
|- | |- | ||
| style="border: none; width: 50%; padding-right: 10px;"| '''Fuel Usage:''' <span style="float:right;">1.8</span> | | style="border: none; width: 50%; padding-right: 10px;" |'''Fuel Usage:''' <span style="float:right;">1.8</span> | ||
| style="border: none; width: 50%; padding-left: 10px;"| [[File:Production cost.png|link=Production]] '''Production Cost:''' <span style="float:right;">9.00</span> | | style="border: none; width: 50%; padding-left: 10px;" |[[File:Production cost.png|link=Production]] '''Production Cost:''' <span style="float:right;">9.00</span> | ||
|} | |} | ||
|} | |} | ||
== {{anchor|Special forces}}Special forces == | =={{anchor|Special forces}}Special forces== | ||
{{hatnote|Back to [[#Infantry research tree|Infantry research tree]]}} | {{hatnote|Back to [[#Infantry research tree|Infantry research tree]]}} | ||
In addition to regular, motorized, and mechanized infantry, there are three specialized infantry types (Marines, Mountaineers, and Paratroopers) that are useful in specific situations. They require standard infantry equipment. | In addition to regular, motorized, and mechanized infantry, there are three specialized infantry types (Marines, Mountaineers, and Paratroopers) that are useful in specific situations. They require standard infantry equipment. | ||
These three types of specialized infantry types are known as '''Special Forces''' or '''SF''' (not to be confused with the army doctrine Superior Firepower). Special Forces have a Battalion cap for each country. This cap is the greater of either 24 battalions or 5% of your total battalions (excluding SF battalions) making up the rest of your divisions. Divisions cannot be changed, trained, given a different template or have their template adjusted if that would result in exceeding the SF cap. To increase the 24 SF battalion cap, you would have to exceed the 480 non-SF battalion breakeven point by 20 for each additional SF battalion. For example, you would need 500 non-SF battalions for 25 SF battalions, 520 non-SF battalions for 26 SF battalions, 540 non-SF battalions for 27 SF battalions, etc. | These three types of specialized infantry types are known as '''Special Forces''' or '''SF''' (not to be confused with the army doctrine Superior Firepower). Special Forces have a Battalion cap for each country. This cap is the greater of either 24 battalions or 5% of your total battalions (excluding SF battalions) making up the rest of your divisions. Divisions cannot be changed, trained, given a different template or have their template adjusted if that would result in exceeding the SF cap. To increase the 24 SF battalion cap, you would have to exceed the 480 non-SF battalion breakeven point by 20 for each additional SF battalion. For example, you would need 500 non-SF battalions for 25 SF battalions, 520 non-SF battalions for 26 SF battalions, 540 non-SF battalions for 27 SF battalions, etc. | ||
=== Marines === | ===Marines=== | ||
Marines are specialized infantry trained to engage in wet terrain and perform amphibious invasions. They receive {{green|+30.0%}} attack in marshes, {{green|+40.0%}} attack when fighting over rivers, and {{green|+50.0%}} attack when engaging enemies during amphibious landings. Marine Divisions are very effective when supported by Engineer Companies. | Marines are specialized infantry trained to engage in wet terrain and perform amphibious invasions. They receive {{green|+30.0%}} attack in marshes, {{green|+40.0%}} attack when fighting over rivers, and {{green|+50.0%}} attack when engaging enemies during amphibious landings. Marine Divisions are very effective when supported by Engineer Companies. | ||
{| class="wikitable" | {| class="wikitable" | ||
|- | |- | ||
! style="width:146px;" | Icon (generic) | ! style="width:146px;" |Icon (generic) | ||
! style="width:15em;" | Technology | ! style="width:15em;" |Technology | ||
! style="width:1px;" | Year | ! style="width:1px;" |Year | ||
! style="width:67px;" | Base cost | ! style="width:67px;" |Base cost | ||
! style="width:13em;" | Prerequisites | ! style="width:13em;" |Prerequisites | ||
! Description | !Description | ||
! style="width:526.5px;" | Statistics | ! style="width:526.5px;" |Statistics | ||
|- | |- | ||
| style="width:1px; text-align: center;" | [[File:marines.png|Marines I]] | | style="width:1px; text-align: center;" |[[File:marines.png|Marines I]] | ||
! Marines I | !Marines I | ||
| 1936 | |1936 | ||
| style="text-align: center;" | 170 days | | style="text-align: center;" |170 days | ||
| | | | ||
| ''Troops specializing in amphibious warfare are growing ever more indispensable. Improvised methods and equipment become things of the past as our naval infantry is supported by specialized landing craft and training.'' | |''Troops specializing in amphibious warfare are growing ever more indispensable. Improvised methods and equipment become things of the past as our naval infantry is supported by specialized landing craft and training.'' | ||
| | | | ||
{| class="wikitable mw-collapsible innercollapse mw-collapsed" style="margin-right:2px" | {| class="wikitable mw-collapsible innercollapse mw-collapsed" style="margin-right:2px" | ||
! style="width:551px; | ! colspan="2" style="width:551px;" | | ||
|- | |- | ||
| colspan="2" style="text-align: center; font-size: 150%; border: none;" | Unlocks | | colspan="2" style="text-align: center; font-size: 150%; border: none;" |Unlocks | ||
|- | |- | ||
| colspan="2" style="text-align: center; border: none;" | [[File:Marine.png|link=Marines]] Marines | | colspan="2" style="text-align: center; border: none;" |[[File:Marine.png|link=Marines]] Marines | ||
|- | |- | ||
| colspan="2" style="text-align: center; border: none;" | | | colspan="2" style="text-align: center; border: none;" | | ||
|- | |- | ||
| style="border: none; width: 50%; padding-right: 10px;"| '''Manpower:''' <span style="float:right;">1000</span> | | style="border: none; width: 50%; padding-right: 10px;" |'''Manpower:''' <span style="float:right;">1000</span> | ||
| style="border: none; width: 50%; padding-left: 10px;"| '''Training time:''' <span style="float:right;">120</span> | | style="border: none; width: 50%; padding-left: 10px;" |'''Training time:''' <span style="float:right;">120</span> | ||
|- | |- | ||
| style="border: none; width: 50%; padding-right: 10px;"| '''Recovery Rate:''' <span style="float:right;">0.40</span> | | style="border: none; width: 50%; padding-right: 10px;" |'''Recovery Rate:''' <span style="float:right;">0.40</span> | ||
| style="border: none; width: 50%; padding-left: 10px;"| '''Breakthrough:''' <span style="float:right;">0.3</span> | | style="border: none; width: 50%; padding-left: 10px;" |'''Breakthrough:''' <span style="float:right;">0.3</span> | ||
|- | |- | ||
| style="border: none; width: 50%; padding-right: 10px;"| '''Supply use:''' <span style="float:right;">0.06</span> | | style="border: none; width: 50%; padding-right: 10px;" |'''Supply use:''' <span style="float:right;">0.06</span> | ||
| style="border: none; width: 50%; padding-left: 10px;"| '''Suppression:''' <span style="float:right;">1.0</span> | | style="border: none; width: 50%; padding-left: 10px;" |'''Suppression:''' <span style="float:right;">1.0</span> | ||
|- | |- | ||
| style="border: none; width: 50%; padding-right: 10px;"| '''Organization:''' <span style="float:right;">70</span> | | style="border: none; width: 50%; padding-right: 10px;" |'''Organization:''' <span style="float:right;">70</span> | ||
| style="border: none; width: 50%; padding-left: 10px;"| '''HP:''' <span style="float:right;">20.0</span> | | style="border: none; width: 50%; padding-left: 10px;" |'''HP:''' <span style="float:right;">20.0</span> | ||
|- | |- | ||
| style="border: none; width: 50%; padding-right: 10px;"| '''Weight:''' <span style="float:right;">0.5</span> | | style="border: none; width: 50%; padding-right: 10px;" |'''Weight:''' <span style="float:right;">0.5</span> | ||
| style="border: none; width: 50%; padding-left: 10px;"| | | style="border: none; width: 50%; padding-left: 10px;" | | ||
|} | |} | ||
|- | |- | ||
| style="width:1px; text-align: center;" | [[File:marines2.png|Marines II]] | | style="width:1px; text-align: center;" |[[File:marines2.png|Marines II]] | ||
! Marines II | !Marines II | ||
| 1939 | |1939 | ||
| style="text-align: center;" | 127 days | | style="text-align: center;" |127 days | ||
| style="text-align: center;" | Marines I | | style="text-align: center;" |Marines I | ||
| ''Amphibious warfare requires constant innovation. Improved logistical support and portable harbors can enable our marines to perform landings that may otherwise have been impossible.'' | |''Amphibious warfare requires constant innovation. Improved logistical support and portable harbors can enable our marines to perform landings that may otherwise have been impossible.'' | ||
| | | | ||
{| class="wikitable mw-collapsible innercollapse mw-collapsed" style="margin-right:2px" | {| class="wikitable mw-collapsible innercollapse mw-collapsed" style="margin-right:2px" | ||
! style="width:551px; | ! colspan="2" style="width:551px;" | | ||
|- | |- | ||
| colspan="2" style="text-align: center; font-size: 150%; border: none;" | Upgrades | | colspan="2" style="text-align: center; font-size: 150%; border: none;" |Upgrades | ||
|- | |- | ||
| style="border: none; width: 100%; padding-right: 10px;"| [[File:Marine.png|link=Marines]] | | style="border: none; width: 100%; padding-right: 10px;" |[[File:Marine.png|link=Marines]] | ||
| style="border: none; width: 100%; padding-left: 10px;"| | | style="border: none; width: 100%; padding-left: 10px;" | | ||
|- | |- | ||
| style="border: none; width: margin:140px; padding-left:4.5em;"| '''Soft attack:''' | | style="border: none; width: margin:140px; padding-left:4.5em;" |'''Soft attack:''' | ||
| style="border: none; width: 50%; padding-left: 10px;"| <span style="float:right;">+5%</span> | | style="border: none; width: 50%; padding-left: 10px;" |<span style="float:right;">+5%</span> | ||
|- | |- | ||
| style="border: none; width: margin:140px; padding-left:4.5em;"| '''Organization:''' | | style="border: none; width: margin:140px; padding-left:4.5em;" |'''Organization:''' | ||
| style="border: none; width: 50%; padding-left: 10px;"| <span style="float:right;">+5</span> | | style="border: none; width: 50%; padding-left: 10px;" |<span style="float:right;">+5</span> | ||
|} | |} | ||
|- | |- | ||
| style="width:1px; text-align: center;" | [[File:marines3.png|Marines III]] | | style="width:1px; text-align: center;" |[[File:marines3.png|Marines III]] | ||
! Marines III | !Marines III | ||
| 1943 | |1943 | ||
| style="text-align: center;" | 170 days | | style="text-align: center;" |170 days | ||
| style="text-align: center;" | Marines II | | style="text-align: center;" |Marines II | ||
| ''Marines can be more than just amphibious infantry. In the future, our marine corps will be among the most disciplined and organized special forces.'' | |''Marines can be more than just amphibious infantry. In the future, our marine corps will be among the most disciplined and organized special forces.'' | ||
| | | | ||
{| class="wikitable mw-collapsible innercollapse mw-collapsed" style="margin-right:2px" | {| class="wikitable mw-collapsible innercollapse mw-collapsed" style="margin-right:2px" | ||
! style="width:551px; | ! colspan="2" style="width:551px;" | | ||
|- | |- | ||
| colspan="2" style="text-align: center; font-size: 150%; border: none;" | Upgrades | | colspan="2" style="text-align: center; font-size: 150%; border: none;" |Upgrades | ||
|- | |- | ||
| style="border: none; width: 100%; padding-right: 10px;"| [[File:Marine.png|link=Marines]] | | style="border: none; width: 100%; padding-right: 10px;" |[[File:Marine.png|link=Marines]] | ||
| style="border: none; width: 100%; padding-left: 10px;"| | | style="border: none; width: 100%; padding-left: 10px;" | | ||
|- | |- | ||
| style="border: none; width: margin:140px; text-align;left;"| '''Organization:''' | | style="border: none; width: margin:140px; text-align;left;" |'''Organization:''' | ||
| style="border: none; width: 50%; padding-left:4.5em;"| <span style="float:right;">+5</span> | | style="border: none; width: 50%; padding-left:4.5em;" |<span style="float:right;">+5</span> | ||
|} | |} | ||
|} | |} | ||
=== Mountain Infantry === | ===Mountain Infantry=== | ||
Mountaineers are specialized infantry that excel in maneuvering through and engaging in rough terrain. They receive {{green|+10.0%}} movement, {{green|+20.0%}} attack, and {{green|+5.0%}} defense in hills and {{green|+20.0%}} movement, {{green|35.0%}} attack, and {{green|10.0%}} defense in mountains. | Mountaineers are specialized infantry that excel in maneuvering through and engaging in rough terrain. They receive {{green|+10.0%}} movement, {{green|+20.0%}} attack, and {{green|+5.0%}} defense in hills and {{green|+20.0%}} movement, {{green|35.0%}} attack, and {{green|10.0%}} defense in mountains. | ||
{| class="wikitable" | {| class="wikitable" | ||
|- | |- | ||
! style="width:146px;" | Icon (generic) | ! style="width:146px;" |Icon (generic) | ||
! style="width:15em;" | Technology | ! style="width:15em;" |Technology | ||
! style="width:1px;" | Year | ! style="width:1px;" |Year | ||
! style="width:67px;" | Base cost | ! style="width:67px;" |Base cost | ||
! style="width:13em;" | Prerequisites | ! style="width:13em;" |Prerequisites | ||
! Description | !Description | ||
! style="width:526.5px;" | Statistics | ! style="width:526.5px;" |Statistics | ||
|- | |- | ||
| style="width:1px; text-align: center;" | [[File:Mountain infantry.png|Mountain infantry I]] | | style="width:1px; text-align: center;" |[[File:Mountain infantry.png|Mountain infantry I]] | ||
! Mountain Infantry I | !Mountain Infantry I | ||
| 1936 | |1936 | ||
| style="text-align: center;" | 170 days | | style="text-align: center;" |170 days | ||
| | | | ||
| ''Combat in mountain ranges exposes troops to many perils, but sometimes cannot be avoided. We can minimize these risks by providing our soldiers with specialized training for this environment.'' | |''Combat in mountain ranges exposes troops to many perils, but sometimes cannot be avoided. We can minimize these risks by providing our soldiers with specialized training for this environment.'' | ||
| | | | ||
{| class="wikitable mw-collapsible innercollapse mw-collapsed" style="margin-right:2px" | {| class="wikitable mw-collapsible innercollapse mw-collapsed" style="margin-right:2px" | ||
! style="width:551px; | ! colspan="2" style="width:551px;" | | ||
|- | |- | ||
| colspan="2" style="text-align: center; font-size: 150%; border: none;" | Unlocks | | colspan="2" style="text-align: center; font-size: 150%; border: none;" |Unlocks | ||
|- | |- | ||
| colspan="2" style="text-align: center; border: none;" | [[File:mountaineers.png|link=Mountaineers]] Mountaineers | | colspan="2" style="text-align: center; border: none;" |[[File:mountaineers.png|link=Mountaineers]] Mountaineers | ||
|- | |- | ||
| colspan="2" style="text-align: center; border: none;" | | | colspan="2" style="text-align: center; border: none;" | | ||
|- | |- | ||
| style="border: none; width: 50%; padding-right: 10px;"| '''Manpower:''' <span style="float:right;">1000</span> | | style="border: none; width: 50%; padding-right: 10px;" |'''Manpower:''' <span style="float:right;">1000</span> | ||
| style="border: none; width: 50%; padding-left: 10px;"| '''Training time:''' <span style="float:right;">120</span> | | style="border: none; width: 50%; padding-left: 10px;" |'''Training time:''' <span style="float:right;">120</span> | ||
|- | |- | ||
| style="border: none; width: 50%; padding-right: 10px;"| '''Recovery Rate:''' <span style="float:right;">0.40</span> | | style="border: none; width: 50%; padding-right: 10px;" |'''Recovery Rate:''' <span style="float:right;">0.40</span> | ||
| style="border: none; width: 50%; padding-left: 10px;"| '''Breakthrough:''' <span style="float:right;">0.3</span> | | style="border: none; width: 50%; padding-left: 10px;" |'''Breakthrough:''' <span style="float:right;">0.3</span> | ||
|- | |- | ||
| style="border: none; width: 50%; padding-right: 10px;"| '''Supply use:''' <span style="float:right;">0.07</span> | | style="border: none; width: 50%; padding-right: 10px;" |'''Supply use:''' <span style="float:right;">0.07</span> | ||
| style="border: none; width: 50%; padding-left: 10px;"| '''Suppression:''' <span style="float:right;">1.0</span> | | style="border: none; width: 50%; padding-left: 10px;" |'''Suppression:''' <span style="float:right;">1.0</span> | ||
|- | |- | ||
| style="border: none; width: 50%; padding-right: 10px;"| '''Organization:''' <span style="float:right;">70</span> | | style="border: none; width: 50%; padding-right: 10px;" |'''Organization:''' <span style="float:right;">70</span> | ||
| style="border: none; width: 50%; padding-left: 10px;"| '''HP:''' <span style="float:right;">20.0</span> | | style="border: none; width: 50%; padding-left: 10px;" |'''HP:''' <span style="float:right;">20.0</span> | ||
|- | |- | ||
| style="border: none; width: 50%; padding-right: 10px;"| '''Weight:''' <span style="float:right;">0.5</span> | | style="border: none; width: 50%; padding-right: 10px;" |'''Weight:''' <span style="float:right;">0.5</span> | ||
| style="border: none; width: 50%; padding-left: 10px;"| | | style="border: none; width: 50%; padding-left: 10px;" | | ||
|} | |} | ||
|- | |- | ||
| style="width:1px; text-align: center;" | [[File:Mountain infantry2.png|Mountain Infantry II]] | | style="width:1px; text-align: center;" |[[File:Mountain infantry2.png|Mountain Infantry II]] | ||
! Mountain Infantry II | !Mountain Infantry II | ||
| 1939 | |1939 | ||
| | | style="text-align: center;" |127 days | ||
| | | style="text-align: center;" |Mountain Infantry I | ||
| ''Going beyond survival, our forces can be trained to use mountains to their advantage. With light equipment and mule transports, they can maneuver in this terrain better than other infantry.'' | |''Going beyond survival, our forces can be trained to use mountains to their advantage. With light equipment and mule transports, they can maneuver in this terrain better than other infantry.'' | ||
| | | | ||
{| class="wikitable mw-collapsible innercollapse mw-collapsed" style="margin-right:2px" | {| class="wikitable mw-collapsible innercollapse mw-collapsed" style="margin-right:2px" | ||
! style="width:551px; | ! colspan="2" style="width:551px;" | | ||
|- | |- | ||
| colspan="2" style="text-align: center; font-size: 150%; border: none;" | Upgrades | | colspan="2" style="text-align: center; font-size: 150%; border: none;" |Upgrades | ||
|- | |- | ||
| style="border: none; width: 100%; padding-right: 10px;"| [[File:mountaineers.png|link=Mountaineers]] | | style="border: none; width: 100%; padding-right: 10px;" |[[File:mountaineers.png|link=Mountaineers]] | ||
| style="border: none; width: 100%; padding-left: 10px;"| | | style="border: none; width: 100%; padding-left: 10px;" | | ||
|- | |- | ||
| style="border: none; width: margin:140px; padding-left:4.5em;"| '''Soft attack:''' | | style="border: none; width: margin:140px; padding-left:4.5em;" |'''Soft attack:''' | ||
| style="border: none; width: 50%; padding-left: 10px;"| <span style="float:right;">+5%</span> | | style="border: none; width: 50%; padding-left: 10px;" |<span style="float:right;">+5%</span> | ||
|- | |- | ||
| style="border: none; width: margin:140px; padding-left:4.5em;"| '''Organization:''' | | style="border: none; width: margin:140px; padding-left:4.5em;" |'''Organization:''' | ||
| style="border: none; width: 50%; padding-left: 10px;"| <span style="float:right;">+5</span> | | style="border: none; width: 50%; padding-left: 10px;" |<span style="float:right;">+5</span> | ||
|} | |} | ||
|- | |- | ||
| style="width:1px; text-align: center;" | [[File:Mountian infantry3.png|Mountain Infantry III]] | | style="width:1px; text-align: center;" |[[File:Mountian infantry3.png|Mountain Infantry III]] | ||
! Mountain Infantry III | !Mountain Infantry III | ||
| 1943 | |1943 | ||
| style="text-align: center;" | 170 days | | style="text-align: center;" |170 days | ||
| style="text-align: center;" | Mountain Infantry II | | style="text-align: center;" |Mountain Infantry II | ||
| ''Preparing for the most arduous mountain missions in high altitudes and low temperatures will require extraordinary training and discipline from our mountain troops.'' | |''Preparing for the most arduous mountain missions in high altitudes and low temperatures will require extraordinary training and discipline from our mountain troops.'' | ||
| | | | ||
{| class="wikitable mw-collapsible innercollapse mw-collapsed" style="margin-right:2px" | {| class="wikitable mw-collapsible innercollapse mw-collapsed" style="margin-right:2px" | ||
! style="width:551px; | ! colspan="2" style="width:551px;" | | ||
|- | |- | ||
| colspan="2" style="text-align: center; font-size: 150%; border: none;" | Upgrades | | colspan="2" style="text-align: center; font-size: 150%; border: none;" |Upgrades | ||
|- | |- | ||
| style="border: none; width: 100%; padding-right: 10px;"| [[File:mountaineers.png|link=Mountaineers]] | | style="border: none; width: 100%; padding-right: 10px;" |[[File:mountaineers.png|link=Mountaineers]] | ||
| style="border: none; width: 100%; padding-left: 10px;"| | | style="border: none; width: 100%; padding-left: 10px;" | | ||
|- | |- | ||
| style="border: none; width: margin:140px; padding-left:4.5em;"| '''Organization:''' | | style="border: none; width: margin:140px; padding-left:4.5em;" |'''Organization:''' | ||
| style="border: none; width: 50%; padding-left: 10px;"| <span style="float:right;">+5</span> | | style="border: none; width: 50%; padding-left: 10px;" |<span style="float:right;">+5</span> | ||
|} | |} | ||
|} | |} | ||
=== Paratroopers === | ===Paratroopers=== | ||
While they take longer to train and only have slightly better stats than normal Infantry, Paratroopers are the only type of unit that can be [[paradrop|paradropped]] into the field, which they do via transport plane. This allows them to perform operations behind enemy lines and in locations where other units cannot easily reach. The AI will use paratroopers in battle, but never uses them for paradrops. | While they take longer to train and only have slightly better stats than normal Infantry, Paratroopers are the only type of unit that can be [[paradrop|paradropped]] into the field, which they do via transport plane. This allows them to perform operations behind enemy lines and in locations where other units cannot easily reach. The AI will use paratroopers in battle, but never uses them for paradrops. | ||
{| class="wikitable" | {| class="wikitable" | ||
|- | |- | ||
! style="width:146px;" | Icon (generic) | ! style="width:146px;" |Icon (generic) | ||
! style="width:15em;" | Technology | ! style="width:15em;" |Technology | ||
! style="width:1px;" | Year | ! style="width:1px;" |Year | ||
! style="width:67px;" | Base cost | ! style="width:67px;" |Base cost | ||
! style="width:13em;" | Prerequisites | ! style="width:13em;" |Prerequisites | ||
! Description | !Description | ||
! style="width:526.5px;" | Statistics | ! style="width:526.5px;" |Statistics | ||
|- | |- | ||
| style="width:1px; text-align: center;" | [[File:Paratroopers.png|Paratroopers I]] | | style="width:1px; text-align: center;" |[[File:Paratroopers.png|Paratroopers I]] | ||
! Paratroopers I | !Paratroopers I | ||
| 1936 | |1936 | ||
| style="text-align: center;" | 170 days | | style="text-align: center;" |170 days | ||
| | | | ||
| ''By incorporating airborne forces into our army, we can make forced entries and position key troops in previously inaccessible areas, allowing for new tactical opportunities.'' | |''By incorporating airborne forces into our army, we can make forced entries and position key troops in previously inaccessible areas, allowing for new tactical opportunities.'' | ||
| | | | ||
{| class="wikitable mw-collapsible innercollapse mw-collapsed" style="margin-right:2px" | {| class="wikitable mw-collapsible innercollapse mw-collapsed" style="margin-right:2px" | ||
! style="width:551px; | ! colspan="2" style="width:551px;" | | ||
|- | |- | ||
| colspan="2" style="text-align: center; font-size: 150%; border: none;" | Unlocks | | colspan="2" style="text-align: center; font-size: 150%; border: none;" |Unlocks | ||
|- | |- | ||
| colspan="2" style="text-align: center; border: none;" | [[File:Paratroop.png|link=Paratroopers]] Paratroopers | | colspan="2" style="text-align: center; border: none;" |[[File:Paratroop.png|link=Paratroopers]] Paratroopers | ||
|- | |- | ||
| colspan="2" style="text-align: center; border: none;" | | | colspan="2" style="text-align: center; border: none;" | | ||
|- | |- | ||
| style="border: none; width: 50%; padding-right: 10px;"| '''Manpower:''' <span style="float:right;">1000</span> | | style="border: none; width: 50%; padding-right: 10px;" |'''Manpower:''' <span style="float:right;">1000</span> | ||
| style="border: none; width: 50%; padding-left: 10px;"| '''Training time:''' <span style="float:right;">150</span> | | style="border: none; width: 50%; padding-left: 10px;" |'''Training time:''' <span style="float:right;">150</span> | ||
|- | |- | ||
| style="border: none; width: 50%; padding-right: 10px;"| '''Recovery Rate:''' <span style="float:right;">0.40</span> | | style="border: none; width: 50%; padding-right: 10px;" |'''Recovery Rate:''' <span style="float:right;">0.40</span> | ||
| style="border: none; width: 50%; padding-left: 10px;"| '''Supply use:''' <span style="float:right;">0.06</span> | | style="border: none; width: 50%; padding-left: 10px;" |'''Supply use:''' <span style="float:right;">0.06</span> | ||
|- | |- | ||
| style="border: none; width: 50%; padding-right: 10px;"| '''Suppression:''' <span style="float:right;">1.0</span> | | style="border: none; width: 50%; padding-right: 10px;" |'''Suppression:''' <span style="float:right;">1.0</span> | ||
| style="border: none; width: 50%; padding-left: 10px;"| '''Organization:''' <span style="float:right;">70</span> | | style="border: none; width: 50%; padding-left: 10px;" |'''Organization:''' <span style="float:right;">70</span> | ||
|- | |- | ||
| style="border: none; width: 50%; padding-right: 10px;"| '''HP:''' <span style="float:right;">22.0</span> | | style="border: none; width: 50%; padding-right: 10px;" |'''HP:''' <span style="float:right;">22.0</span> | ||
| style="border: none; width: 50%; padding-left: 10px;"| '''Weight:''' <span style="float:right;">0.5</span> | | style="border: none; width: 50%; padding-left: 10px;" |'''Weight:''' <span style="float:right;">0.5</span> | ||
|} | |} | ||
|- | |- | ||
| style="width:1px; text-align: center;" | [[File:Paratroopers2.png|Paratroopers II]] | | style="width:1px; text-align: center;" |[[File:Paratroopers2.png|Paratroopers II]] | ||
! Paratroopers II | !Paratroopers II | ||
| 1939 | |1939 | ||
| style="text-align: center;" | 127 days | | style="text-align: center;" |127 days | ||
| style="text-align: center;" | Paratroopers I | | style="text-align: center;" |Paratroopers I | ||
| ''Transitioning from small operations with only a few paratroopers to larger airborne divisions paves way for massive airborne landings, taking these forces beyond a novelty to a natural part of warfare.'' | |''Transitioning from small operations with only a few paratroopers to larger airborne divisions paves way for massive airborne landings, taking these forces beyond a novelty to a natural part of warfare.'' | ||
| | | | ||
{| class="wikitable mw-collapsible innercollapse mw-collapsed" style="margin-right:2px" | {| class="wikitable mw-collapsible innercollapse mw-collapsed" style="margin-right:2px" | ||
! style="width:551px; | ! colspan="2" style="width:551px;" | | ||
|- | |- | ||
| colspan="2" style="text-align: center; font-size: 150%; border: none;" | Upgrades | | colspan="2" style="text-align: center; font-size: 150%; border: none;" |Upgrades | ||
|- | |- | ||
| style="border: none; width: 100%; padding-right: 10px;"| [[File:Paratroop.png|link=Paratroopers]] | | style="border: none; width: 100%; padding-right: 10px;" |[[File:Paratroop.png|link=Paratroopers]] | ||
| style="border: none; width: 100%; padding-left: 10px;"| | | style="border: none; width: 100%; padding-left: 10px;" | | ||
|- | |- | ||
| style="border: none; width: margin:140px; padding-left:4.5em;"| '''Soft attack:''' | | style="border: none; width: margin:140px; padding-left:4.5em;" |'''Soft attack:''' | ||
| style="border: none; width: 50%; padding-left: 10px;"| <span style="float:right;">+5%</span> | | style="border: none; width: 50%; padding-left: 10px;" |<span style="float:right;">+5%</span> | ||
|- | |- | ||
| style="border: none; width: margin:140px; padding-left:4.5em;"| '''Organization:''' | | style="border: none; width: margin:140px; padding-left:4.5em;" |'''Organization:''' | ||
| style="border: none; width: 50%; padding-left: 10px;"| <span style="float:right;">+5</span> | | style="border: none; width: 50%; padding-left: 10px;" |<span style="float:right;">+5</span> | ||
|} | |} | ||
|- | |- | ||
| style="width:1px; text-align: center;" | [[File:Paratroopers3.png|Paratroopers III]] | | style="width:1px; text-align: center;" |[[File:Paratroopers3.png|Paratroopers III]] | ||
! Paratroopers III | !Paratroopers III | ||
| 1943 | |1943 | ||
| style="text-align: center;" | 170 days | | style="text-align: center;" |170 days | ||
| style="text-align: center;" | Paratroops II | | style="text-align: center;" |Paratroops II | ||
| ''Learning to adapt paradrop operations according to weather, standardizing equipment such as jump boots and extended specialized training will minimize the confusion and risks involved in these dangerous missions.'' | |''Learning to adapt paradrop operations according to weather, standardizing equipment such as jump boots and extended specialized training will minimize the confusion and risks involved in these dangerous missions.'' | ||
| | | | ||
{| class="wikitable mw-collapsible innercollapse mw-collapsed" style="margin-right:2px" | {| class="wikitable mw-collapsible innercollapse mw-collapsed" style="margin-right:2px" | ||
! style="width:551px; | ! colspan="2" style="width:551px;" | | ||
|- | |- | ||
| colspan="2" style="text-align: center; font-size: 150%; border: none;" | Upgrades | | colspan="2" style="text-align: center; font-size: 150%; border: none;" |Upgrades | ||
|- | |- | ||
| style="border: none; width: 100%; padding-right: 10px;"| [[File:paratroop.png|link=Paratroopers]] | | style="border: none; width: 100%; padding-right: 10px;" |[[File:paratroop.png|link=Paratroopers]] | ||
| style="border: none; width: 100%; padding-left: 10px;"| | | style="border: none; width: 100%; padding-left: 10px;" | | ||
|- | |- | ||
| style="border: none; width: margin:140px; padding-left:4.5em;"| '''Organization:''' | | style="border: none; width: margin:140px; padding-left:4.5em;" |'''Organization:''' | ||
| style="border: none; width: 50%; padding-left: 10px;"| <span style="float:right;">+5</span> | | style="border: none; width: 50%; padding-left: 10px;" |<span style="float:right;">+5</span> | ||
|} | |} | ||
|} | |} | ||
== Special Forces Concentration == | ==Special Forces Concentration== | ||
{{hatnote|Back to [[#Infantry research tree|Infantry research tree]]}} | {{hatnote|Back to [[#Infantry research tree|Infantry research tree]]}} | ||
Special forces (marines, mountaineers, paratroopers) are trained and equipped for conditions that ordinary soldiers aren’t expected to excel in. The first tech will give them a boost to acclimatization speed. Afterwards, the tree splits. One option is to train your special forces harder, to improve their skills and their ability to fight for longer before having to be resupplied. The other option is to expand the special forces training programs to accept more recruits. Your special forces will be more numerous, but come with more drag and not quite as high speed. In the end though, they will still be elite forces and will be able to develop training to make them even more skilled in fighting in the harshest of conditions. Note: The maximum quantity of special forces is capped at 24 battalions or 5% of your fielded regular battalions (this limit can be increased by unlocking the Expanded Special Forces Program technology). | Special forces (marines, mountaineers, paratroopers) are trained and equipped for conditions that ordinary soldiers aren’t expected to excel in. The first tech will give them a boost to acclimatization speed. Afterwards, the tree splits. One option is to train your special forces harder, to improve their skills and their ability to fight for longer before having to be resupplied. The other option is to expand the special forces training programs to accept more recruits. Your special forces will be more numerous, but come with more drag and not quite as high speed. In the end though, they will still be elite forces and will be able to develop training to make them even more skilled in fighting in the harshest of conditions. Note: The maximum quantity of special forces is capped at 24 battalions or 5% of your fielded regular battalions (this limit can be increased by unlocking the Expanded Special Forces Program technology). | ||
<div style="align-center; text-align:center;"><big><!--Interactive--> Special Forces research tree </big><br>[[File:Special_Forces_screen.png|center|1225px|link=File:Special_Forces_screen.png|]]</div> | <div style="align-center; text-align:center;"><big><!--Interactive--> Special Forces research tree </big><br>[[File:Special_Forces_screen.png|center|1225px|link=File:Special_Forces_screen.png|]]</div> | ||
{| class="wikitable" | {| class="wikitable" | ||
|- | |- | ||
! style="width:146px;" | Icon (generic) | ! style="width:146px;" |Icon (generic) | ||
! style="width:15em;" | Technology | ! style="width:15em;" |Technology | ||
! style="width:1px;" | Year | ! style="width:1px;" |Year | ||
! style="width:67px;" | Base cost | ! style="width:67px;" |Base cost | ||
! style="width:13em;" | Prerequisites | ! style="width:13em;" |Prerequisites | ||
! Description | !Description | ||
! style="width:526.5px;" | Statistics | ! style="width:526.5px;" |Statistics | ||
|- | |- | ||
| style="width:1px; text-align: center;" | [[File:Special_Forces.png|Special Forces]] | | style="width:1px; text-align: center;" |[[File:Special_Forces.png|Special Forces]] | ||
! Special Forces | !Special Forces | ||
| 1938 | |1938 | ||
| style="text-align: center;" | 170 days | | style="text-align: center;" |170 days | ||
| | | | ||
| ''Unconventional fighting requires specialist training. We need to ensure that our troops are prepared and able to adapt to harsh conditions.'' | |''Unconventional fighting requires specialist training. We need to ensure that our troops are prepared and able to adapt to harsh conditions.'' | ||
| | | | ||
{| class="wikitable mw-collapsible innercollapse mw-collapsed" style="margin-right:2px" | {| class="wikitable mw-collapsible innercollapse mw-collapsed" style="margin-right:2px" | ||
! style="width:551px; | ! colspan="2" style="width:551px;" | | ||
|- | |- | ||
| colspan="2" style="text-align: center; font-size: 150%; border: none;" | Upgrades | | colspan="2" style="text-align: center; font-size: 150%; border: none;" |Upgrades | ||
|- | |- | ||
| colspan="2" style="text-align: center; border: none;" | [[File:Marine.png|Marines]] [[File:Mountaineers.png|Mountaineers]] [[File:Paratroop.png|Paratroopers]] | | colspan="2" style="text-align: center; border: none;" |[[File:Marine.png|Marines]] [[File:Mountaineers.png|Mountaineers]] [[File:Paratroop.png|Paratroopers]] | ||
|- | |- | ||
| colspan="2" style="text-align: center; border: none;" | | | colspan="2" style="text-align: center; border: none;" | | ||
|- | |- | ||
| style="border: none; width: 50%; padding-right: 10px;"| '''Hot Acclimatization gain factor:''' <span style="float:right;">+5%</span> | | style="border: none; width: 50%; padding-right: 10px;" |'''Hot Acclimatization gain factor:''' <span style="float:right;">+5%</span> | ||
| style="border: none; width: 50%; padding-left: 10px;"| '''Cold Acclimatization gain factor:''' <span style="float:right;">+5%</span> | | style="border: none; width: 50%; padding-left: 10px;" |'''Cold Acclimatization gain factor:''' <span style="float:right;">+5%</span> | ||
|} | |} | ||
|- | |- | ||
| style="width:1px; text-align: center;" | [[File:Advanced_Special_Forces_Training.png|Advanced Special Forces Training]] | | style="width:1px; text-align: center;" |[[File:Advanced_Special_Forces_Training.png|Advanced Special Forces Training]] | ||
! Advanced Special Forces Training | !Advanced Special Forces Training | ||
| 1940 | |1940 | ||
| style="text-align: center;" | 170 days | | style="text-align: center;" |170 days | ||
| style="text-align: center;" | Special Forces | | style="text-align: center;" |Special Forces | ||
| ''With extensive training, we can ensure that our special forces will be able to perform above and beyond that of normal men. Mutually exclusive with Expanded Special Forces Program.'' | |''With extensive training, we can ensure that our special forces will be able to perform above and beyond that of normal men. Mutually exclusive with Expanded Special Forces Program.'' | ||
| | | | ||
{| class="wikitable mw-collapsible innercollapse mw-collapsed" style="margin-right:2px" | {| class="wikitable mw-collapsible innercollapse mw-collapsed" style="margin-right:2px" | ||
! style="width:551px; | ! colspan="2" style="width:551px;" | | ||
|- | |- | ||
| colspan="2" style="text-align: center; font-size: 150%; border: none;" | Upgrades | | colspan="2" style="text-align: center; font-size: 150%; border: none;" |Upgrades | ||
|- | |- | ||
| colspan="2" style="text-align: center; border: none;" | [[File:Marine.png|Marines]] [[File:Mountaineers.png|Mountaineers]] [[File:Paratroop.png|Paratroopers]] | | colspan="2" style="text-align: center; border: none;" |[[File:Marine.png|Marines]] [[File:Mountaineers.png|Mountaineers]] [[File:Paratroop.png|Paratroopers]] | ||
| style="border: none; width: 100%; padding-left: 10px;"| | | style="border: none; width: 100%; padding-left: 10px;" | | ||
|- | |- | ||
| style="border: none; width: 50%; padding-left: 10px;"| '''Division Training Time:''' <span style="float:right;">+10%</span> | | style="border: none; width: 50%; padding-left: 10px;" |'''Division Training Time:''' <span style="float:right;">+10%</span> | ||
|- | |- | ||
| style="border: none; width: margin:140px; padding-left:4.5em;"| '''Defense:''' | | style="border: none; width: margin:140px; padding-left:4.5em;" |'''Defense:''' | ||
| style="border: none; width: 50%; padding-left: 10px;"| <span style="float:right;">+5%</span> | | style="border: none; width: 50%; padding-left: 10px;" |<span style="float:right;">+5%</span> | ||
|- | |- | ||
| style="border: none; width: margin:140px; padding-left:4.5em;"| '''Organization:''' | | style="border: none; width: margin:140px; padding-left:4.5em;" |'''Organization:''' | ||
| style="border: none; width: 50%; padding-left: 10px;"| <span style="float:right;">+5</span> | | style="border: none; width: 50%; padding-left: 10px;" |<span style="float:right;">+5</span> | ||
|} | |} | ||
|- | |- | ||
| style="width:1px; text-align: center;" | [[File:Extreme_Environment_Training.png|Extreme Environment Training]] | | style="width:1px; text-align: center;" |[[File:Extreme_Environment_Training.png|Extreme Environment Training]] | ||
! Extreme Environment Training | !Extreme Environment Training | ||
| 1942 | |1942 | ||
| style="text-align: center;" | 170 days | | style="text-align: center;" |170 days | ||
| style="text-align: center;" | Advanced Special Forces Training | | style="text-align: center;" |Advanced Special Forces Training | ||
| ''We need to be able to fight in the harshest of environments. With the right training and equipment, our troops will be able to fight in the most extreme conditions.'' | |''We need to be able to fight in the harshest of environments. With the right training and equipment, our troops will be able to fight in the most extreme conditions.'' | ||
| | | | ||
{| class="wikitable mw-collapsible innercollapse mw-collapsed" style="margin-right:2px" | {| class="wikitable mw-collapsible innercollapse mw-collapsed" style="margin-right:2px" | ||
! style="width:551px; | ! colspan="2" style="width:551px;" | | ||
|- | |- | ||
| colspan="2" style="text-align: center; font-size: 150%; border: none;" | Upgrades | | colspan="2" style="text-align: center; font-size: 150%; border: none;" |Upgrades | ||
|- | |- | ||
| colspan="2" style="text-align: center; border: none;" | [[File:Marine.png|Marines]] [[File:Mountaineers.png|Mountaineers]] [[File:Paratroop.png|Paratroopers]] | | colspan="2" style="text-align: center; border: none;" |[[File:Marine.png|Marines]] [[File:Mountaineers.png|Mountaineers]] [[File:Paratroop.png|Paratroopers]] | ||
| style="border: none; width: 100%; padding-left: 10px;"| | | style="border: none; width: 100%; padding-left: 10px;" | | ||
|- | |- | ||
| style="border: none; width: 50%; padding-left: 10px;"| '''Division Training Time:''' <span style="float:right;">+10%</span> | | style="border: none; width: 50%; padding-left: 10px;" |'''Division Training Time:''' <span style="float:right;">+10%</span> | ||
| style="border: none; width: 50%; padding-right: 10px;"| '''Supply Grace:''' <span style="float:right;">+48 hr</span> | | style="border: none; width: 50%; padding-right: 10px;" |'''Supply Grace:''' <span style="float:right;">+48 hr</span> | ||
|- | |- | ||
| style="border: none; width: 50%; padding-right: 10px;"| '''Hot Acclimatization gain factor:''' <span style="float:right;">+50%</span> | | style="border: none; width: 50%; padding-right: 10px;" |'''Hot Acclimatization gain factor:''' <span style="float:right;">+50%</span> | ||
| style="border: none; width: 50%; padding-left: 10px;"| '''Cold Acclimatization gain factor:''' <span style="float:right;">+50%</span> | | style="border: none; width: 50%; padding-left: 10px;" |'''Cold Acclimatization gain factor:''' <span style="float:right;">+50%</span> | ||
|} | |} | ||
|- | |- | ||
| style="width:1px; text-align: center;" | [[File:Expanded_Special_Forces_Program.png|Expanded Special Forces Program]] | | style="width:1px; text-align: center;" |[[File:Expanded_Special_Forces_Program.png|Expanded Special Forces Program]] | ||
! Expanded Special Forces Program | !Expanded Special Forces Program | ||
| 1940 | |1940 | ||
| style="text-align: center;" | 170 days | | style="text-align: center;" |170 days | ||
| style="text-align: center;" | Special Forces | | style="text-align: center;" |Special Forces | ||
| ''Special forces are able to perform missions that ordinary soldiers can not. We need to expand the training program to get more of our soldiers qualified. Mutually exclusive with Advanced Special Forces Training.'' | |''Special forces are able to perform missions that ordinary soldiers can not. We need to expand the training program to get more of our soldiers qualified. Mutually exclusive with Advanced Special Forces Training.'' | ||
| | | | ||
{| class="wikitable mw-collapsible innercollapse mw-collapsed" style="margin-right:2px" | {| class="wikitable mw-collapsible innercollapse mw-collapsed" style="margin-right:2px" | ||
! style="width:551px; | ! colspan="2" style="width:551px;" | | ||
|- | |- | ||
| colspan="2" style="text-align: center; font-size: 150%; border: none;" | Upgrades | | colspan="2" style="text-align: center; font-size: 150%; border: none;" |Upgrades | ||
|- | |- | ||
| colspan="2" style="text-align: center; border: none;" | [[File:Marine.png|Marines]] [[File:Mountaineers.png|Mountaineers]] [[File:Paratroop.png|Paratroopers]] | | colspan="2" style="text-align: center; border: none;" |[[File:Marine.png|Marines]] [[File:Mountaineers.png|Mountaineers]] [[File:Paratroop.png|Paratroopers]] | ||
| style="border: none; width: 100%; padding-left: 10px;"| | | style="border: none; width: 100%; padding-left: 10px;" | | ||
|- | |- | ||
| style="border: none; width: 50%; padding-right: 10px;"| '''Capacity Multiplier:''' <span style="float:right;">+5%</span> | | style="border: none; width: 50%; padding-right: 10px;" |'''Capacity Multiplier:''' <span style="float:right;">+5%</span> | ||
| style="border: none; width: 50%; padding-left: 10px;"| '''Division Training Time:''' <span style="float:right;">-10%</span> | | style="border: none; width: 50%; padding-left: 10px;" |'''Division Training Time:''' <span style="float:right;">-10%</span> | ||
|} | |} | ||
|- | |- | ||
| style="width:1px; text-align: center;" | [[File:Survival_Training.png|Survival Training]] | | style="width:1px; text-align: center;" |[[File:Survival_Training.png|Survival Training]] | ||
! Survival Training | !Survival Training | ||
| 1942 | |1942 | ||
| style="text-align: center;" | 170 days | | style="text-align: center;" |170 days | ||
| style="text-align: center;" | Expanded Special Forces Program | | style="text-align: center;" |Expanded Special Forces Program | ||
| ''Our special forces will often fight behind enemy lines and in short supply. We need to train them to endure harsh weather and fight with limited supplies.'' | |''Our special forces will often fight behind enemy lines and in short supply. We need to train them to endure harsh weather and fight with limited supplies.'' | ||
| | | | ||
{| class="wikitable mw-collapsible innercollapse mw-collapsed" style="margin-right:2px" | {| class="wikitable mw-collapsible innercollapse mw-collapsed" style="margin-right:2px" | ||
! style="width:551px; | ! colspan="2" style="width:551px;" | | ||
|- | |- | ||
| colspan="2" style="text-align: center; font-size: 150%; border: none;" | Upgrades | | colspan="2" style="text-align: center; font-size: 150%; border: none;" |Upgrades | ||
|- | |- | ||
| colspan="2" style="text-align: center; border: none;" | [[File:Marine.png|Marines]] [[File:Mountaineers.png|Mountaineers]] [[File:Paratroop.png|Paratroopers]] | | colspan="2" style="text-align: center; border: none;" |[[File:Marine.png|Marines]] [[File:Mountaineers.png|Mountaineers]] [[File:Paratroop.png|Paratroopers]] | ||
| style="border: none; width: 100%; padding-left: 10px;"| | | style="border: none; width: 100%; padding-left: 10px;" | | ||
|- | |- | ||
| style="border: none; width: 50%; padding-right: 10px;"| '''Hot Acclimatization gain factor:''' <span style="float:right;">+20%</span> | | style="border: none; width: 50%; padding-right: 10px;" |'''Hot Acclimatization gain factor:''' <span style="float:right;">+20%</span> | ||
| style="border: none; width: 50%; padding-left: 10px;"| '''Cold Acclimatization gain factor:''' <span style="float:right;">+20%</span> | | style="border: none; width: 50%; padding-left: 10px;" |'''Cold Acclimatization gain factor:''' <span style="float:right;">+20%</span> | ||
|- | |- | ||
| style="border: none; width: 50%; padding-right: 10px;"| '''Out of Supply:''' <span style="float:right;">-10%</span> | | style="border: none; width: 50%; padding-right: 10px;" |'''Out of Supply:''' <span style="float:right;">-10%</span> | ||
|} | |} | ||
|- | |- | ||
| style="width:1px; text-align: center;" | [[File:Elite_Forces.png|Elite Forces]] | | style="width:1px; text-align: center;" |[[File:Elite_Forces.png|Elite Forces]] | ||
! Elite Forces | !Elite Forces | ||
| 1944 | |1944 | ||
| style="text-align: center;" | 170 days | | style="text-align: center;" |170 days | ||
| style="text-align: center;" | Survival Training | | style="text-align: center;" |Survival Training | ||
| ''Only the best of the best will become special forces. The soldiers that make it through the training will be stronger. faster, and fight harder than anyone else.'' | |''Only the best of the best will become special forces. The soldiers that make it through the training will be stronger. faster, and fight harder than anyone else.'' | ||
| | | | ||
{| class="wikitable mw-collapsible innercollapse mw-collapsed" style="margin-right:2px" | {| class="wikitable mw-collapsible innercollapse mw-collapsed" style="margin-right:2px" | ||
! style="width:551px; | ! colspan="2" style="width:551px;" | | ||
|- | |- | ||
| colspan="2" style="text-align: center; font-size: 150%; border: none;" | Upgrades | | colspan="2" style="text-align: center; font-size: 150%; border: none;" |Upgrades | ||
|- | |- | ||
| colspan="2" style="text-align: center; border: none;" | [[File:Marine.png|Marines]] [[File:Mountaineers.png|Mountaineers]] [[File:Paratroop.png|Paratroopers]] | | colspan="2" style="text-align: center; border: none;" |[[File:Marine.png|Marines]] [[File:Mountaineers.png|Mountaineers]] [[File:Paratroop.png|Paratroopers]] | ||
| style="border: none; width: 100%; padding-left: 10px;"| | | style="border: none; width: 100%; padding-left: 10px;" | | ||
|- | |- | ||
| style="border: none; width: 50%; padding-right: 10px;"| '''Hot Acclimatization gain factor:''' <span style="float:right;">+20%</span> | | style="border: none; width: 50%; padding-right: 10px;" |'''Hot Acclimatization gain factor:''' <span style="float:right;">+20%</span> | ||
| style="border: none; width: 50%; padding-left: 10px;"| '''Cold Acclimatization gain factor:''' <span style="float:right;">+20%</span> | | style="border: none; width: 50%; padding-left: 10px;" |'''Cold Acclimatization gain factor:''' <span style="float:right;">+20%</span> | ||
|- | |- | ||
| style="border: none; width: 50%; padding-right: 10px;"| '''Supply Grace:''' <span style="float:right;">+48 hr</span> | | style="border: none; width: 50%; padding-right: 10px;" |'''Supply Grace:''' <span style="float:right;">+48 hr</span> | ||
|- | |- | ||
| style="border: none; width: 50%; padding-left: 10px;"| '''Soft Attack:''' <span style="float:right;">+5%</span> | | style="border: none; width: 50%; padding-left: 10px;" |'''Soft Attack:''' <span style="float:right;">+5%</span> | ||
| style="border: none; width: margin:140px; padding-left:4.5em;"| '''Organization:''' | | style="border: none; width: margin:140px; padding-left:4.5em;" |'''Organization:''' | ||
| style="border: none; width: 50%; padding-left: 10px;"| <span style="float:right;">+5</span> | | style="border: none; width: 50%; padding-left: 10px;" |<span style="float:right;">+5</span> | ||
|} | |} | ||
2020年8月26日 (三) 14:49的版本
步兵科技科研树解锁了新的步兵装备,机动装备和机械化装备,以及解锁和改进特种部队,并改善了步兵和骑兵的整体战斗力。
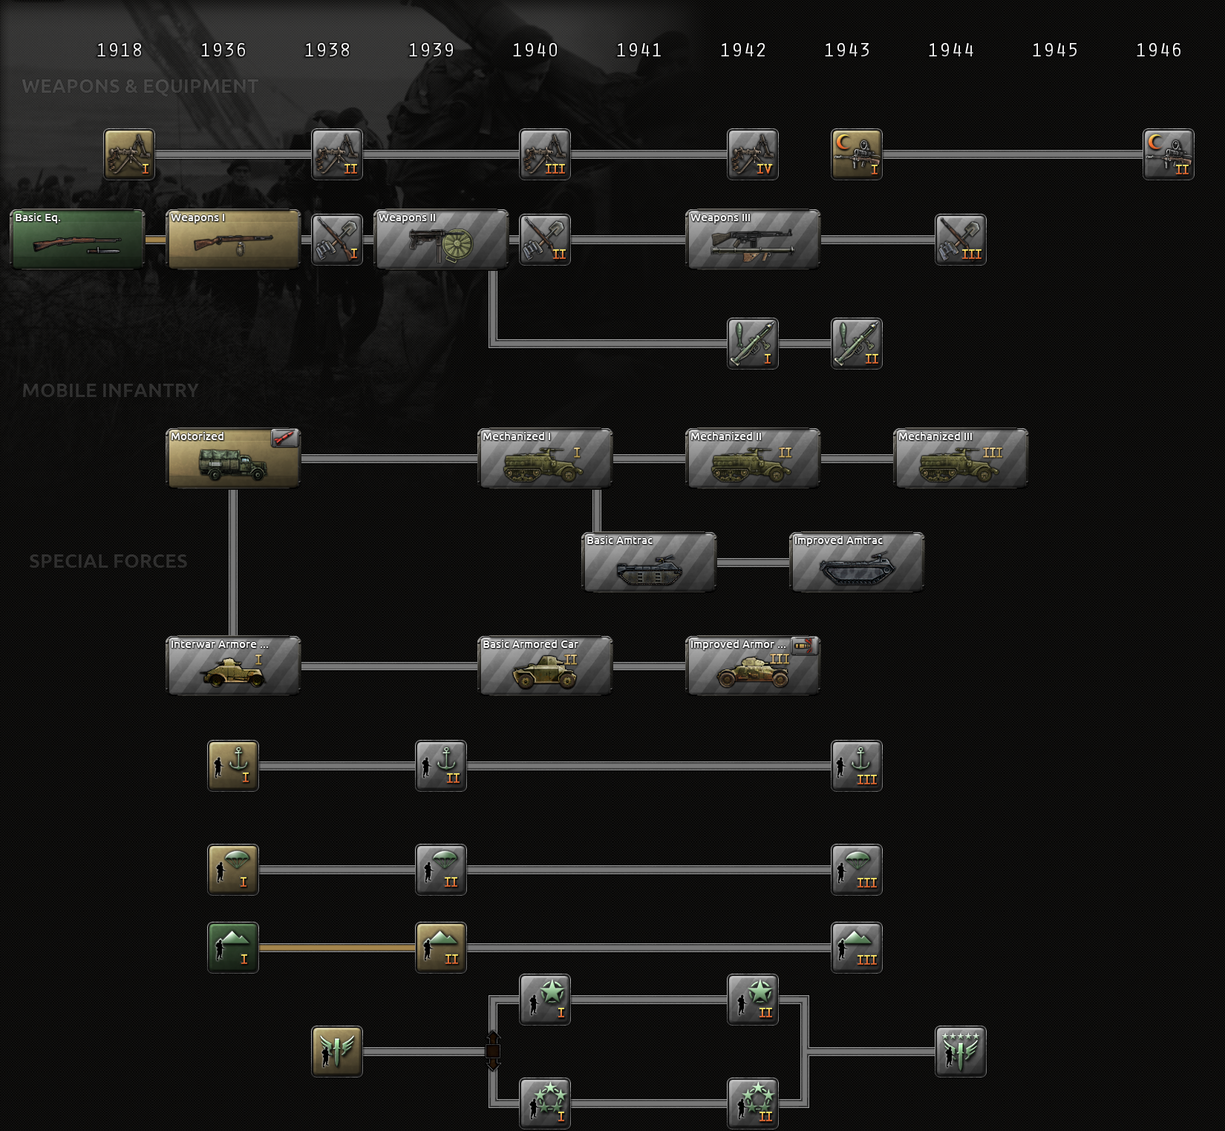
武器和装备
步兵武器
|
|
这部分内容可能已不适合当前版本,最后更新于1.9。 |
步兵装备代表步兵的标准武器套件,是任何部队的基础。每个国家都可以使用1918年的基本步兵装备,而所有主要国家和非主要国家都已完成1936年武器的研究。共有四种越来越先进的步兵装备。
| 图标(通用) | 科技 | 年份 | 基础花费 | 先决条件 | 描述 | 统计 | ||||||||||||||||||||||||||||||||
|---|---|---|---|---|---|---|---|---|---|---|---|---|---|---|---|---|---|---|---|---|---|---|---|---|---|---|---|---|---|---|---|---|---|---|---|---|---|---|
| 基础步兵装备 | 1918 | 自动解锁 | 无 | 第一次世界大战中的发展的初级步兵装备。 |
| |||||||||||||||||||||||||||||||||
| 步兵装备 I | 1936 | 127天 | 基础步兵装备完成研发 | 个人和部队使用的步兵武器,以及士兵所需的其他装备 |
| |||||||||||||||||||||||||||||||||

|
Improved Infantry Equipment I | 1938 | 127 days | Infantry Equipment I | Personal and crew served weapons for infantry as well as the various other bits of kit a soldier needs. Improved weapon models and more specialized equipment. |
| ||||||||||||||||||||||||||||||||
| Infantry Equipment II | 1939 | 170 days | Improved Infantry Equipment I | Personal and crew served weapons for infantry as well as the various other bits of kit a soldier needs. Modernized to include a great number of sub-machineguns and anti-tank rifles. |
| |||||||||||||||||||||||||||||||||

|
Improved Infantry Equipment II | 1940 | 170 days | Infantry Equipment II | Personal and crew served weapons for infantry as well as the various other bits of kit a soldier needs. Improved weapon models and more specialized equipment. |
| ||||||||||||||||||||||||||||||||

|
Infantry Anti-Tank I | 1942 | 127 days | Infantry Equipment II | Arming our infantry with anti-tank rifles will allow them to take out lighter armored vehicles while maintaining mobility. |
| ||||||||||||||||||||||||||||||||

|
Infantry Anti-Tank II | 1943 | 127 days | Infantry Anti-Tank I | For infantry to effectively engage heavier armored units, high-explosive anti-tank weapons need to be made smaller and lighter. |
| ||||||||||||||||||||||||||||||||
| Infantry Equipment III | 1942 | 170 days | Improved Infantry Equipment II | Personal and crew served weapons for infantry as well as the various other bits of kit a soldier needs. Further modernized to include personal Assault Rifles and anti-tank rockets. |
| |||||||||||||||||||||||||||||||||

|
Improved Infantry Equipment III |
1944 | 127 days | Infantry Equipment III | Personal and crew served weapons for infantry as well as the various other bits of kit a soldier needs. Further Modernized to include personal Assault Rifles and anti-tank rockets. Improved availability of weapons previously distributed to a limited extent. |
| ||||||||||||||||||||||||||||||||
Support weapons
Support weapons includes crew-served weapons such as medium and heavy machine guns and mortars. These technologies provide bonuses to the defense and breakthrough of cavalry and all types of infantry.
- Back to Infantry research tree
| Icon (generic) | Technology | Year | Base cost | Prerequisites | Description | Statistics | ||||||||||||||||||||||||||||||
|---|---|---|---|---|---|---|---|---|---|---|---|---|---|---|---|---|---|---|---|---|---|---|---|---|---|---|---|---|---|---|---|---|---|---|---|---|

|
Support Weapons I | 1918 | 127 days | Automatic weapons are becoming more portable. Submachine guns have already proven effective and the development of hand-held support weapons must continue. |
| |||||||||||||||||||||||||||||||

|
Support Weapons II | 1938 | 127 days | Support Weapons I | The development of automatic weapons which combine the aspects of light and heavy machine guns allows versatility in how our infantry employ their equipment. |
| ||||||||||||||||||||||||||||||

|
Support Weapons III | 1940 | 127 days | Support Weapons II | While maintaining and improving reliability of machine guns, we can also experiment with higher firing rates to ensure lethality of the constant stream of bullets. |
| ||||||||||||||||||||||||||||||

|
Support Weapons IV | 1942 | 127 days | Support Weapons III | With the increased use of assault rifles, developing automatic weapons that can be used in any environment by all soldiers is a priority for a modern army. |
| ||||||||||||||||||||||||||||||
Night vision
Night vision equipment allows soldiers to see even in the dark, offsetting some of the -50% penalty that units receive when fighting at night and giving an edge over enemies who do not have such equipment.
- Back to Infantry research tree
| Icon (generic) | Technology | Year | Base cost | Prerequisites | Description | Statistics | ||||||
|---|---|---|---|---|---|---|---|---|---|---|---|---|

|
Night Vision I | 1943 | 212 days | Being able to see the enemy without being seen is key to night operations. With the invention of infra-red technology, we can outfit our army with devices which, though unwieldy, make this possible. |
| |||||||

|
Night Vision II | 1946 | 170 days | Early infra-red scopes, although initially intended for use by snipers, had a limited vision range. As both the portability and vision improves, these devices can be used by more troops operating at night. |
| |||||||
Motorized
- Back to Infantry research tree
Motorized infantry is a somewhat harder and much faster version of infantry, but is more expensive and less reliable. It represents infantry outfitted with "soft-skinned—unarmored or lightly armored—vehicles (Jeeps, trucks, etc.). It provides infantry with more strategic (deploying to the area of operations, though state infrastructure is the primary strategic mover) and operational (moving along the front line) mobility and is suitable to accompany armored forces.
Motorized technology enables research of Mechanized Infantry that uses increasingly advanced armored personnel carriers and infantry fighting vehicles (e.g., armored cars and half-tracks). These are much more expensive than Motorized, and initially slower, but provide higher attack, armor and hardness, with much greater tactical mobility (moving under fire, i.e., the "breakthrough" stat). Mechanized Infantry should be upgraded to keep pace with the faster advanced tanks. Mechanized Infantry lacking tanks is better as a defensive fire brigade than an assault force (except against relatively weak opposition that it can outpace and overrun). As a general rule, mechanized infantry are best used with armored forces, just as they were in reality.
| Icon (generic) | Technology | Year | Base cost | Prerequisites | Description | Statistics | |||||||||||||||||||||||||||||||||||||
|---|---|---|---|---|---|---|---|---|---|---|---|---|---|---|---|---|---|---|---|---|---|---|---|---|---|---|---|---|---|---|---|---|---|---|---|---|---|---|---|---|---|---|---|
| Motorized | 1936 | 170 days | Motorizing infantry is the first stage to mechanizing an army. Civilian trucks are readily adapted to military uses of transporting soldiers, towing guns, and carrying equipment and supplies. This greatly increases the strategic mobility of infantry units, which would otherwise rely on marching. |
| |||||||||||||||||||||||||||||||||||||||

|
Motorized Rocket Artillery | 1939 | 127 days | Motorized | Multiple rocket launchers such as these deliver explosives to a target area more quickly than conventional artillery, but with lower accuracy and requiring a longer time to reload. Being mounted on trucks, this version is able to launch attacks and change positions before the enemy can return fire. |
| |||||||||||||||||||||||||||||||||||||
| Mechanized Equipment I | 1940 | 170 days | Motorized | Mechanized infantry is infantry equipped with armored personnel carriers (APCs) or infantry fighting vehicles (IFVs) for transport and combat. Mechanized infantry is distinguished from motorized infantry in that its vehicles provide a degree of protection from hostile fire, as opposed to soft-skinned wheeled vehicles (trucks or jeeps) for motorized infantry. |
| ||||||||||||||||||||||||||||||||||||||
| Mechanized Equipment II | 1942 | 170 days | Mechanized Equipment I | Mechanized infantry is infantry equipped with armored personnel carriers (APCs) or infantry fighting vehicles (IFVs) for transport and combat. Mechanized infantry is distinguished from motorized infantry in that its vehicles provide a degree of protection from hostile fire, as opposed to soft-skinned wheeled vehicles (trucks or jeeps) for motorized infantry. |
| ||||||||||||||||||||||||||||||||||||||
| Mechanized Equipment III | 1944 | 255 days | Mechanized Equipment II | Mechanized infantry is infantry equipped with armored personnel carriers (APCs) or infantry fighting vehicles (IFVs) for transport and combat. Mechanized infantry is distinguished from motorized infantry in that its vehicles provide a degree of protection from hostile fire, as opposed to soft-skinned wheeled vehicles (trucks or jeeps) for motorized infantry. |
| ||||||||||||||||||||||||||||||||||||||

|
Basic Amphibious Tractor
|
1941 | 170 days | Mechanized Equipment I | Amphibious Tractors, or Amtracs, allow Marines to be landed on a beach under armored protection. However, this comes at the cost of poor fuel efficiency. |
| |||||||||||||||||||||||||||||||||||||

|
Improved Amphibious Tractor
|
1943 | 170 days | Basic Amphibious Tractor | These Amtracs feature several improvements over the base version, such as rear loading ramp for easier unloading on the beach. |
| |||||||||||||||||||||||||||||||||||||

|
Interwar Armored Car
|
1936 | 170 days | Motorized | Where previous armored cars were simply commercial models with thin steel plating, this model was designed from the ground up to carry armor and light armament. |
| |||||||||||||||||||||||||||||||||||||

|
Basic Armored Car
|
1940 | 170 days | Interwar Armored Car | An improved internal layout and additional ammunition storage creates a more effective armored car. |
| |||||||||||||||||||||||||||||||||||||

|
Improved Armored Car
|
1942 | 170 days | Basic Armored Car | Changes on the battlefield require a much heavier armament and thicker armor to defeat enemy light untis and survive to report back. |
| |||||||||||||||||||||||||||||||||||||
|
|
Anti-Tank Armored Car
|
1942 | 85 days | Improved Armored Car | Our light mechanized units will come into contact with enemy tank forces at some point. Developing a special anti-tank variant would give them a fighting chance. |
| |||||||||||||||||||||||||||||||||||||
Special forces
- Back to Infantry research tree
In addition to regular, motorized, and mechanized infantry, there are three specialized infantry types (Marines, Mountaineers, and Paratroopers) that are useful in specific situations. They require standard infantry equipment.
These three types of specialized infantry types are known as Special Forces or SF (not to be confused with the army doctrine Superior Firepower). Special Forces have a Battalion cap for each country. This cap is the greater of either 24 battalions or 5% of your total battalions (excluding SF battalions) making up the rest of your divisions. Divisions cannot be changed, trained, given a different template or have their template adjusted if that would result in exceeding the SF cap. To increase the 24 SF battalion cap, you would have to exceed the 480 non-SF battalion breakeven point by 20 for each additional SF battalion. For example, you would need 500 non-SF battalions for 25 SF battalions, 520 non-SF battalions for 26 SF battalions, 540 non-SF battalions for 27 SF battalions, etc.
Marines
Marines are specialized infantry trained to engage in wet terrain and perform amphibious invasions. They receive +30.0% attack in marshes, +40.0% attack when fighting over rivers, and +50.0% attack when engaging enemies during amphibious landings. Marine Divisions are very effective when supported by Engineer Companies.
| Icon (generic) | Technology | Year | Base cost | Prerequisites | Description | Statistics | ||||||||||||||||||
|---|---|---|---|---|---|---|---|---|---|---|---|---|---|---|---|---|---|---|---|---|---|---|---|---|

|
Marines I | 1936 | 170 days | Troops specializing in amphibious warfare are growing ever more indispensable. Improvised methods and equipment become things of the past as our naval infantry is supported by specialized landing craft and training. |
| |||||||||||||||||||

|
Marines II | 1939 | 127 days | Marines I | Amphibious warfare requires constant innovation. Improved logistical support and portable harbors can enable our marines to perform landings that may otherwise have been impossible. |
| ||||||||||||||||||

|
Marines III | 1943 | 170 days | Marines II | Marines can be more than just amphibious infantry. In the future, our marine corps will be among the most disciplined and organized special forces. |
| ||||||||||||||||||
Mountain Infantry
Mountaineers are specialized infantry that excel in maneuvering through and engaging in rough terrain. They receive +10.0% movement, +20.0% attack, and +5.0% defense in hills and +20.0% movement, 35.0% attack, and 10.0% defense in mountains.
| Icon (generic) | Technology | Year | Base cost | Prerequisites | Description | Statistics | ||||||||||||||||||
|---|---|---|---|---|---|---|---|---|---|---|---|---|---|---|---|---|---|---|---|---|---|---|---|---|

|
Mountain Infantry I | 1936 | 170 days | Combat in mountain ranges exposes troops to many perils, but sometimes cannot be avoided. We can minimize these risks by providing our soldiers with specialized training for this environment. |
| |||||||||||||||||||

|
Mountain Infantry II | 1939 | 127 days | Mountain Infantry I | Going beyond survival, our forces can be trained to use mountains to their advantage. With light equipment and mule transports, they can maneuver in this terrain better than other infantry. |
| ||||||||||||||||||

|
Mountain Infantry III | 1943 | 170 days | Mountain Infantry II | Preparing for the most arduous mountain missions in high altitudes and low temperatures will require extraordinary training and discipline from our mountain troops. |
| ||||||||||||||||||
Paratroopers
While they take longer to train and only have slightly better stats than normal Infantry, Paratroopers are the only type of unit that can be paradropped into the field, which they do via transport plane. This allows them to perform operations behind enemy lines and in locations where other units cannot easily reach. The AI will use paratroopers in battle, but never uses them for paradrops.
| Icon (generic) | Technology | Year | Base cost | Prerequisites | Description | Statistics | ||||||||||||||||
|---|---|---|---|---|---|---|---|---|---|---|---|---|---|---|---|---|---|---|---|---|---|---|

|
Paratroopers I | 1936 | 170 days | By incorporating airborne forces into our army, we can make forced entries and position key troops in previously inaccessible areas, allowing for new tactical opportunities. |
| |||||||||||||||||

|
Paratroopers II | 1939 | 127 days | Paratroopers I | Transitioning from small operations with only a few paratroopers to larger airborne divisions paves way for massive airborne landings, taking these forces beyond a novelty to a natural part of warfare. |
| ||||||||||||||||

|
Paratroopers III | 1943 | 170 days | Paratroops II | Learning to adapt paradrop operations according to weather, standardizing equipment such as jump boots and extended specialized training will minimize the confusion and risks involved in these dangerous missions. |
| ||||||||||||||||
Special Forces Concentration
- Back to Infantry research tree
Special forces (marines, mountaineers, paratroopers) are trained and equipped for conditions that ordinary soldiers aren’t expected to excel in. The first tech will give them a boost to acclimatization speed. Afterwards, the tree splits. One option is to train your special forces harder, to improve their skills and their ability to fight for longer before having to be resupplied. The other option is to expand the special forces training programs to accept more recruits. Your special forces will be more numerous, but come with more drag and not quite as high speed. In the end though, they will still be elite forces and will be able to develop training to make them even more skilled in fighting in the harshest of conditions. Note: The maximum quantity of special forces is capped at 24 battalions or 5% of your fielded regular battalions (this limit can be increased by unlocking the Expanded Special Forces Program technology).

| Icon (generic) | Technology | Year | Base cost | Prerequisites | Description | Statistics | |||||||||||||
|---|---|---|---|---|---|---|---|---|---|---|---|---|---|---|---|---|---|---|---|

|
Special Forces | 1938 | 170 days | Unconventional fighting requires specialist training. We need to ensure that our troops are prepared and able to adapt to harsh conditions. |
| ||||||||||||||

|
Advanced Special Forces Training | 1940 | 170 days | Special Forces | With extensive training, we can ensure that our special forces will be able to perform above and beyond that of normal men. Mutually exclusive with Expanded Special Forces Program. |
| |||||||||||||

|
Extreme Environment Training | 1942 | 170 days | Advanced Special Forces Training | We need to be able to fight in the harshest of environments. With the right training and equipment, our troops will be able to fight in the most extreme conditions. |
| |||||||||||||

|
Expanded Special Forces Program | 1940 | 170 days | Special Forces | Special forces are able to perform missions that ordinary soldiers can not. We need to expand the training program to get more of our soldiers qualified. Mutually exclusive with Advanced Special Forces Training. |
| |||||||||||||

|
Survival Training | 1942 | 170 days | Expanded Special Forces Program | Our special forces will often fight behind enemy lines and in short supply. We need to train them to endure harsh weather and fight with limited supplies. |
| |||||||||||||

|
Elite Forces | 1944 | 170 days | Survival Training | Only the best of the best will become special forces. The soldiers that make it through the training will be stronger. faster, and fight harder than anyone else. |
| |||||||||||||
| 政策 | 意识形态 • 阵营 • 国策 • 内阁 • 政府 • 傀儡国 • 外交 • 全球紧张度 • 内战 • 占领区 • 情报机构 |
| 生产 | 贸易 • 生产 • 建设 • 装备 • 燃料 |
| 科研与科技 | 科研 • 步兵科技 • 辅助部队(支援连)科技 • 装甲车辆科技 • 火炮科技 • 陆军学说 • 海军科技 • 海军学说 • 空军科技 • 空军学说 • 工程学科技 • 工业科技 |
| 军事与战争 | 战争 • 陆军单位 • 陆战 • 编制设计 • Army planner • 集团军 • 指挥官 • 作战计划 • 战术 • 海军单位 • 海战 • 空军单位 • 空战 • 经验 • 损耗与事故 • 后勤 • 人力 • 核弹 |
| 地图 | 地图 • 省份 • 地形 • 气候 • 地区 |
| 事件与决议 | 事件 • 决议 |