小无编辑摘要 |
Wisdom help(讨论 | 贡献) 小 (对图片Supply-007解读的翻译) |
||
| (未显示3个用户的6个中间版本) | |||
| 第1行: | 第1行: | ||
{{Version|1. | {{Version|1.11}} | ||
{{hatnote|有关1.11版本前的后勤系统,请参考本页面的历史版本。}} | |||
在钢铁雄心4中,'''后勤'''是指将战斗人员(增援)和装备送到需要的地方去,以此来支持作战部队,同时确保作战单位所在地的补给水平足够他们有效率的行动。其中最重要、最复杂的元素就是在1.11版本(“巴巴罗萨”补丁)大改的补给系统。 | |||
== 补给 == | |||
{{SVersion|1.11}} | |||
{{SVersion|1. | 补给 本身并不是生产出来的,省份的 补给 水平代表了对作战部 队的 “支持限度”(可以把它看成是一种柔 和的 单位堆叠限制) 。 每一个陆战单位自身也 有 一个内部 的补给 状态,和其所 在 省份的 补给 水平相独立 , 但两者之间也有关连 。 | ||
一个省份的可 用补给 来源于三 个 不同 的 部分:“补给中心补给”、“空投补给”和“地区补给” 。 | |||
补给中心 的补给 是 通过 补给网络从一个国家的首都运输 到 此国前线作战部队 的 。而 补给 网络则由补给中心、港口、铁路 和 运输航线构成。 | |||
空投补给是由执行空投任务的运输机提供的,仅对其空投的空域 有 效。 | |||
地区 补给 则是指每个地区都有的一个固定的补给量 , 所有作战单位都可以从所在地区中获得补给(如果是一个还没有被某一方所完全占领的地区,该地区的补给则由占领的数方部队共享) 。 | |||
* 值得注意的是,即 使 一个作战单位能从补给中心获得所需的全部 补给, 他依然会从所在地区的补给当中抽取一 部 分。实际上,他们 会 优先使用地区补给,其次使用补给中心 的 补给 , 最后才使用空投 的补给。 | |||
只要作战单位所需的 补给 总量小于所在省份能提供的补给量,那么这些作战单位就能完全补给。相反,则这些作战单位将承受惩罚。 | |||
下面将会详细介绍。 | |||
[[File:Supply-006.png|alt=An image showing how to select the supply map mode using the game UI.|thumb|The two crates in the map mode selection area in the bottom-right of the screen indicate the supply map mode.]] | |||
补给 情况在游戏中主要 通 过供应 地 图模式显示 。 在默认设置下 , 可以通 过 按下"F4"键或在屏幕右下角选择 补给 地图模式图标来访问此模式 。 | |||
补给 地 图通过不同的着色来展示每个省份的供应状况。这些颜色渐变使得同时查看数百个省份的补给情况时也能一目了然。 | |||
* 亮(浅)蓝色:有大量可用的补给 | |||
* 深蓝色:有少量可用的 补给 | |||
* 紫色:有少量或没有可用的补给,但该省份的部队没有受到低补给的影响。 | |||
* 黄色:该省份的部队补给供应'''部分'''不足,但仍有足够的 补给 让部队不至于受到严重的debuff。 | |||
* 亮红色:该省份的部队补给供应'''严重'''不足,它们正遭受重大的 补给 相关惩罚。 | |||
[[File:Supply-007.png|alt=An image showing the shadings of the supply mapmode.|none|thumb|在莫斯科周围,供应充足的省份是亮蓝色的,而在更远的地方,它们变成了深蓝色。一些边境省份 的补给 供应不足 ( 比如选中的这个省份 ) , 该 省没 有 剩余 的供 应,无法完全供应驻扎在那里 的 部队 ,它 们用明亮的橙色表示。紫色省份 的 供应量很低或 没有 可用 的 供应,但没有部队驻扎 。]] | |||
The tooltips in the supply mapmode are invaluable, and hovering over different items shows different information: | |||
*Unit: Unit supply draw, and where it’s coming from. | |||
*Supply hub: Amount of supply requested of the hub, and highlights the railroad connection to the capital. Holding down the Shift key will show the range of the supply hub (at that time – range can change with weather). | |||
*Port: Amount of supply requested of the hub, and shows paths to any ships that may be drawing Hub (but not State) supplies from the port. Holding down the Shift key will show the range of the supply hub (at that time – range can change with weather). | |||
*Province: Total and available supply in a province. Holding down the CTRL key will also show a breakdown of where the hub supply is coming from. | |||
[[File:Supply-009.png|alt=An image showing the supply map mode tooltip for a port|thumb|Hovering over the port on the island to the South-East of the Arabian Peninsula also brings up arrows to ships supplied by that port, as well as a tooltip containing much useful information.|left]] [[File:Supply-008.png|alt=An image showing the tooltip for a supply hub|thumb|Bringing up the tooltip for the supply hub of Velikiye Luki highlights in red the rail connection to the capital, while the tooltip provides a range of information on the nature of the hub.|none]] | |||
{{clear}} | |||
==后勤== | |||
=== 补给 中心=== | |||
Hub supply is the amount of supply provided by supply hubs or ports (which act as supply hubs, as well as ports). There are three elements to be mindful of when looking at hub supply: | |||
*The total draw on the supply capacity of a supply hub. | |||
* | *The range of a supply hub, and the amount of supply from the hub in a given province. | ||
* | *Provinces received supply from all hubs in range. | ||
* | |||
In most situations, at time of writing, the most common supply issues are based on insufficient supply in a given province, rather than insufficient total hub supply capacity. | |||
==== Total hub supply capacity ==== | |||
The total supply hub/port capacity is based on the connection between the hub/port and the capital, and for ports, the level of the port (both where the convoy departs, and where it arrives). | |||
A level one railway connecting a hub to the capital provides 15 maximum supply from that hub, while a level one port connected to the capital by a railway also provides 15. However, a level one port connect to the capital by a convoy rather than by a rail connection has a base supply capacity of 20. Note that if the convoy route supplying the port is raided, the amount of supply provided will be reduced until the route has recovered its capacity. | |||
For supply hubs, the base capacity increases for each additional level of rail connection to the capital, based on the smallest rail level at any point in that connection (so, for example, if there are three stretches of track, two at level 2, and one at level 1, the connection is considered to be a level 1 connection – to upgrade it to a level 2 connection, the level 1 stretch of track would need to be upgraded to level 2). Each level of rail connection increases the supply of a hub by 5, to a maximum of 35. if connected by river, the supply hub is considered to have a level 1 connection. | |||
=== | One exception to this is the capital supply hub, which has its capacity set at a base of 5 and then supplemented by the amount of civilian and military factories, and naval dockyards, in the nation. | ||
For ports, the base capacity for ports connected via convoys increases by 5 for each level of naval base, up to an effective maximum of 35 (or 65 if your capital has a port), as the amount of supply sent by convoy can never exceed the rail connection to the departure port. | |||
! | |||
==== Hub supply range ==== | |||
Supply hubs provide supply to each province based on a number of factors, the most important of which is the number of provinces between the province being supplied and the supply hub, with this being modified by the level of the rail connection to the supply hub from the capital, the level of infrastructure, [[Terrain#Types|terrain]], and the [[Weather#Weather_types|weather]]. | |||
[[File:Supply-010.png|alt=An image showing the declining level of hub supply provided the further from the supply hub a province is.|none|thumb|999x999px|Look at the “Supply from hubs” value in this sequence of screen grabs to get an idea of the diminishing value of supply from the hub, as distance increases. Note that the state referred to in the tooltip is the state the province is in, not the state containing the hub where the supply is coming from (the furthest-right tooltip is still drawing its supply from the hub in Akhtubinsk).]] | |||
==== Improving supply hub range ==== | |||
Outside of aerial supply, improvements to the level of supply in a province over the course of a game will almost entirely be due improvements in the amount of hub supply provided. The four means by which hub supply can be improved are by: | |||
*Increasing the level of motorization of a hub or army. | |||
*Increasing the level of the rail connection to the hub. | |||
*Increasing the level of infrastructure in the area. | |||
*Building a new supply hub. | |||
Note that the first three methods (motorization, increase the rail connection level and increasing the level of infrastructure) all stack on top of each other - so a an un-motorized supply hub in a state with level 1 infrastructure and a level 1 rail connection would have the shortest possible supply range, while a fully motorized hub with level five infrastructure and a level 5 rail connection would have the longest possible range. | |||
It's very important to bear in mind that hub supply falloff works increases significantly for every extra province distant from the hub, port or capital - so while it is possible to extend hub range, individual changes may be relatively small, and it will often take a substantial investment to increase range enough to push it out to the next province from the hub. | |||
=====摩托化===== | |||
By default, each supply hub is set to “not motorized”, indicated by a horse. This can be improved by two different tiers of motorization, by clicking on the appropriate icon (see example below). Once a hub is motorized, one or two small trucks (depending on the level of motorization) will be visible as part of the supply hub icon (a green truck or trucks indicates that the hub has been directly motorized, while grey truck(s) indicates it has been motorized by a nearby army – more on that below). Note that trucks assigned to motorization of supply hubs, whether directly via hubs or by selection the motorization options for armies, do not consume fuel or manpower. | |||
Depending on motorization level, each hub needs 0, 40, or 80 trucks (icon symbols: horse, one truck, two trucks). | |||
These trucks take attrition, which is increased in poor [[Terrain#Types|terrain]] and [[Weather#Weather_types|weather]], and they can be subject to air attack from enemy aircraft assigned to the logistical strike mission. | |||
[[File:Supply-012.jpg|none|thumb|999x999px|Observe the changing icons as the level of motorisation of the Odessa supply hub (port) is increased. As per the far-right image, as long as a hub is motorized, it will have an icon of one or two trucks to indicate this (the number of trucks indicating the level of motorization).|链接=Special:FilePath/Supply-012.jpg]] | |||
The other way to achieve hub motorization, is to assign it at the army level. This automatically toggles the level of motorization set for the army on hubs that are in range of where the army is drawing supplies from. This has the advantage of reduced micromanagement of hub motorization levels, but it can lead to fluctuating demands for troops, as the number of hubs in range of the army changes over time. See the three screenshots and their captions below for an example of this in action. | |||
[[File:Supply-011.jpg|none|thumb|300x300px|In this example, the troops at Tiraspol, to the north-west of Odessa, aren’t fully supplied. While the level of supply isn’t critical, one way to improve the level of supply would be to increase the level of motorization of the army (is currently set to “not motorized”, as indicated by the “horse” highlighted by a white ellipse and arrow in this screenshot).|链接=Special:FilePath/Supply-011.jpg]] | |||
[[File:Supply-013.jpg|none|thumb|The army has now selected the first level of motorization, again highlighted by a white ellipse and arrow), and the supply situation for the troops at Tiraspol has improved considerably. Also note the small grey truck that is now part of the icon for the Odessa supply hub.|链接=Special:FilePath/Supply-013.jpg]] | |||
[[File:Supply-014.jpg|none|thumb|The army has now selected the second level of motorization, again highlighted by a white ellipse and arrow), and troops at Tiraspol are now fully supplied. Also note that the grey “truck” icon that is part of the Odessa supply hub icon now has two trucks in it.| 链接=Special:FilePath/Supply-014.jpg]] | |||
Note that the full benefits of motorization will only be received if sufficient trucks are available. If more trucks have been assigned to support hubs than are available, then the benefits will be reduced, in proportion to the shortfall in trucks. | |||
[[File:Supply-015.jpg|none|thumb|While Rokossovky’s army has full motorization toggled, because of the shortage of trucks (note the tooltip), the troops at Tiraspol are not fully supplied.|链接=Special:FilePath/Supply-015.jpg]] | |||
=====提高铁路等级===== | |||
After motorization, increasing the level of the rail connection is the next most powerful and often (but it depends on how far the supply hub is from your capital by rail) the next quickest. | |||
[[File:Supply-016.jpg|thumb|To find out the level of the rail connection between a hub and the capital, hover over the hub in the supply mapmode, and see what the tooltip says about the bottleneck. In this case, Akhtubinsk is limited by its railway connection only being level 2, for the entire path from Moscow.|链接=Special:FilePath/Supply-016.jpg]] | |||
Each tile of railway costs 170 CIC, +130 CIC for each existing railway level (to a maximum of level 5), so it’s relatively quick and cheap to lay a level 1 railway down, but a long level 5 railway is a serious industrial undertaking. For example, as per the table below, the total CIC to build a railway from nothing up to level 5 is 2,150 CIC per province (170 + 300 + 430 + 560 + 690), adjusted for any construction bonuses and infrastructure effects on construction speed. | |||
{| class="wikitable" | |||
|+ | |||
Railway cost (CIC) per level, per province | |||
!Rail level | |||
!1 | |||
!2 | |||
!3 | |||
!4 | |||
!5 | |||
|- | |- | ||
| 1 || | |CIC cost | ||
| 170 | |||
|300 | |||
|430 | |||
| 560 | |||
|690 | |||
|} | |||
Actually building railways can be done in a number of ways: | |||
*Selecting the supply hub, and then clicking the middle (top) of the three icons that appears. Each click of this will add another level of railway to each province on the rail connection to the capital (so, for example, three clicks on a hub connected by a level 2 railway will put construction orders in to upgrade it to the maximum level). | |||
*Opening up the production interface, and selecting the “Railways” button, and then clicking on one of the white numbers in a black circle on a rail connection between two hubs – this will place construction orders to increase the rail level between the two hubs by one level. Each extra click will place construction orders to increase it by a further level. | |||
[[File:Supply-017B.jpg|none|thumb|Here the supply hub button has been pressed, bringing up the three icons – the one in the middle, highlighted by the arrow, will put in construction orders to upgrade the rail connection to the capital.|链接=Special:FilePath/Supply-017B.jpg]] | |||
[[File:Supply-018.jpg|none|thumb|500x500px|Here, the “upgrade rail connection to capital” has been pressed for Akhtubinsk – see the construction orders in the construction build queue, as well as the “under construction” icon on the stretches of railway being upgraded in the supply map mode.|链接=Special:FilePath/Supply-018.jpg]] | |||
[[File:Supply-020.jpg|none|thumb|1000x1000px|The “2” between Lipetsk and Tambov highlighted here, indicates that the level of rail connection between the two supply hubs is level 2. Click on this two with the “rail” tool in the production interface selected, and construction orders will be placed to increase the level of the rail connection between the two hubs. |链接=Special:FilePath/Supply-020.jpg]] | |||
Each additional level of rail will increase the size of the total amount of supply in the hub, which means the amount of supply flowing from the supply hub outwards is also increased. In some cases can mean provinces with no hub supply at all will receive some hub supply, although as noted above, the increasing size of "supply flow drop-off" the further from a supply hub means that extensions in range are likely to be limited. | |||
[[File:Supply-019.jpg|none|thumb|1500x1500px|This series of screengrabs shows the impact on a province on the Soviet border with Finland of incrementally increasing the level of rail connection to the hub from 1 (far-left) through to five (far right) – note the weather is clear, and the hub is not motorized.|链接=Special:FilePath/Supply-019.jpg]] | |||
Bear in mind that railways are also useful for strategic redeployment, and the higher the railway level, the faster troops will strategically redeploy. | |||
=====建造新的补给中心===== | |||
[[File:Supply-021.jpg|thumb|Here, Japan selects a supply hub for construction, which they then place it in a province where it will have a useful distribution. Bear in mind supply hub range is by province, not by area, so all else being equal supply will flow from a hub through two large provinces just as well as it will through two small ones.|链接=Special:FilePath/Supply-021.jpg]] | |||
If it looks like it’s not cost-effective, or possible, to get hub supply from existing hubs, it is also possible to build new supply hubs. On the coast, ports act as supply hubs, and are considerably cheaper (5,000 CIC for the first level of the naval base, with a further 1000 CIC added to the cost for each subsequent level). Inland, however, supply hubs need to be used, which require 20000 CIC (modified by any construction speed and infrastructure construction bonuses). | |||
Both ports and supply hubs are constructed using the construction interface, shown in the screenshot below. | |||
Both ports and supply hubs can be constructed in the territory of allies, and of subjects. | |||
If it can trace a path using convoys, other ports, and railways back to the capital, a port will be supplied by sea without needing a rail connection. | |||
[[File:Supply-022.jpg|left|thumb|Here, Japan selects “railways” in the construction interface, and the clicks on the province to the south-west of where the new supply hub is building, and then clicks on the province containing the supply hub that’s being built.|链接=Special:FilePath/Supply-022.jpg]] | |||
A supply hub will also require a connection to the capital, traced via rail or river. Connection via a river is instant, and will be made if the new supply hub is connected via a river (bordering the province containing the supply hub) to either the capital, or another supply hub or port in a province bordering the same river. | |||
To connect a new supply hub with a rail connection, open the construction interface and select the “railways” option, and then click on a province with a railway that is connected to the capital, and then click on the province with the new supply hub. The level of the railway constructed will be the same as that of the level of the railway in the province that it’s extending from, but this can be manually adjusted down or up levels (as long as the railway hasn’t been built yet) using either the construction list (the +/- buttons on the railway in the list) or on the supply map (left-click on small number (underneath the crossed hammers) on the railways under construction to increase the level, and right-click to decrease the level). | |||
Railways can be built in controlled, allied or subject territory at any time, and do not need to wait for a supply hub to be completed (or even started). | |||
[[File:Supply-023.jpg|thumb|Improving the level of infrastructure in the state of Arkhangelsk improves the level of hub supply provided at the airbase to the south of the hub. Note that the overall supply in the province increases by significantly more, because infrastructure has both a hub supply range and a state supply effect – more on state supply below.|链接=Special:FilePath/Supply-023.jpg]] | |||
=====提高基础设施等级===== | |||
Higher levels of infrastructure also allow supply from a hub to reach further, by reducing the drop-off in supply flow from the hub (to a maximum reduction in drop-off of 0.3 for level 5 infrastructure). Note that the level of infrastructure that matters is the level of infrastructure for state containing the province from which the supply is flowing. So, for example, if there are two states, a level five infrastructure state with a supply hub bordering a level one infrastructure state, the supply flowing from a province in the level five infrastructure state to a bordering province in the level one infrastructure state will flow as if it was level five infrastructure. However, supply flowing from a province in a level one infrastructure state to another bordering province in the same level one infrastructure state, will flow as if it was level one infrastructure. | |||
As is the case for other ways to extend supply hub range, the increasing amount of supply drop-off as the distance from the hub (counted in provinces) increases means that any increases are likely to only be at the margins (ie, perhaps an increase of range of one province). | |||
Be mindful that each level of infrastructure costs 6000 CIC – such that four levels of infrastructure in one state cost more than a new supply hub. | |||
====火车==== | |||
To run at full efficiency, supply networks need trains for rail connections, similar to the requirement of convoys for naval connections, with the amount of trains related to the amount of hub supply required from each hub. The train requirements for a hub can be seen in the tooltip for that hub. | |||
[[File:Supply-024.jpg|none|thumb|750x750px|Note how the number of trains increases as the hub supply use goes up.|链接=Special:FilePath/Supply-024.jpg]] | |||
Train requirements for the network as a whole can be found in the logistics tooltip, which can be brought up by hovering over the logistics icon at the top of the screen (it looks like a crate with a percentage next to it). If there are less trains than the network requires, there will be a reduction in hub supply available to divisions drawing it. | |||
[[File:Supply-025.jpg|none|thumb|500x500px|In the first screengrab, the logistics tooltip indicates there are only 58% of the trains required. In the second screengrab, of the Minsk supply hub tooltip, it shows that this results in only 6 of the 11 required trains being available. In the third screengrab, the divisions drawing on hub supply are only partially supplied because of this (note that their overall level of supply is higher than might be expected by the train shortfall because they are also drawing on state supply – more on that below).| 链接=Special:FilePath/Supply-025.jpg]] | |||
[[File:Supply-026.jpg|thumb|The research options for both the war austerity train, and the armoured train, can be found at the bottom of the “Support Companies” tab, as highlighted in this screenshot.| 链接=Special:FilePath/Supply-026.jpg]] | |||
Trains are not subject to attrition, but they can be destroyed by air attack from enemy aircraft using logistical strike. | |||
As well as the base model train, two other train models can be researched over the course of the game. One is an unarmoured “austerity” train – which does the same job as the base model, but at a cheaper price (50 MIC instead of 70). The other is an armoured train, more on which below. | |||
=====装甲火车===== | |||
Armoured trains are a special type of train that is more resistant to enemy Logistics Strike air missions. If you have armoured trains available in your inventory, they will automatically be used before other train types. Armoured trains have a significantly higher production cost of 105 MIC, so are much more expensive than the starting train and more than double the cost of the austerity train. | |||
[[File:Supply-027.jpg|none|thumb|In the top screenshot, 100 Polish CAS have been attacking the logistics of Belarus for a week, against a Soviet logistics network that only had unarmoured trains. In the bottom screenshot, the same situation has taken place but the Soviet trains have been armoured. Note the significant reduction in the number of trains destroyed.|链接=Special:FilePath/Supply-027.jpg]] | |||
====占领铁路和补给中心==== | |||
As a front advances into enemy territory, enemy-held rail lines and hubs may come under friendly control. While rail lines may or may not need repairing (rail can be damaged by strategic bombing, or by your opponent using scorched earth before they lose control of the state), they won’t be available for use right away in most situations. When capturing a railroad on territory that is not your core, the cooldown until the railroad can be used is 10 days, while it’s 5 if the territory is a core state, and there is no cooldown if the war is a civil war. | |||
[[File:Supply-028.jpg|none|thumb|600x600px|The stopwatch symbol above a grey railroad indicates a railroad being converted. If you hover over the stopwatch, a tooltip will indicate how long is remaining for the conversion. Note that this will reset back to 10 days if another province on the path towards a supply hub is captured.|链接=Special:FilePath/Supply-028.jpg]] | |||
===== Rail conversion time ===== | |||
A newly-captured hub will only be functional once it is connected by “converted” railroads, and it won’t be connected until every province has had the required number of days under friendly control to convert. There is no conversion time, however, for supply hubs. | |||
[[File:Supply-029.jpg|none|thumb|Be mindful that even after the stopwatch has been removed from the railroads, there may be a wait until the supply hub is available, as there is no indicator for the conversion of the railroad in the province containing the hub (but this still needs to convert before the hub can be used).|链接=Special:FilePath/Supply-029.jpg]] [[File:Supply-030.jpg|none|thumb|450x450px|There is (understandably) no conversion time for rivers – so supply hubs that can connect to your supply network by a river that you control (to another hub, not just a railroad) will provide hub supply instantly.|链接=Special:FilePath/Supply-030.jpg]] | |||
====天气和terrain ==== | |||
Both weather and terrain have an impact on the supply system - the tables in the [[Weather#Weather types|weather]] and [[Terrain#Types|terrain]] pages on the wiki provide the figures for the various supply impacts for different terrain/weather states. Things to be mindful of when thinking about the impact of terrain and weather are: | |||
* There are two weather effects: | |||
**The '''Supply Factor''' reduces the flow of supplies from a supply hub (in-effect, reducing its range) acting as a percentage reduction on the supply flow into a province [''to be confirmed].'' These effects can stack if, for example, a region has a ground condition of deep snow and a weather condition of blizzard - deep winter conditions like this can substantially reduce the range of hub supply for the duration of those weather/ground conditions. | |||
**The '''Supply Consumption Factor''' increases the supply use of a division. Both of these elements can be in play depending on the particular circumstances. | |||
*There is one terrain effect: | |||
**The '''Supply Flow Penalty Factor''.''''' This changes the supply fall-off in hub supply when moving away from the hub, and is added to other reductions in supply flow. This isn't a percentage figure, but rather a direct change (usually reduction, but it actually is an increase in urban areas) in the supply amount as it relates to the figures shown for hub supply in the province tooltips. | |||
===地区补给=== | |||
Unlike hub supply, state supply is a fixed amount of supply provided within a state, based on four things: victory points, infrastructure, population and something called ‘base supply’, which is a fixed amount of extra supply in a state. While state supply from population and infrastructure will be in every (non-impassable) state, a few states don’t have victory points, and many states have no base supply. | |||
[[File:Supply-005.png|thumb|407x407px|To see how much state supply is available, hover over a province in supply map mode to bring up the province supply tooltip. In this province, we can see there is 0.90 state supply from level 3 infrastructure, 0.14 supply from 831,140 population, and 0.25 from the level 1 victory point in Novgorod.]] | |||
A state with a victory point in it will get 0.2 state supply from this, and then a further 0.05 supply for the total VP value of the victory points in the state (so, for example, a state with one 1-point VP, and one 5-point VP, would have 0.5 supply from VPs, made up of 0.2 base and 0.3 from 6 VPs in total in the state). See the table below for some examples: | |||
{| class="wikitable" | |||
|+ | |||
!VP | |||
!50 | |||
!20 | |||
!15 | |||
!10 | |||
!5 | |||
!3 | |||
!1 | |||
|- | |- | ||
| | |Supply | ||
|2.70 | |||
|1.20 | |||
|0.95 | |||
| 2 | |0.70 | ||
|0.45 | |||
|0.35 | |||
|0.25 | |||
|} | |||
Infrastructure provides 0.3 per level of infrastructure, as long as the infrastructure is undamaged (see the table below for infrastructure values) – if damaged, however, the amount of state supply provided by infrastructure is reduced until the damage is repaired. | |||
{| class="wikitable" | |||
|+ | |||
!Infrastructure level | |||
!5 | |||
!4 | |||
!3 | |||
!2 | |||
!1 | |||
| | |||
| 95 | |||
| | |||
| | |||
| | |||
|- | |- | ||
| | |Supply | ||
|1.50 | |||
|1.20 | |||
|0.90 | |||
|0.60 | |||
|0.30 | |||
|} | |} | ||
Population adds supply on a diminishing scale from 0.01 supply per province in a state of 30.000 people, to 4.25 supply per province in a state with 23.6 M people. Converted to per 1 million people, the scale slides from 0.3 supply per million sparsely populated states to 0.18 supply per million in very densely populated states (e.g. Chinese states). | |||
State supply is evenly distributed to all the units that are in the state (including air and naval units), before other sources of supply are used. Given this, it’s important to be mindful that while there might be enough state supply to support any units outside of hub range, those units will still have to share that state supply with units drawing supply from hubs or ports. | |||
[[File:Supply-033.jpg|none|thumb|500x500px|This collection of screen grabs shows a number of units drawing supply from the state of Murmansk at the same point in time. Note that ships drawing from the port still consume state supply, as do aircraft on the airfield. Note that the armoured division within range of the hub is drawing the same amount of state supply as the armoured division outside of the hub’s range.|链接=Special:FilePath/Supply-033.jpg]] | |||
Understanding state supply is essential to understanding how the supply map mode “heat map” works – as unlike hub supply, the shading of each province on the heat map takes into account that total amount of state supply available for the whole state - but once that state supply is used elsewhere in the state, the available state supply for other provinces is reduced accordingly. Checking an area to see whether the heatmap shading is due to mostly hub or state supply will provide a clearer indication of the effective supply in the province if more forces are moved into the state in other provinces. Please see the example provided by the two screenshots below for a bit more detail. | |||
[[File:Supply-031.jpg|none|thumb|This tooltip shows that there is 2.75 supply remining in the province. Look closely, however, and notice that it’s all due to state supply – this if that supply is used up elsewhere, once units have moved into the state there will be a lot less actual supply in that province.|链接=Special:FilePath/Supply-031.jpg]] | |||
[[File:Supply-032.jpg|none|thumb|If we now move in a sizeable force to protect against the border with Italian Libya, the same province that previously had 2.75 supply available now has very little (0.12), because the supply available in the state has been distributed between all of the divisions in that state, leaving only 32% of the division in that province’s requirements.|链接=Special:FilePath/Supply-032.jpg]] | |||
==== Contested states ==== | |||
If control of a state is split between two countries at war with each other, the amount of state supply will be split in two. Hub, population and infrastructure elements will be allocated based on the proportion of the state’s provinces owned by each side, while state supply from victory points is provided to whoever owns the provinces containing those victory points. | |||
[[File:Supply-034.jpg|none|thumb|800x800px|These screen grabs show how state supply (the only source of supply in this example) changes as Italian forces advance across the state of Matrouh. In the first screen grab, we see total state supply in Mersa Matruh is 2.75 (note that level of rounding for state supply is to one decimal place, even though two are displayed), then in the second it shows that after the Italian forces have 2 provinces, they have access to 22% of the state supply from base, infrastructure and population, as they now control 2 of the 9 provinces in the state. In the third screen grab, the Italians now have four provinces and the victory point at Marsa Matruh, giving them 44% (4 as a proportion of the 9 provinces in the state) of the base, infrastructure and population supply, and all of the 0.25 state supply provided by the single VP at Marsa Matruh.|链接=Special:FilePath/Supply-034.jpg]] | |||
=== | === 空投 补给=== | ||
[[File:Supply-036.jpg|thumb|Air supply is shown under the “Supply from State” heading in the province supply tooltip, but like state supply, the amount shown is the total available to the whole of the air region. In this case, air supply missions are providing 7.28 air supply to the whole region.|链接=Special:FilePath/Supply-036.jpg]] | |||
The final of the three pillars of the supply system is aerial supply. Aerial supply is provided by transport aircraft flying “Air Supply” missions. Like state supply, the total amount of supply provided via this is available in any province in the air zone in which the air supply mission is flown (regardless of whether it is in range of the transport aircraft or not). However, unlike state supply, air supply is drawn last, so units only draw on air supply if they cannot meet their full supply requirements from state and hub supply. | |||
[[File:Supply-035.jpg|none|thumb|550x550px|Here we see the 2 TrAD Air Wing, comprised of 40 transport aircraft, assigned to air supply in the Northern Front air region. While the range of the transport aircraft does not cover the whole region, the whole region will still receive access to the air supply from this air wing. However, because the transport aircraft cannot cover the whole region, they do receive a penalty to mission efficiency, which affects how much air supply they can provide (and how much supply they require as well).|链接=Special:FilePath/Supply-035.jpg]] | |||
[[File:Supply-037.jpg|none|thumb|950x950px|The screengrabs show a number of different situations for units in the “Northern Front” air region. Going from from left to right, in the first a division is in a province with access to some state supply, but no hub supply, and so is “topped up” by air supply. In the second, two divisions are fully covered by state and hub supply, and so don’t draw on any air supply. In the third, the province has nowhere near enough state supply (and no hub supply at all), and air supply is essential to these units being decently supplied. In the fourth, we see that the air wing flying the supply mission, that is flying from within the air zone, and drawing hub and state supply to provide the air supply elsewhere in the zone.|链接=Special:FilePath/Supply-037.jpg]] | |||
As is the case for any air mission, the mission efficiency will reduce the amount of supplies that can be provided, and efficiency can be impacted by a range of elements, including weather, the supply status of the squadron performing the mission, and the relationship between the size of the air zone and the range of the squadron. At 100% mission efficiency each fully supplied transport plane flying in good weather is capable of providing 0.2 {{hover|NSupply.LOCAL_SUPPLY_PER_AIR_MISSION|supply per plane}}. | |||
[[File:Supply-038.jpg|none|thumb|600x600px|Here the 2 TrAD air wing finds itself in rainy weather (-10% mission efficiency) and with 15% of its aircraft disrupted, dropping the supplies provided through air supply from 7.28 down to 6.2.|链接=Special:FilePath/Supply-038.jpg]] | |||
The supply requirements for an air wing are determined by the amount of supply they are able to provide via their mission efficiency – so all else being equal, a wing of transport aircraft that can cover a greater proportion of the air zone will provide more air supply than the same sized wing using a different airfield that gives it less coverage. Transport air wings flying air supply missions can only use state and hub supply, and can’t draw themselves on air supply. | |||
===补给不足 的 影响=== | |||
==== 地 面单位==== | |||
= | [[File:Supply-001.png|alt=An image highlighting where to find the details of a unit's supply footprint|thumb|Here we see the supply footprint of the Soviet 72ya Div. Note that the base supply cost (0.77) is a product of its various battalions and support companies, but that it’s been modified up by a blizzard, and down by the supply skills of the army and army group commanders.]] | ||
The amount of supply a division requires for full supply is based on a range of elements, including the line battalions, the support battalions (logistics battalions reduce overall supply use), weather and the capabilities of their commanders. | |||
If a division is below full supply, a faded or bright red crate icon will appear on its on-map icon, and on its icon in the list of divisions in the army. To get a precise look at a division’s supply status, hover over the icon in the army division list to bring up the tooltip. A division’s supply will move towards the amount that can be supported in the province, whether that’s up or down. So, for example, if a division moves from a province where it is 100% supplied, to one where it is 50% supplied, for the first hour in that new province it will still have 100% supply, and then the division’s supply state will go down as its stored supply runs down to 50%. | |||
[[File:Supply-039.jpg|none|thumb|Here, the 27ya Division is in a poor state, with just 10% supply status (and only 9% stored supply, which will increase to 10% as long as the province supply for the division doesn’t drop).|链接=Special:FilePath/Supply-039.jpg]] | |||
There are significant penalties for being out of supply to a range of unit characteristics. Note that there can be a delay between a low supply state being reached and the full penalty kicking in. Unit characteristics impacted by low supply, with the impact increasing as the supply state deteriorates, are: | |||
* Speed | |||
* Max organisation | |||
* Org regain speed | |||
* Attack (with a higher max penalty for units defending (-50%) than units attacking (-20%)) | |||
* Breakthrough (for units attacking) | |||
* Defence (for units defending) | |||
* Attrition - if a unit’s level of supply drops to 35% or less, it will begin to take supply-based attrition, increasing the amount of equipment the unit uses by increasing amounts the further supply drops. | |||
[[File:Supply-040.jpg|none|thumb|600x600px|The impact of the 27ya Division’s low supply state significantly reduces its movement speed – if it wasn’t for the base game speed of 1km/hr, the speed of the division would be even lower.| 链接=Special:FilePath/Supply-040.jpg]] | |||
[[File:Supply-042.jpg|none|thumb|600x600px|Here, the somewhat undersupplied British attack the very undersupplied Italians – note the impact on attack and breakthrough/defense of the units on both sides of the combat.| 链接=Special:FilePath/Supply-042.jpg]] | |||
| | Being in a low supply state also has an impact on how quickly manpower reinforcements arrive. As long as a division has a connection to the capital via a continuous path through friendly provinces, ports and/or convoys, manpower reinforcements will arrive - although at very low supply levels they can take a long time. Note, however, that the speed of equipment resupply is not affected by a division’s supply state (but if a division has low supply they will experience constant attrition for as long as this is the case, which may prevent a division from reaching its full equipment levels). | ||
| | |||
| | |||
| | |||
If a division is cut off from the capital, even if it is in full supply due to occupying a victory point or another source of state supply, or due to air supply, it will not receive manpower or equipment reinforcements. | |||
Note that fuel works a bit differently to manpower or equipment. Like manpower and equipment, if a unit is cut-off from their capital, it won’t be replenished. Like manpower, the rate of fuel resupply slows if a unit is not fully supplied. However, unlike manpower, fuel supply stops entirely once the supply state is sufficiently poor. Air supply does not impact fuel supply, so even if a unit can trace a line of provinces to its capital and is fully air supplied, if it doesn’t have enough state or hub supply it may not receive fuel resupply. | |||
[[File:Supply-041.jpg|none|thumb|600x600px|In the screengrab on the left, the 53<sup>rd</sup> (Welsh) Infantry Division is at a very low supply status, and it’s going to have to wait nearly a month to be brought back up to strength. In the screengrab on the right, the division has moved into a better-supplied province, and the replenishment is going to happen much sooner.|链接=Special:FilePath/Supply-041.jpg]] | |||
=== | ===== Stored supply/supply grace ===== | ||
Supply grace and stored supply refer to the same thing, which is the amount of supply greater than 100% that will be stored by a division if it is in a fully supplied province. The amount of stored supply for a division can be seen towards the bottom of the tooltip that comes up when hovering over a division’s name in the Army UI element, as per the example below. | |||
== | The base amount of stored supply that a division can accumulate is 150%. The rate at which it drops varies, but it should enable a division to operate for 2-3 days at full supply efficiency even if the province it is in is not fully supplied, before the stored supply drops below 100%. | ||
[[File:Supply-043.jpg|none|thumb|Here the French 25<sup>th</sup> Infantry Division has accumulated its full amount of stored supply.|链接=Special:FilePath/Supply-043.jpg]] | |||
For special forces divisions some technologies can increase the length of supply grace. This can be further extended for Marine divisions if they are lead by a general with the “Amphibious”. The extra supply grace provided is described in terms of hours, but this is only broadly indicative, as the rate of reduction in stored supply can vary depending on the situation the division finds itself in. | |||
[[File:Supply-045.jpg|none|thumb|Two of the special force technologies can increase supply grace for special forces divisions. The final tech in the tree increases the stored supply in special forces divisions by roughly (it may vary depending on actual conditions) 48 hours.|链接=Special:FilePath/Supply-045.jpg]] | |||
[[File:Supply-044.jpg|none|thumb|A general with the “Amphibious” trait can give marine divisions a very helpful extra 240 hours (more or less, depending on the division’s circumstances) of stored supply. Note that it can take some time to build up to this level of stored supply.|链接=Special:FilePath/Supply-044.jpg]] | |||
====空中单位==== | |||
An air unit’s supply is based on the level of supply in the province containing the airbase. If an air unit is flying a mission and is not at 100% supply, it will have a malus on efficiency due to its reduced supply level. It is important to bear in mind that if supply falls below a threshold, the air unit will also not receive enough fuel, reducing mission efficiency even further. | |||
[[File:Supply-047.jpg|none|thumb|Due to some rather questionable British army deployment orders, the supply to the airbase in South-West England is only sufficient to give 72% supply to the air wing operating from there.|链接=Special:FilePath/Supply-047.jpg]] | |||
[[File:Supply-046.jpg|none|thumb|Looking at the tooltip for the air unit from the example above, we can see that the impact of being at 72% supply is a 28% penalty on mission efficiency.|链接=Special:FilePath/Supply-046.jpg]] | |||
====海军单位==== | |||
For naval units, being less than fully supplied impacts directly on spotting efficiency and repair speed, but it also reduces the rate of fuel received, which depending on the fuel situation can have an impact on their efficiency in combat as well. It is worth bearing in mind that naval units have access to the full amount of potential supply from the hub they're drawing supply from (rather than being limited by what the province can support as well, as per land and air units), so it is far, far less common for naval units to be undersupplied than it is for land or air units. | |||
[[File:Supply-048.jpg|none|thumb|600x600px|In these two screengrabs, the situations are identical except that the British (green) fleet on the left-hand side is at 57% supply, and the British fleet on the right hand side is at 76% supply. Note (as highlighted) that the detection chance has increased with the greater level of supply.|链接=Special:FilePath/Supply-048.jpg]] | |||
===盟国补给=== | |||
By default, you can draw supply from your allies’ supply hubs, and your allies can draw supply from your supply hubs. Note, however, that if you’re fighting on allied territory, you can’t use the state supply system. Allied divisions share hub supply with divisions of the host country, but the host country divisions will probably be a bit better supplied as they’ll be able to access whatever state supply is available as well. | |||
[[File:Supply-049.jpg|none|thumb|Supply-049 – Here, the US task force and the US divisions in Dover draw supply from the British hub, as does the British task force there and a few other British divisions off-screen.|链接=Special:FilePath/Supply-049.jpg]] | |||
[[File:Supply-050.jpg|none|thumb|750x750px|On the left, the US divisions in Dover only have access to hub supply, while on the right, the British divisions there have access to both hub supply and state supply, and so are able to maintain a higher supply state.|链接=Special:FilePath/Supply-050.jpg]] | |||
While the AI won’t do this, if you want allies not to be involved on a particular front, it’s possible to toggle off supply for allies on a hub-by-hub basis. To toggle supply for allies off (or back on) for a particular hub, click on the hub, and then select the blue flag to the left and above the supply hub symbol (see examples below). | |||
[[File:Supply-051.jpg|none|thumb|750x750px|On the left-hand side, the supply hub is still providing supply to allies. By clicking on the button with the blue flag on it, the situation changes to that on the right, where allies can no longer draw supply from the hub. Notice that there’s a small “do not enter” (red circle with a line through it) on the actual supply hub icon as well. Bear in mind that allied supply has to be turned off hub-by-hub – for Britain to completely deny allied supply in Dover, for example, supply needs to be turned off at the hubs in London, Portsmouth and the nearby port to the north.|链接=Special:FilePath/Supply-051.jpg]] | |||
{{Mechanics_Navbox}} | {{Mechanics_Navbox}} | ||
[[ | [[ 分类: 军事]] | ||
[[en:Logistics]] | |||
[[fr:Logistics]] | |||
[[ | |||
[[ | |||
2023年8月10日 (四) 16:53的最新版本
- 有关1.11版本前的后勤系统,请参考本页面的历史版本。
在钢铁雄心4中,后勤是指将战斗人员(增援)和装备送到需要的地方去,以此来支持作战部队,同时确保作战单位所在地的补给水平足够他们有效率的行动。其中最重要、最复杂的元素就是在1.11版本(“巴巴罗萨”补丁)大改的补给系统。
补给
|
|
这部分内容可能已不适合当前版本,最后更新于1.11。 |
补给本身并不是生产出来的,省份的补给水平代表了对作战部队的“支持限度”(可以把它看成是一种柔和的单位堆叠限制)。每一个陆战单位自身也有一个内部的补给状态,和其所在省份的补给水平相独立,但两者之间也有关连。
一个省份的可用补给来源于三个不同的部分:“补给中心补给”、“空投补给”和“地区补给”。
补给中心的补给是通过补给网络从一个国家的首都运输到此国前线作战部队的。而补给网络则由补给中心、港口、铁路和运输航线构成。
空投补给是由执行空投任务的运输机提供的,仅对其空投的空域有效。
地区补给则是指每个地区都有的一个固定的补给量,所有作战单位都可以从所在地区中获得补给(如果是一个还没有被某一方所完全占领的地区,该地区的补给则由占领的数方部队共享)。
- 值得注意的是,即使一个作战单位能从补给中心获得所需的全部补给,他依然会从所在地区的补给当中抽取一部分。实际上,他们会优先使用地区补给,其次使用补给中心的补给,最后才使用空投的补给。
只要作战单位所需的补给总量小于所在省份能提供的补给量,那么这些作战单位就能完全补给。相反,则这些作战单位将承受惩罚。
下面将会详细介绍。

补给情况在游戏中主要通过供应地图模式显示。在默认设置下,可以通过按下"F4"键或在屏幕右下角选择补给地图模式图标来访问此模式。
补给地图通过不同的着色来展示每个省份的供应状况。这些颜色渐变使得同时查看数百个省份的补给情况时也能一目了然。
- 亮(浅)蓝色:有大量可用的补给
- 深蓝色:有少量可用的补给
- 紫色:有少量或没有可用的补给,但该省份的部队没有受到低补给的影响。
- 黄色:该省份的部队补给供应部分不足,但仍有足够的补给让部队不至于受到严重的debuff。
- 亮红色:该省份的部队补给供应严重不足,它们正遭受重大的补给相关惩罚。

The tooltips in the supply mapmode are invaluable, and hovering over different items shows different information:
- Unit: Unit supply draw, and where it’s coming from.
- Supply hub: Amount of supply requested of the hub, and highlights the railroad connection to the capital. Holding down the Shift key will show the range of the supply hub (at that time – range can change with weather).
- Port: Amount of supply requested of the hub, and shows paths to any ships that may be drawing Hub (but not State) supplies from the port. Holding down the Shift key will show the range of the supply hub (at that time – range can change with weather).
- Province: Total and available supply in a province. Holding down the CTRL key will also show a breakdown of where the hub supply is coming from.


后勤
补给中心
Hub supply is the amount of supply provided by supply hubs or ports (which act as supply hubs, as well as ports). There are three elements to be mindful of when looking at hub supply:
- The total draw on the supply capacity of a supply hub.
- The range of a supply hub, and the amount of supply from the hub in a given province.
- Provinces received supply from all hubs in range.
In most situations, at time of writing, the most common supply issues are based on insufficient supply in a given province, rather than insufficient total hub supply capacity.
Total hub supply capacity
The total supply hub/port capacity is based on the connection between the hub/port and the capital, and for ports, the level of the port (both where the convoy departs, and where it arrives).
A level one railway connecting a hub to the capital provides 15 maximum supply from that hub, while a level one port connected to the capital by a railway also provides 15. However, a level one port connect to the capital by a convoy rather than by a rail connection has a base supply capacity of 20. Note that if the convoy route supplying the port is raided, the amount of supply provided will be reduced until the route has recovered its capacity.
For supply hubs, the base capacity increases for each additional level of rail connection to the capital, based on the smallest rail level at any point in that connection (so, for example, if there are three stretches of track, two at level 2, and one at level 1, the connection is considered to be a level 1 connection – to upgrade it to a level 2 connection, the level 1 stretch of track would need to be upgraded to level 2). Each level of rail connection increases the supply of a hub by 5, to a maximum of 35. if connected by river, the supply hub is considered to have a level 1 connection.
One exception to this is the capital supply hub, which has its capacity set at a base of 5 and then supplemented by the amount of civilian and military factories, and naval dockyards, in the nation. For ports, the base capacity for ports connected via convoys increases by 5 for each level of naval base, up to an effective maximum of 35 (or 65 if your capital has a port), as the amount of supply sent by convoy can never exceed the rail connection to the departure port.
Hub supply range
Supply hubs provide supply to each province based on a number of factors, the most important of which is the number of provinces between the province being supplied and the supply hub, with this being modified by the level of the rail connection to the supply hub from the capital, the level of infrastructure, terrain, and the weather.

Improving supply hub range
Outside of aerial supply, improvements to the level of supply in a province over the course of a game will almost entirely be due improvements in the amount of hub supply provided. The four means by which hub supply can be improved are by:
- Increasing the level of motorization of a hub or army.
- Increasing the level of the rail connection to the hub.
- Increasing the level of infrastructure in the area.
- Building a new supply hub.
Note that the first three methods (motorization, increase the rail connection level and increasing the level of infrastructure) all stack on top of each other - so a an un-motorized supply hub in a state with level 1 infrastructure and a level 1 rail connection would have the shortest possible supply range, while a fully motorized hub with level five infrastructure and a level 5 rail connection would have the longest possible range.
It's very important to bear in mind that hub supply falloff works increases significantly for every extra province distant from the hub, port or capital - so while it is possible to extend hub range, individual changes may be relatively small, and it will often take a substantial investment to increase range enough to push it out to the next province from the hub.
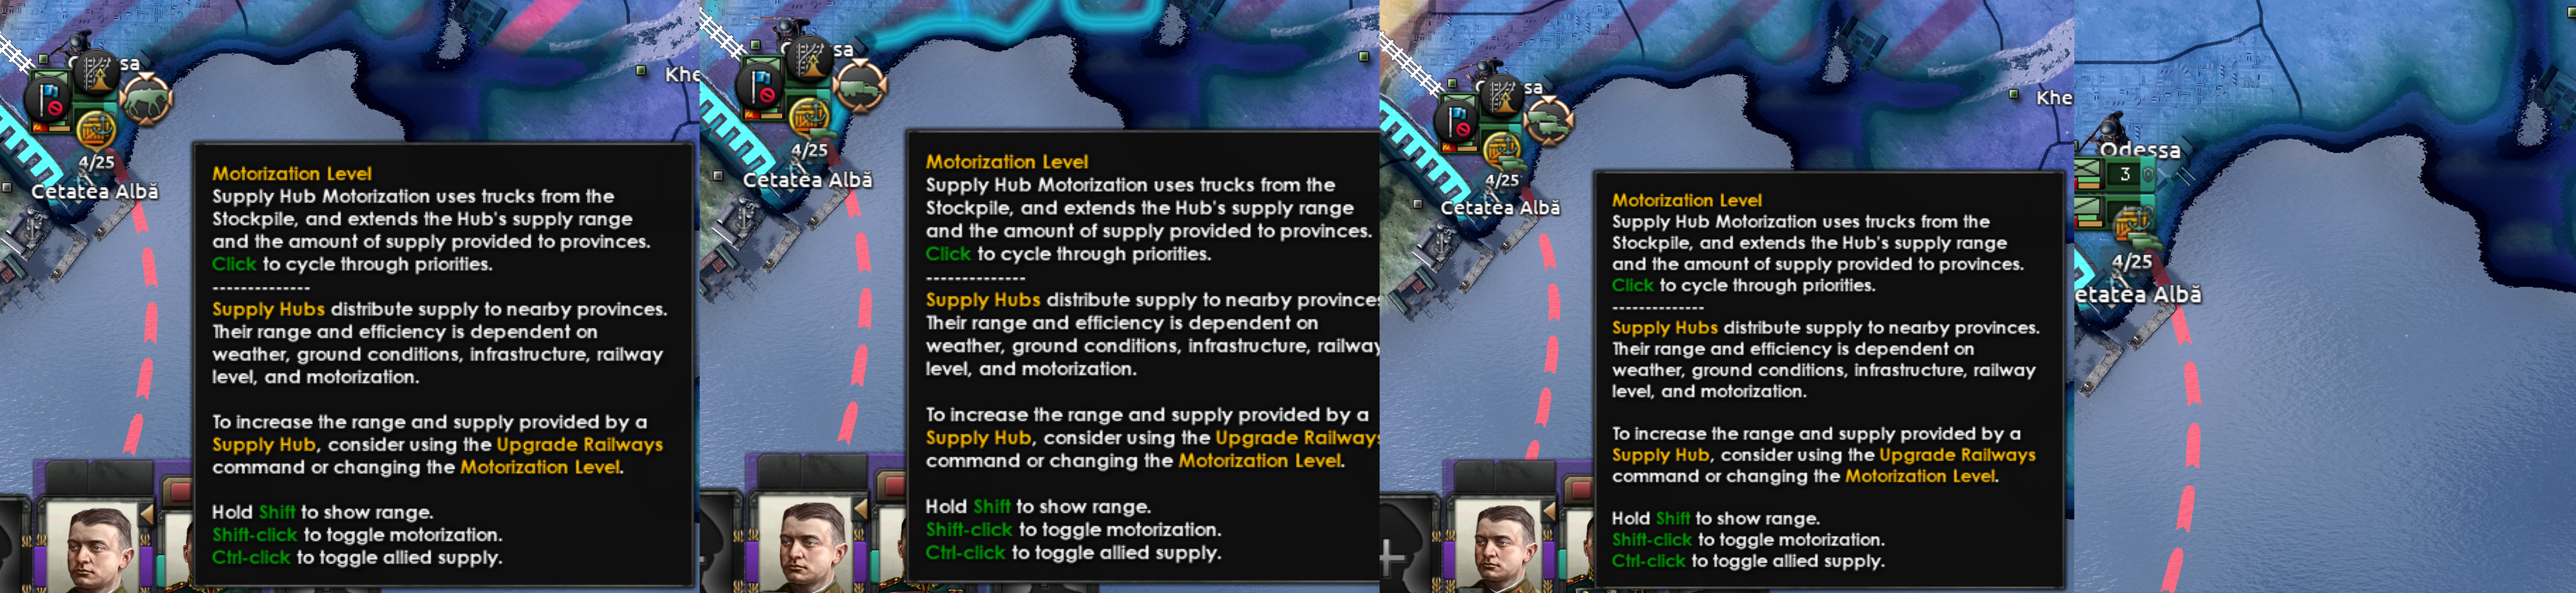
摩托化
By default, each supply hub is set to “not motorized”, indicated by a horse. This can be improved by two different tiers of motorization, by clicking on the appropriate icon (see example below). Once a hub is motorized, one or two small trucks (depending on the level of motorization) will be visible as part of the supply hub icon (a green truck or trucks indicates that the hub has been directly motorized, while grey truck(s) indicates it has been motorized by a nearby army – more on that below). Note that trucks assigned to motorization of supply hubs, whether directly via hubs or by selection the motorization options for armies, do not consume fuel or manpower.
Depending on motorization level, each hub needs 0, 40, or 80 trucks (icon symbols: horse, one truck, two trucks).
These trucks take attrition, which is increased in poor terrain and weather, and they can be subject to air attack from enemy aircraft assigned to the logistical strike mission.
The other way to achieve hub motorization, is to assign it at the army level. This automatically toggles the level of motorization set for the army on hubs that are in range of where the army is drawing supplies from. This has the advantage of reduced micromanagement of hub motorization levels, but it can lead to fluctuating demands for troops, as the number of hubs in range of the army changes over time. See the three screenshots and their captions below for an example of this in action.
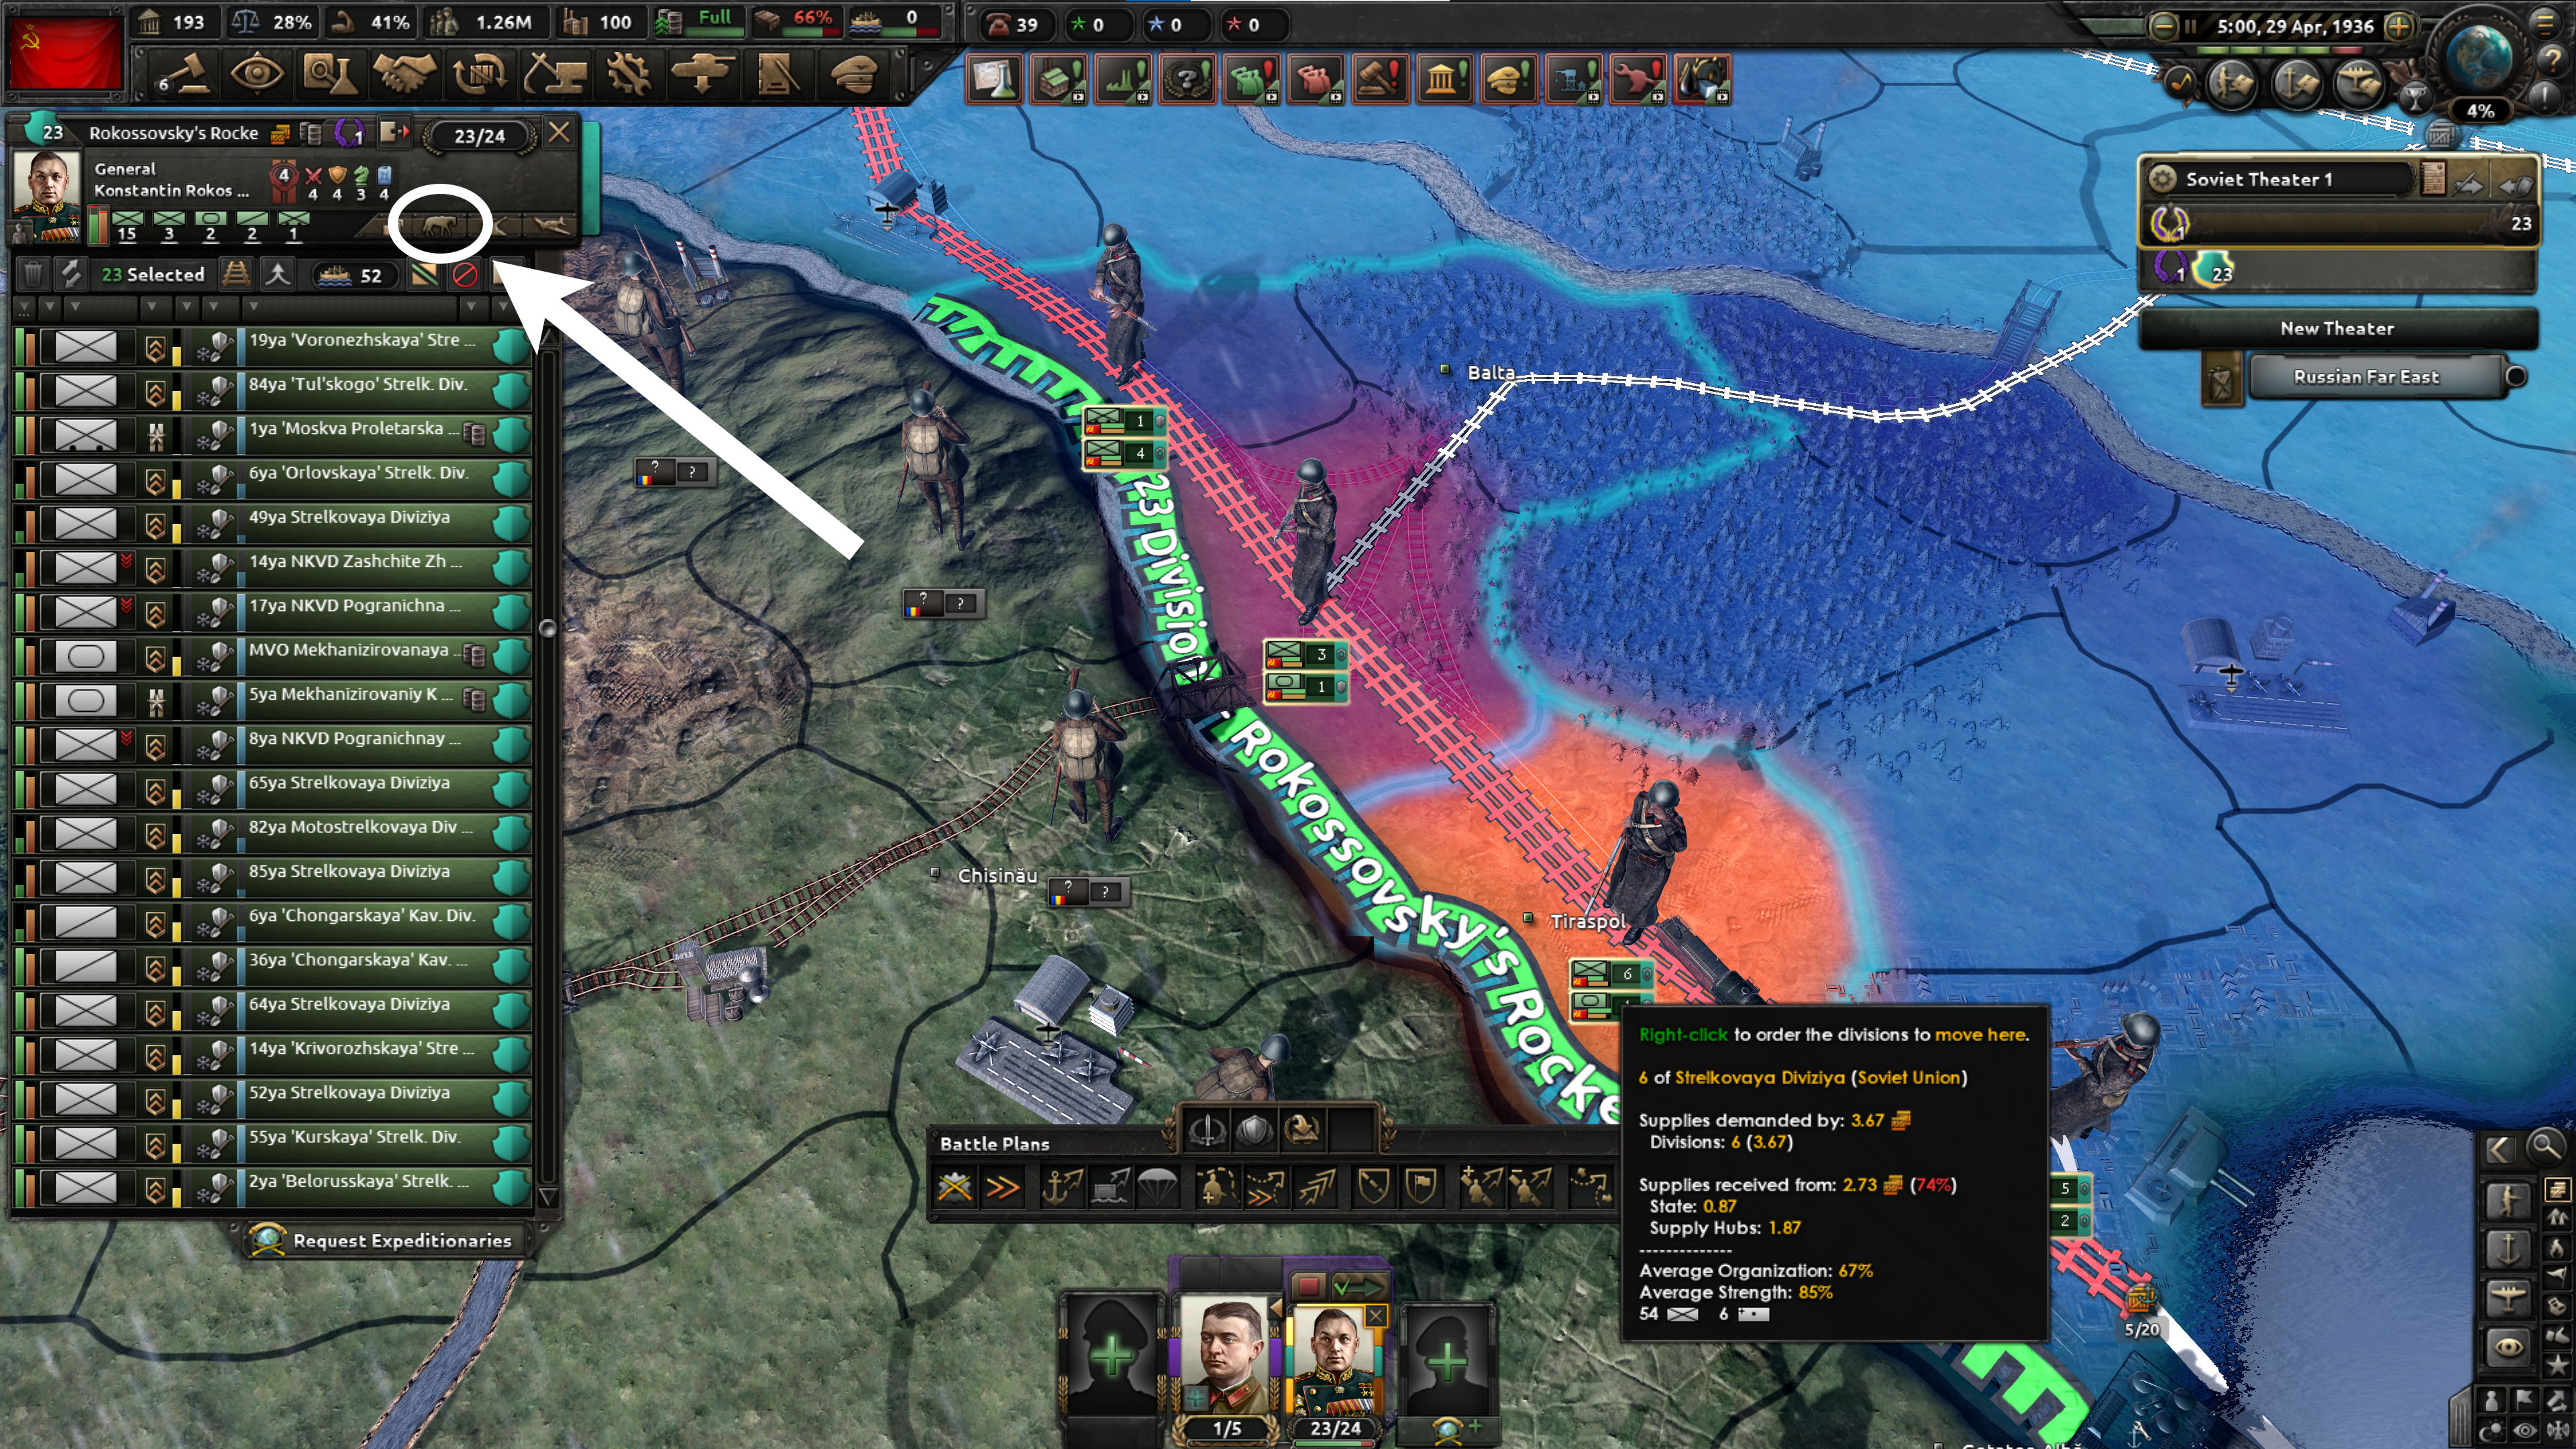
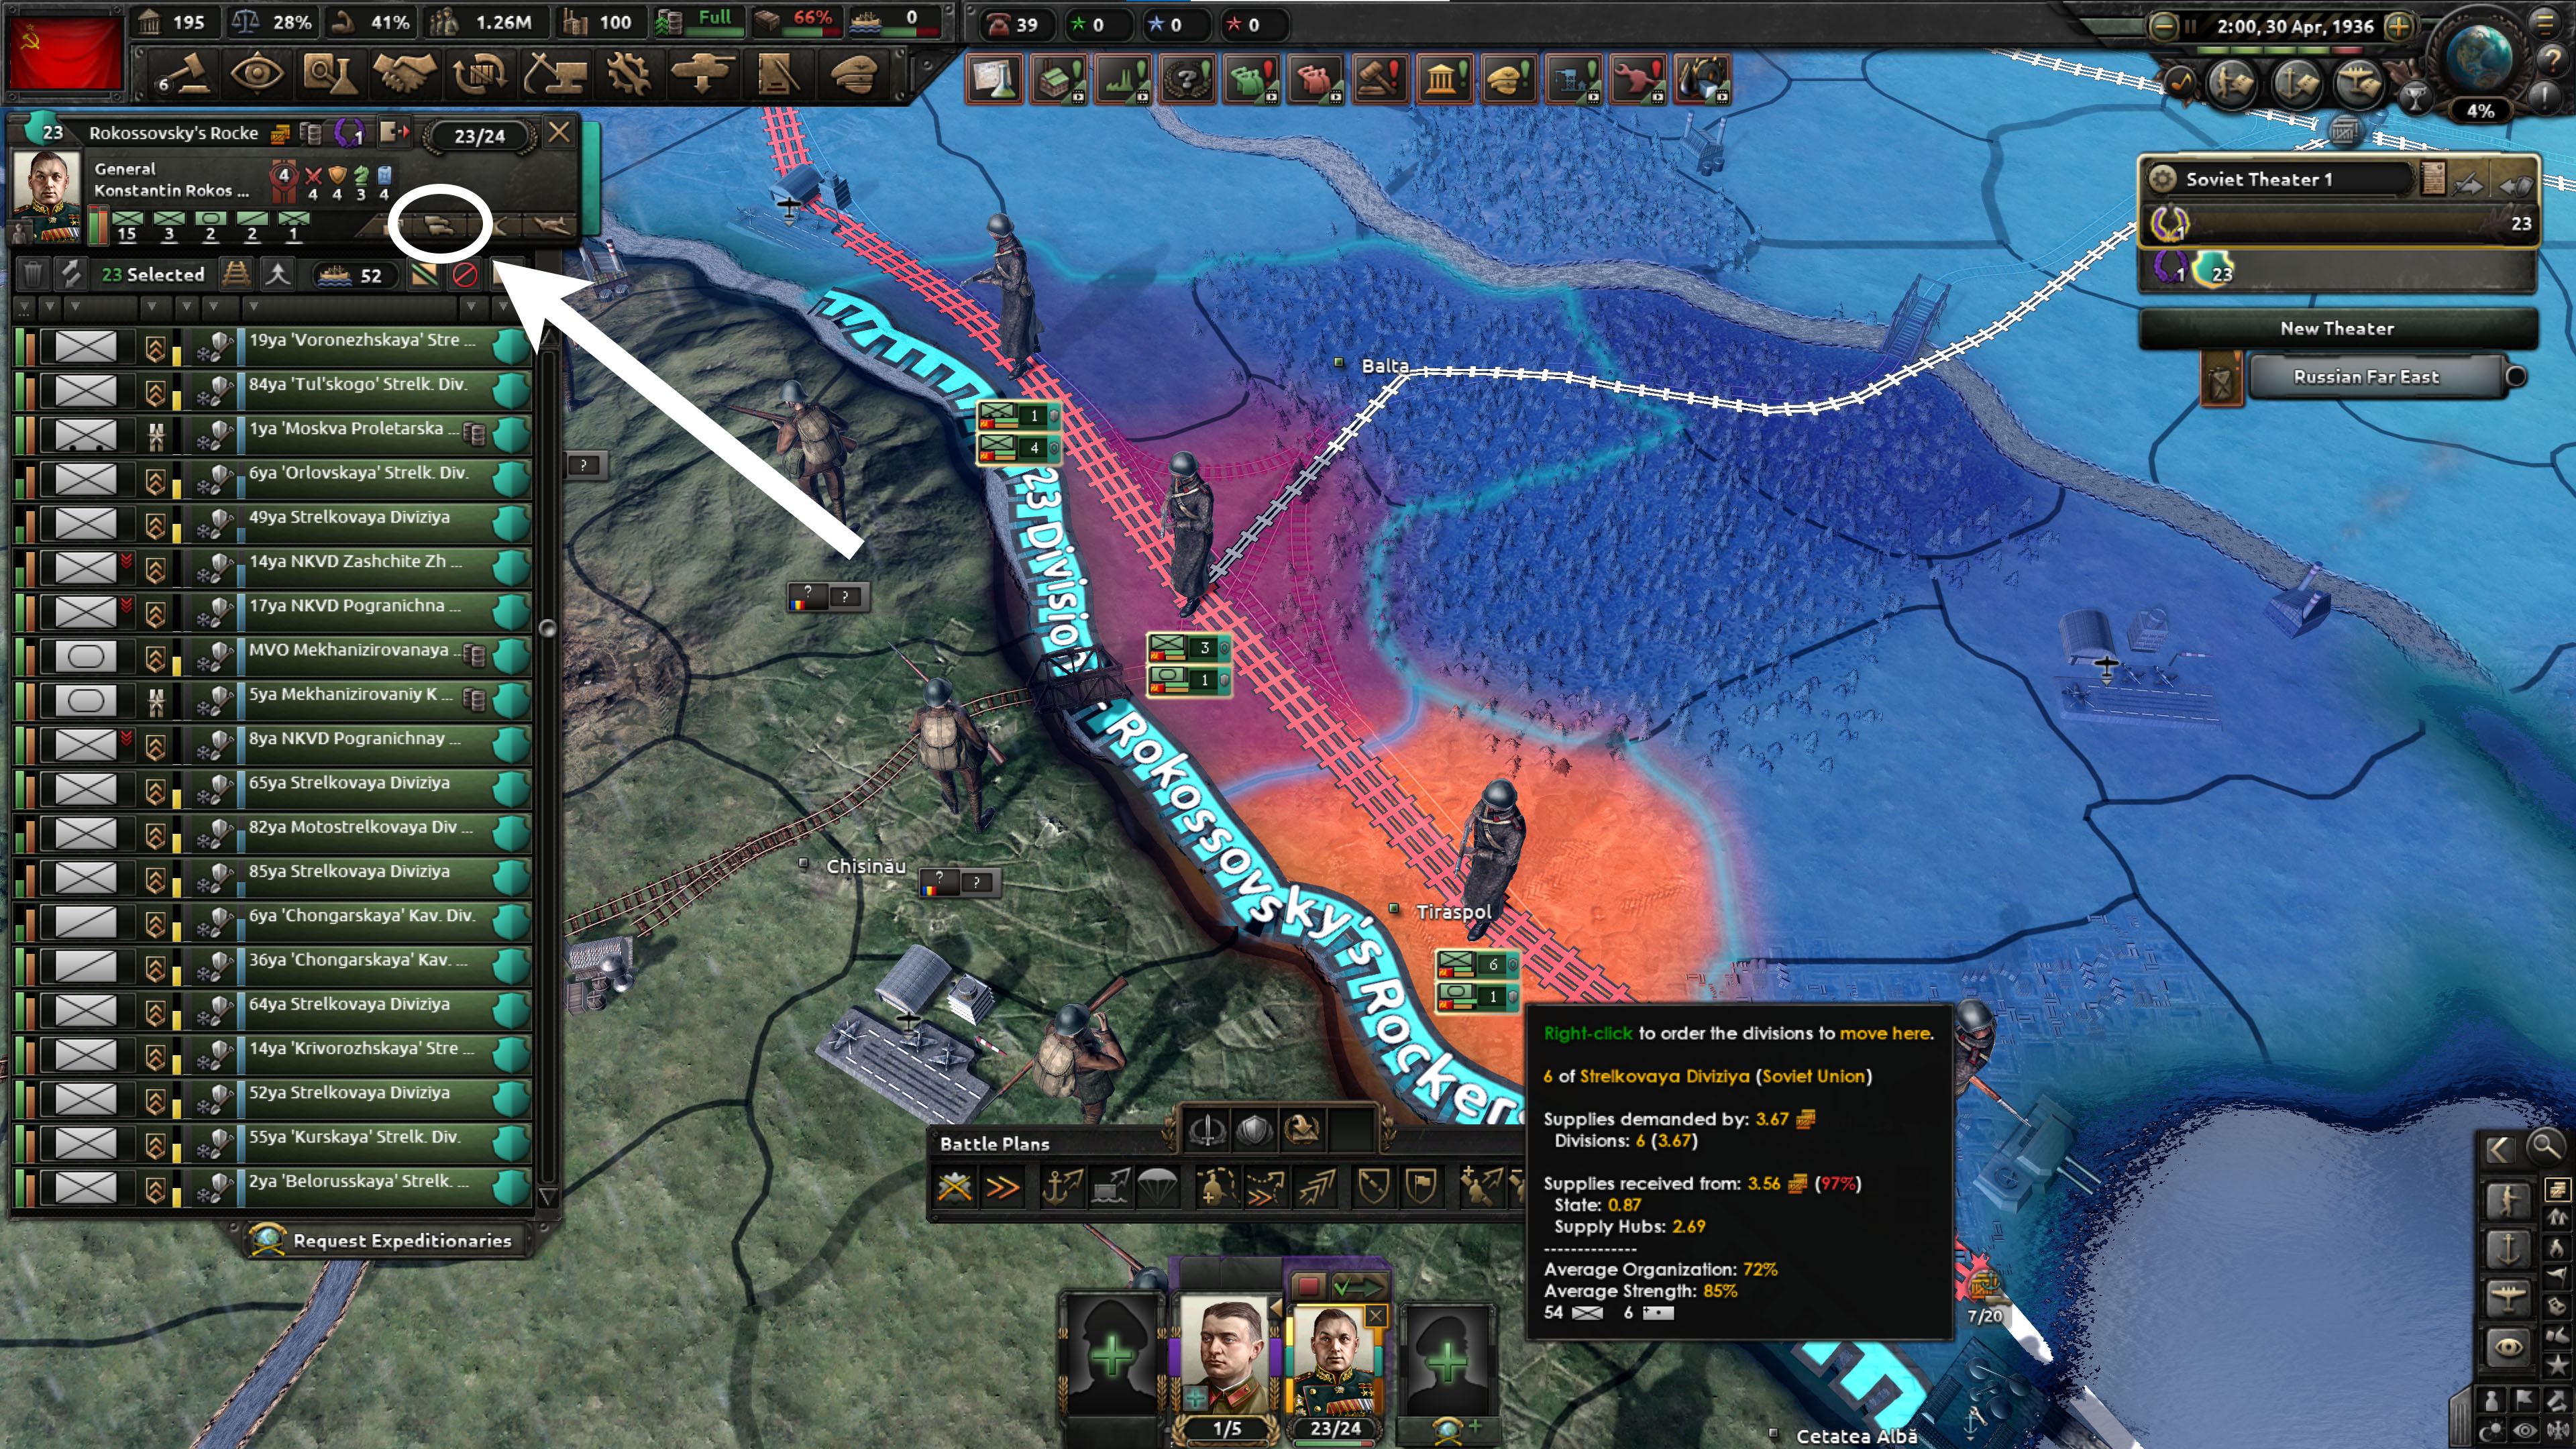
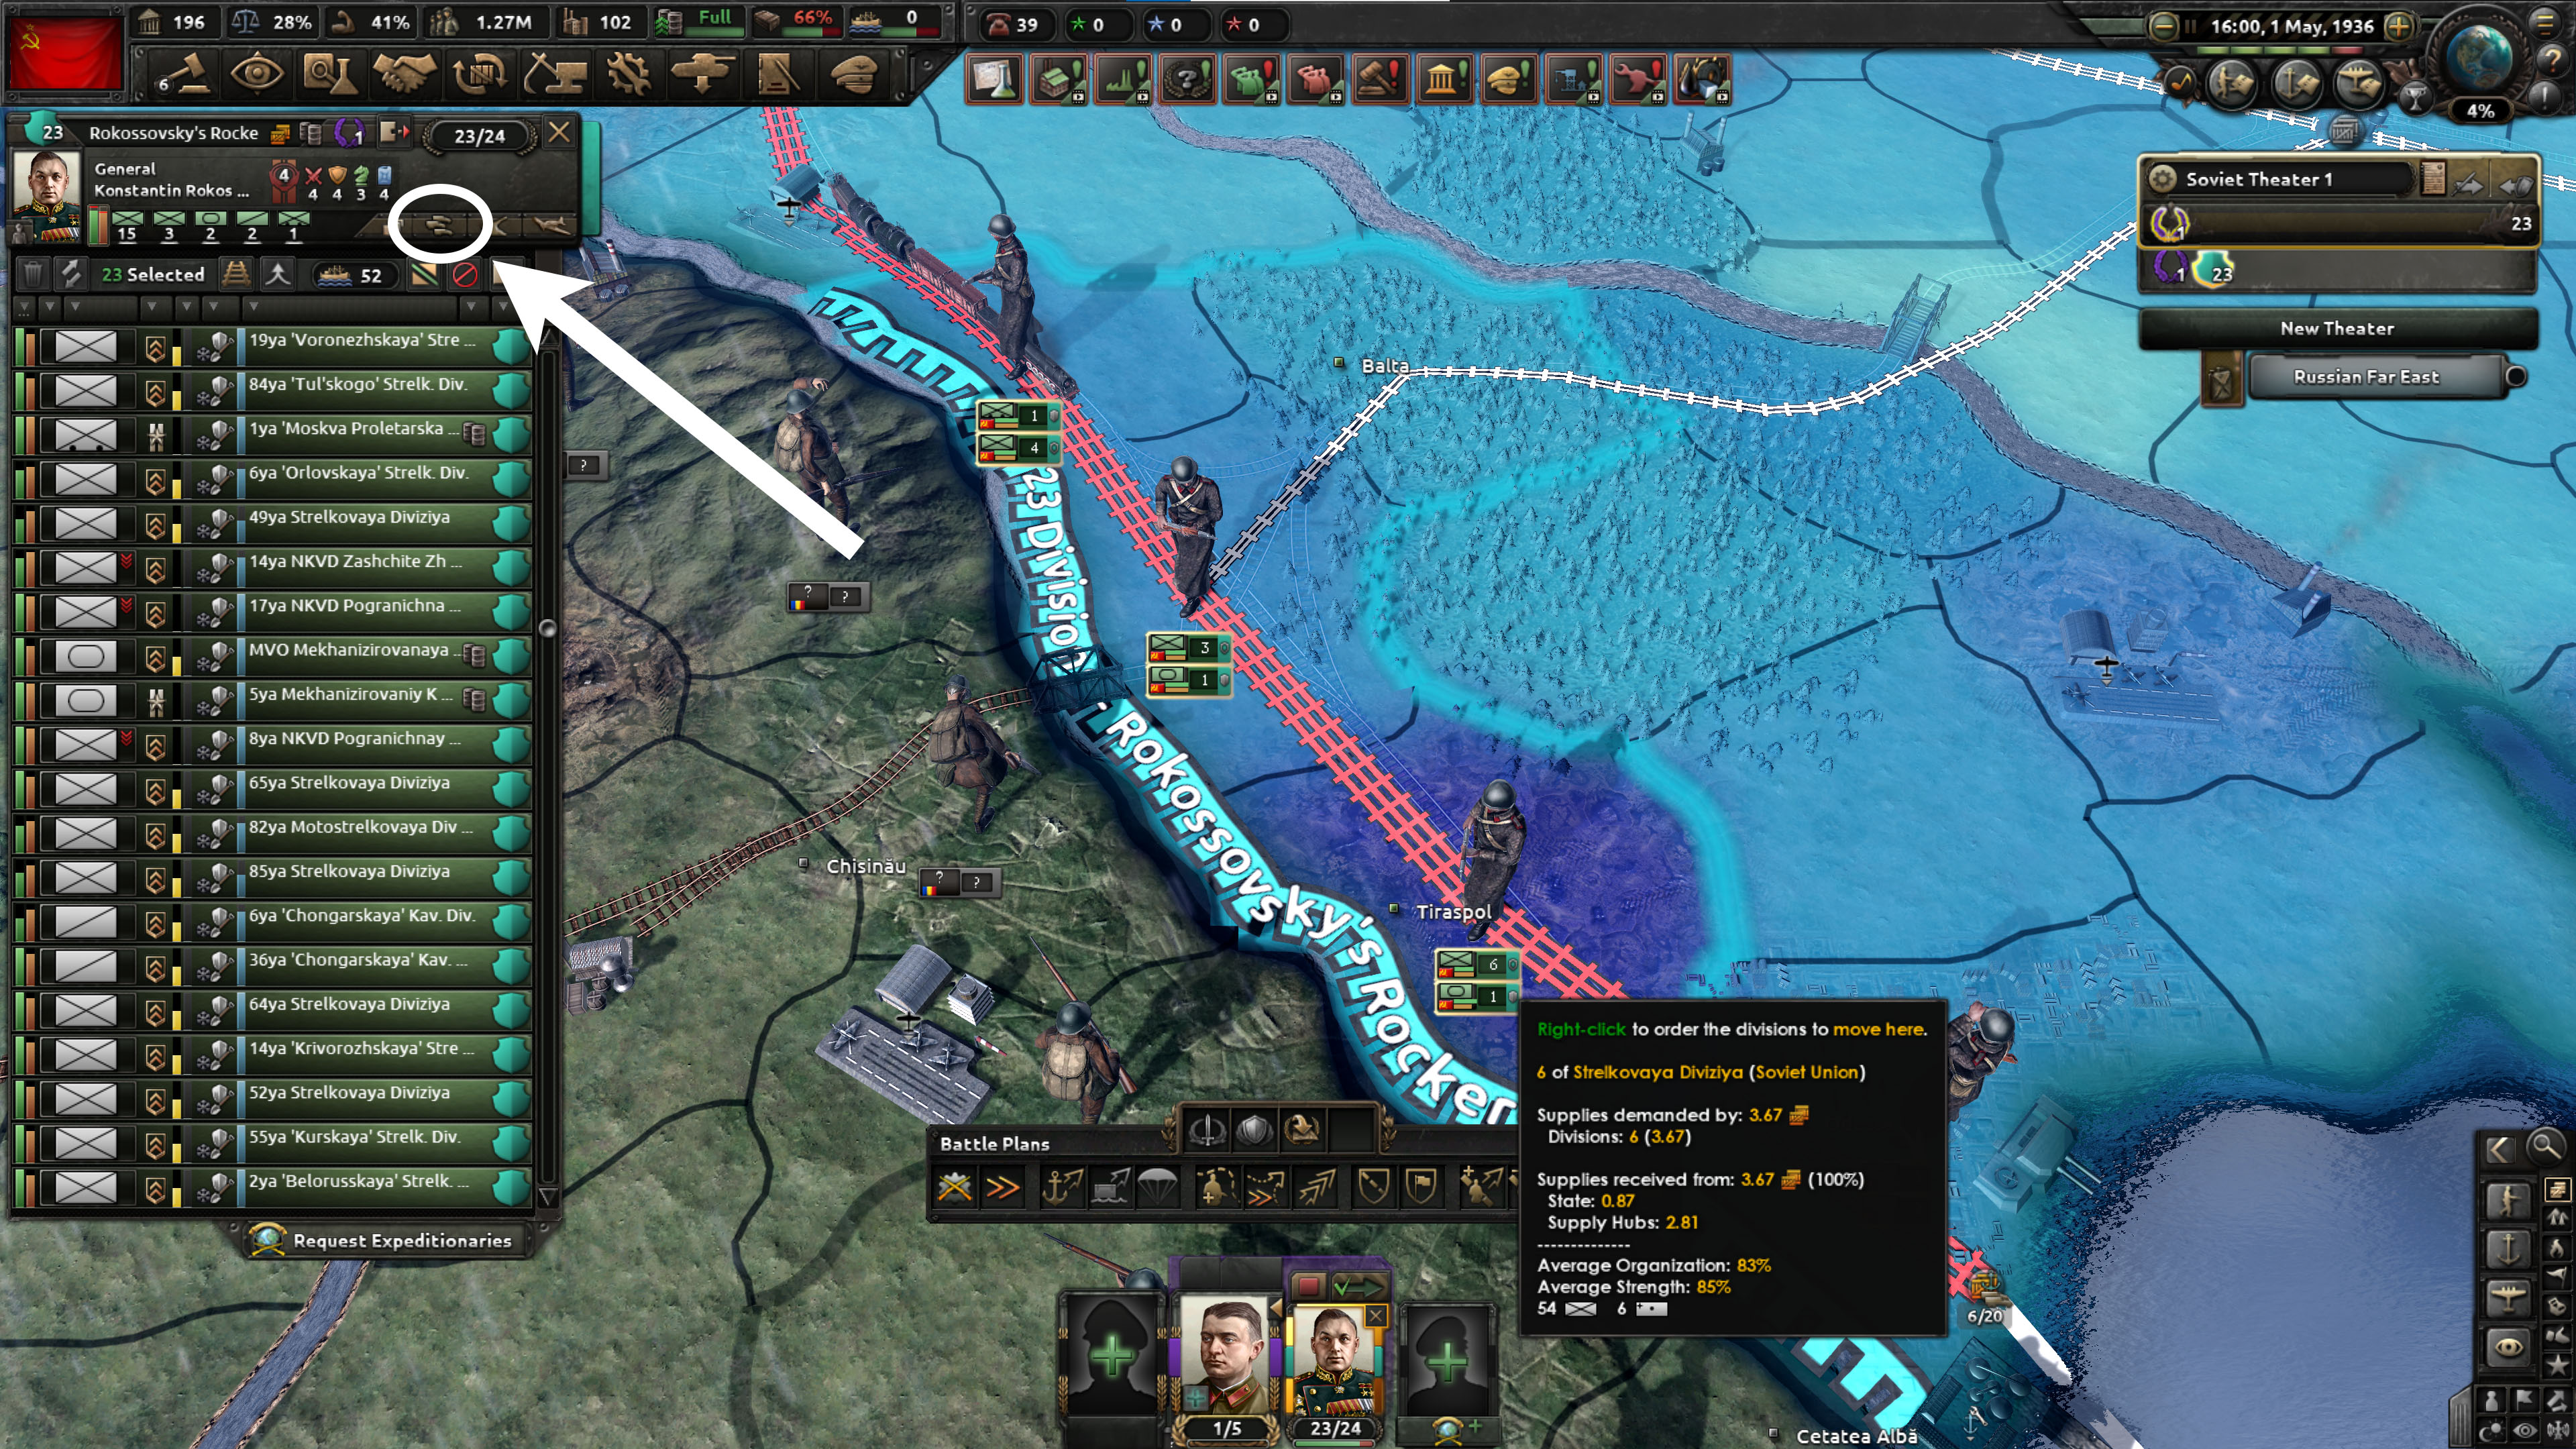
Note that the full benefits of motorization will only be received if sufficient trucks are available. If more trucks have been assigned to support hubs than are available, then the benefits will be reduced, in proportion to the shortfall in trucks.
提高铁路等级
After motorization, increasing the level of the rail connection is the next most powerful and often (but it depends on how far the supply hub is from your capital by rail) the next quickest.
Each tile of railway costs 170 CIC, +130 CIC for each existing railway level (to a maximum of level 5), so it’s relatively quick and cheap to lay a level 1 railway down, but a long level 5 railway is a serious industrial undertaking. For example, as per the table below, the total CIC to build a railway from nothing up to level 5 is 2,150 CIC per province (170 + 300 + 430 + 560 + 690), adjusted for any construction bonuses and infrastructure effects on construction speed.
| Rail level | 1 | 2 | 3 | 4 | 5 |
|---|---|---|---|---|---|
| CIC cost | 170 | 300 | 430 | 560 | 690 |
Actually building railways can be done in a number of ways:
- Selecting the supply hub, and then clicking the middle (top) of the three icons that appears. Each click of this will add another level of railway to each province on the rail connection to the capital (so, for example, three clicks on a hub connected by a level 2 railway will put construction orders in to upgrade it to the maximum level).
- Opening up the production interface, and selecting the “Railways” button, and then clicking on one of the white numbers in a black circle on a rail connection between two hubs – this will place construction orders to increase the rail level between the two hubs by one level. Each extra click will place construction orders to increase it by a further level.
Each additional level of rail will increase the size of the total amount of supply in the hub, which means the amount of supply flowing from the supply hub outwards is also increased. In some cases can mean provinces with no hub supply at all will receive some hub supply, although as noted above, the increasing size of "supply flow drop-off" the further from a supply hub means that extensions in range are likely to be limited.
Bear in mind that railways are also useful for strategic redeployment, and the higher the railway level, the faster troops will strategically redeploy.
建造新的补给中心
If it looks like it’s not cost-effective, or possible, to get hub supply from existing hubs, it is also possible to build new supply hubs. On the coast, ports act as supply hubs, and are considerably cheaper (5,000 CIC for the first level of the naval base, with a further 1000 CIC added to the cost for each subsequent level). Inland, however, supply hubs need to be used, which require 20000 CIC (modified by any construction speed and infrastructure construction bonuses).
Both ports and supply hubs are constructed using the construction interface, shown in the screenshot below.
Both ports and supply hubs can be constructed in the territory of allies, and of subjects.
If it can trace a path using convoys, other ports, and railways back to the capital, a port will be supplied by sea without needing a rail connection.
A supply hub will also require a connection to the capital, traced via rail or river. Connection via a river is instant, and will be made if the new supply hub is connected via a river (bordering the province containing the supply hub) to either the capital, or another supply hub or port in a province bordering the same river.
To connect a new supply hub with a rail connection, open the construction interface and select the “railways” option, and then click on a province with a railway that is connected to the capital, and then click on the province with the new supply hub. The level of the railway constructed will be the same as that of the level of the railway in the province that it’s extending from, but this can be manually adjusted down or up levels (as long as the railway hasn’t been built yet) using either the construction list (the +/- buttons on the railway in the list) or on the supply map (left-click on small number (underneath the crossed hammers) on the railways under construction to increase the level, and right-click to decrease the level).
Railways can be built in controlled, allied or subject territory at any time, and do not need to wait for a supply hub to be completed (or even started).
提高基础设施等级
Higher levels of infrastructure also allow supply from a hub to reach further, by reducing the drop-off in supply flow from the hub (to a maximum reduction in drop-off of 0.3 for level 5 infrastructure). Note that the level of infrastructure that matters is the level of infrastructure for state containing the province from which the supply is flowing. So, for example, if there are two states, a level five infrastructure state with a supply hub bordering a level one infrastructure state, the supply flowing from a province in the level five infrastructure state to a bordering province in the level one infrastructure state will flow as if it was level five infrastructure. However, supply flowing from a province in a level one infrastructure state to another bordering province in the same level one infrastructure state, will flow as if it was level one infrastructure.
As is the case for other ways to extend supply hub range, the increasing amount of supply drop-off as the distance from the hub (counted in provinces) increases means that any increases are likely to only be at the margins (ie, perhaps an increase of range of one province).
Be mindful that each level of infrastructure costs 6000 CIC – such that four levels of infrastructure in one state cost more than a new supply hub.
火车
To run at full efficiency, supply networks need trains for rail connections, similar to the requirement of convoys for naval connections, with the amount of trains related to the amount of hub supply required from each hub. The train requirements for a hub can be seen in the tooltip for that hub.
Train requirements for the network as a whole can be found in the logistics tooltip, which can be brought up by hovering over the logistics icon at the top of the screen (it looks like a crate with a percentage next to it). If there are less trains than the network requires, there will be a reduction in hub supply available to divisions drawing it.
Trains are not subject to attrition, but they can be destroyed by air attack from enemy aircraft using logistical strike.
As well as the base model train, two other train models can be researched over the course of the game. One is an unarmoured “austerity” train – which does the same job as the base model, but at a cheaper price (50 MIC instead of 70). The other is an armoured train, more on which below.
装甲火车
Armoured trains are a special type of train that is more resistant to enemy Logistics Strike air missions. If you have armoured trains available in your inventory, they will automatically be used before other train types. Armoured trains have a significantly higher production cost of 105 MIC, so are much more expensive than the starting train and more than double the cost of the austerity train.
占领铁路和补给中心
As a front advances into enemy territory, enemy-held rail lines and hubs may come under friendly control. While rail lines may or may not need repairing (rail can be damaged by strategic bombing, or by your opponent using scorched earth before they lose control of the state), they won’t be available for use right away in most situations. When capturing a railroad on territory that is not your core, the cooldown until the railroad can be used is 10 days, while it’s 5 if the territory is a core state, and there is no cooldown if the war is a civil war.
Rail conversion time
A newly-captured hub will only be functional once it is connected by “converted” railroads, and it won’t be connected until every province has had the required number of days under friendly control to convert. There is no conversion time, however, for supply hubs.
天气和terrain
Both weather and terrain have an impact on the supply system - the tables in the weather and terrain pages on the wiki provide the figures for the various supply impacts for different terrain/weather states. Things to be mindful of when thinking about the impact of terrain and weather are:
- There are two weather effects:
- The Supply Factor reduces the flow of supplies from a supply hub (in-effect, reducing its range) acting as a percentage reduction on the supply flow into a province [to be confirmed]. These effects can stack if, for example, a region has a ground condition of deep snow and a weather condition of blizzard - deep winter conditions like this can substantially reduce the range of hub supply for the duration of those weather/ground conditions.
- The Supply Consumption Factor increases the supply use of a division. Both of these elements can be in play depending on the particular circumstances.
- There is one terrain effect:
- The Supply Flow Penalty Factor. This changes the supply fall-off in hub supply when moving away from the hub, and is added to other reductions in supply flow. This isn't a percentage figure, but rather a direct change (usually reduction, but it actually is an increase in urban areas) in the supply amount as it relates to the figures shown for hub supply in the province tooltips.
地区补给
Unlike hub supply, state supply is a fixed amount of supply provided within a state, based on four things: victory points, infrastructure, population and something called ‘base supply’, which is a fixed amount of extra supply in a state. While state supply from population and infrastructure will be in every (non-impassable) state, a few states don’t have victory points, and many states have no base supply.

A state with a victory point in it will get 0.2 state supply from this, and then a further 0.05 supply for the total VP value of the victory points in the state (so, for example, a state with one 1-point VP, and one 5-point VP, would have 0.5 supply from VPs, made up of 0.2 base and 0.3 from 6 VPs in total in the state). See the table below for some examples:
| VP | 50 | 20 | 15 | 10 | 5 | 3 | 1 |
|---|---|---|---|---|---|---|---|
| Supply | 2.70 | 1.20 | 0.95 | 0.70 | 0.45 | 0.35 | 0.25 |
Infrastructure provides 0.3 per level of infrastructure, as long as the infrastructure is undamaged (see the table below for infrastructure values) – if damaged, however, the amount of state supply provided by infrastructure is reduced until the damage is repaired.
| Infrastructure level | 5 | 4 | 3 | 2 | 1 |
|---|---|---|---|---|---|
| Supply | 1.50 | 1.20 | 0.90 | 0.60 | 0.30 |
Population adds supply on a diminishing scale from 0.01 supply per province in a state of 30.000 people, to 4.25 supply per province in a state with 23.6 M people. Converted to per 1 million people, the scale slides from 0.3 supply per million sparsely populated states to 0.18 supply per million in very densely populated states (e.g. Chinese states).
State supply is evenly distributed to all the units that are in the state (including air and naval units), before other sources of supply are used. Given this, it’s important to be mindful that while there might be enough state supply to support any units outside of hub range, those units will still have to share that state supply with units drawing supply from hubs or ports.
Understanding state supply is essential to understanding how the supply map mode “heat map” works – as unlike hub supply, the shading of each province on the heat map takes into account that total amount of state supply available for the whole state - but once that state supply is used elsewhere in the state, the available state supply for other provinces is reduced accordingly. Checking an area to see whether the heatmap shading is due to mostly hub or state supply will provide a clearer indication of the effective supply in the province if more forces are moved into the state in other provinces. Please see the example provided by the two screenshots below for a bit more detail.
Contested states
If control of a state is split between two countries at war with each other, the amount of state supply will be split in two. Hub, population and infrastructure elements will be allocated based on the proportion of the state’s provinces owned by each side, while state supply from victory points is provided to whoever owns the provinces containing those victory points.
空投补给
The final of the three pillars of the supply system is aerial supply. Aerial supply is provided by transport aircraft flying “Air Supply” missions. Like state supply, the total amount of supply provided via this is available in any province in the air zone in which the air supply mission is flown (regardless of whether it is in range of the transport aircraft or not). However, unlike state supply, air supply is drawn last, so units only draw on air supply if they cannot meet their full supply requirements from state and hub supply.
As is the case for any air mission, the mission efficiency will reduce the amount of supplies that can be provided, and efficiency can be impacted by a range of elements, including weather, the supply status of the squadron performing the mission, and the relationship between the size of the air zone and the range of the squadron. At 100% mission efficiency each fully supplied transport plane flying in good weather is capable of providing 0.2 supply per plane.
The supply requirements for an air wing are determined by the amount of supply they are able to provide via their mission efficiency – so all else being equal, a wing of transport aircraft that can cover a greater proportion of the air zone will provide more air supply than the same sized wing using a different airfield that gives it less coverage. Transport air wings flying air supply missions can only use state and hub supply, and can’t draw themselves on air supply.
补给不足的影响
地面单位

The amount of supply a division requires for full supply is based on a range of elements, including the line battalions, the support battalions (logistics battalions reduce overall supply use), weather and the capabilities of their commanders.
If a division is below full supply, a faded or bright red crate icon will appear on its on-map icon, and on its icon in the list of divisions in the army. To get a precise look at a division’s supply status, hover over the icon in the army division list to bring up the tooltip. A division’s supply will move towards the amount that can be supported in the province, whether that’s up or down. So, for example, if a division moves from a province where it is 100% supplied, to one where it is 50% supplied, for the first hour in that new province it will still have 100% supply, and then the division’s supply state will go down as its stored supply runs down to 50%.
There are significant penalties for being out of supply to a range of unit characteristics. Note that there can be a delay between a low supply state being reached and the full penalty kicking in. Unit characteristics impacted by low supply, with the impact increasing as the supply state deteriorates, are:
- Speed
- Max organisation
- Org regain speed
- Attack (with a higher max penalty for units defending (-50%) than units attacking (-20%))
- Breakthrough (for units attacking)
- Defence (for units defending)
- Attrition - if a unit’s level of supply drops to 35% or less, it will begin to take supply-based attrition, increasing the amount of equipment the unit uses by increasing amounts the further supply drops.
Being in a low supply state also has an impact on how quickly manpower reinforcements arrive. As long as a division has a connection to the capital via a continuous path through friendly provinces, ports and/or convoys, manpower reinforcements will arrive - although at very low supply levels they can take a long time. Note, however, that the speed of equipment resupply is not affected by a division’s supply state (but if a division has low supply they will experience constant attrition for as long as this is the case, which may prevent a division from reaching its full equipment levels).
If a division is cut off from the capital, even if it is in full supply due to occupying a victory point or another source of state supply, or due to air supply, it will not receive manpower or equipment reinforcements.
Note that fuel works a bit differently to manpower or equipment. Like manpower and equipment, if a unit is cut-off from their capital, it won’t be replenished. Like manpower, the rate of fuel resupply slows if a unit is not fully supplied. However, unlike manpower, fuel supply stops entirely once the supply state is sufficiently poor. Air supply does not impact fuel supply, so even if a unit can trace a line of provinces to its capital and is fully air supplied, if it doesn’t have enough state or hub supply it may not receive fuel resupply.
Stored supply/supply grace
Supply grace and stored supply refer to the same thing, which is the amount of supply greater than 100% that will be stored by a division if it is in a fully supplied province. The amount of stored supply for a division can be seen towards the bottom of the tooltip that comes up when hovering over a division’s name in the Army UI element, as per the example below.
The base amount of stored supply that a division can accumulate is 150%. The rate at which it drops varies, but it should enable a division to operate for 2-3 days at full supply efficiency even if the province it is in is not fully supplied, before the stored supply drops below 100%.
For special forces divisions some technologies can increase the length of supply grace. This can be further extended for Marine divisions if they are lead by a general with the “Amphibious”. The extra supply grace provided is described in terms of hours, but this is only broadly indicative, as the rate of reduction in stored supply can vary depending on the situation the division finds itself in.
空中单位
An air unit’s supply is based on the level of supply in the province containing the airbase. If an air unit is flying a mission and is not at 100% supply, it will have a malus on efficiency due to its reduced supply level. It is important to bear in mind that if supply falls below a threshold, the air unit will also not receive enough fuel, reducing mission efficiency even further.
海军单位
For naval units, being less than fully supplied impacts directly on spotting efficiency and repair speed, but it also reduces the rate of fuel received, which depending on the fuel situation can have an impact on their efficiency in combat as well. It is worth bearing in mind that naval units have access to the full amount of potential supply from the hub they're drawing supply from (rather than being limited by what the province can support as well, as per land and air units), so it is far, far less common for naval units to be undersupplied than it is for land or air units.
盟国补给
By default, you can draw supply from your allies’ supply hubs, and your allies can draw supply from your supply hubs. Note, however, that if you’re fighting on allied territory, you can’t use the state supply system. Allied divisions share hub supply with divisions of the host country, but the host country divisions will probably be a bit better supplied as they’ll be able to access whatever state supply is available as well.
While the AI won’t do this, if you want allies not to be involved on a particular front, it’s possible to toggle off supply for allies on a hub-by-hub basis. To toggle supply for allies off (or back on) for a particular hub, click on the hub, and then select the blue flag to the left and above the supply hub symbol (see examples below).
| 政策 | 意识形态 • 阵营 • 国策 • 内阁 • 政府 • 傀儡国 • 外交 • 全球紧张度 • 内战 • 占领区 • 情报机构 |
| 生产 | 贸易 • 生产 • 建设 • 装备 • 燃料 |
| 科研与科技 | 科研 • 步兵科技 • 辅助部队(支援连)科技 • 装甲车辆科技 • 火炮科技 • 陆军学说 • 海军科技 • 海军学说 • 空军科技 • 空军学说 • 工程学科技 • 工业科技 |
| 军事与战争 | 战争 • 陆军单位 • 陆战 • 编制设计 • Army planner • 集团军 • 指挥官 • 作战计划 • 战术 • 海军单位 • 海战 • 空军单位 • 空战 • 经验 • 损耗与事故 • 后勤 • 人力 • 核弹 |
| 地图 | 地图 • 省份 • 地形 • 气候 • 地区 |
| 事件与决议 | 事件 • 决议 |