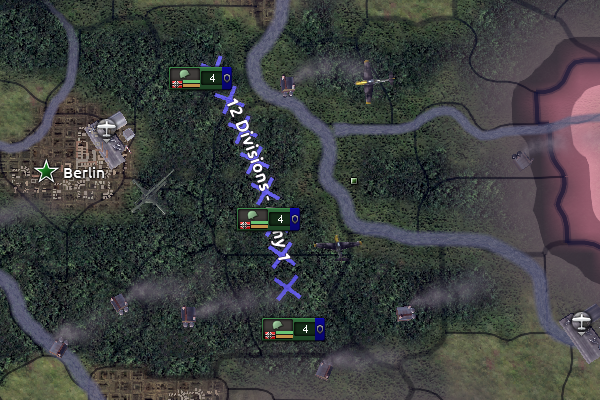
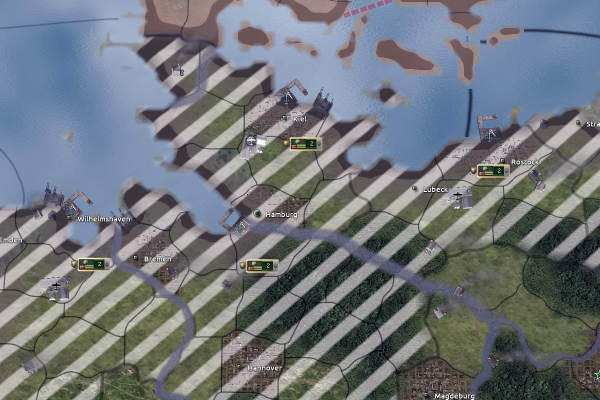
作战计划(Battle plan)是一種能帮助玩家看到他们的部队会如何前进攻重要的工具, 可以让AI控制玩家的部队并授予其计划加成操纵部队并不一定要用计划来执行,但使用它能帮助玩家减少微操以及增加游戏流畅性。
如果有需要的话, 在一个集团军内的不同部队可以被分配至不同的作战计划. 在这種情况下,玩家将需要手动把部队分配至各作战计划中, 否则部队将会被规划到第一条划出的计划。
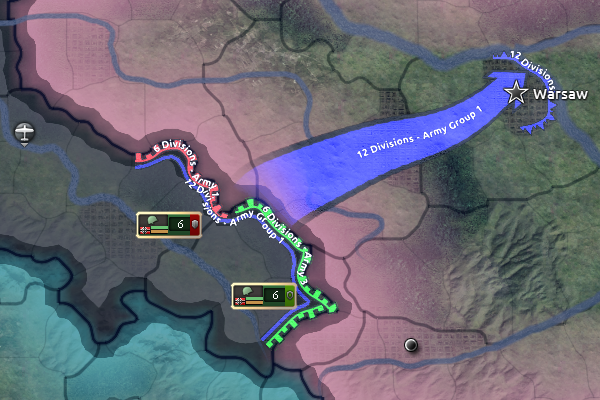
举个例子,如果你要大举入侵意大利的话,你可以在对方忙于在南方作战时的空档创造一个由北部攻击的作战计划,作战的目的是联合南方的军队摧毁敌方军队。玩家可以设置并在合适的时候分批激活一个或更多的登陆/空降以及陆军攻击计划。一些计划也许是计划被同时激活,也可能分批连续激活。 如果要激活特定的计划,只需SHIFT+左键点击该计划就能激活。玩家也能在计划激活前或激活后改变该计划的性质,玩家可以借此吧集团军内不同部分的部队分配到不同的任务中以配合整体计划,就像在二战中不同的陆军军队执行不同的任务一样。你可以选择不用这些功能,但在某些你要同时或分批激活的时刻这些功能是很有用的。
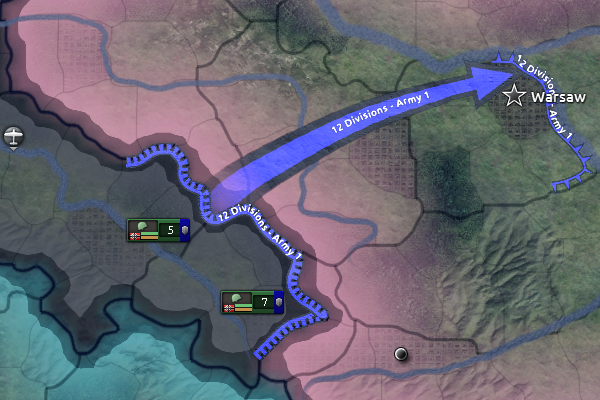
如果玩家要創建陸軍的進攻計劃,首先要創建一條前綫-這是陸軍開始執行計劃的地方。選擇'前綫'安鈕(或者Z鍵),然后再你和對方的國境綫/戰鬥區域上畫一條綫,這條綫代表了你選擇的部隊集結的地方。最后按下'進攻綫'按鈕'(或者X鍵)(圖相是一個箭頭)然后畫一條指示陸軍該由此處往何處進攻的綫。
使用戰鬥計化劃
|
|
这部分内容可能已不适合当前版本,最后更新于1.9。 |
各種戰鬥計劃可以在 戰鬥計劃工具欄 看到,要使用戰鬥工具欄祇要在以經在一個集團軍或其控制之下的部隊就能看到。
這些安鈕分別是
詳細請見 Hotkeys#Battleplan_hotkeys.
用這些按鈕
玩家可以選則戰鬥計劃是被 ![]() 小心懂慎地,
小心懂慎地, ![]() 平衡地 或
平衡地 或 ![]() 激進地 執行
激進地 執行
這些按鈕的用途
將會在接下來的部分介紹。
海軍入侵
![]() 一個海軍入侵是一個在敵方沿海地區登陸并令敵人出其不備然后開啓第二戰場的有力工具。
一個海軍入侵是一個在敵方沿海地區登陸并令敵人出其不備然后開啓第二戰場的有力工具。
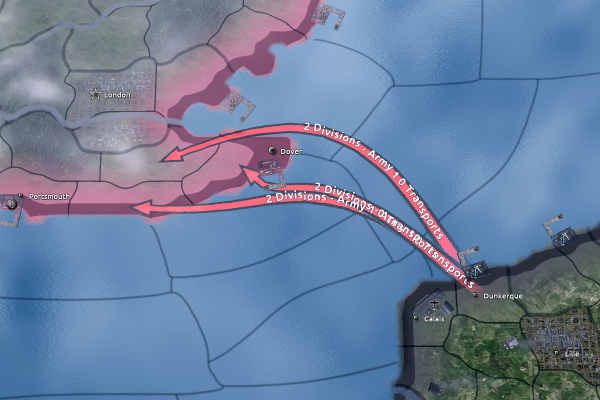
當玩家想要創建一個海軍入侵計劃時,首先要點擊一個有港口的沿海省份作爲出發點。被選擇執行任務的軍隊會在那集結,然后在要入侵的沿海省份上按右鍵就能創建一個入侵計劃。
海軍入侵可以在友軍港口創建,這意味著玩家可以在一個同盟國或擁有军事通行权的國家的港口開始入侵,同時玩家也可以在一個未和敵方國家交戰國家的港口創建并開始海軍入侵。
海軍入侵上限
一個海軍入侵計劃可分配最高的軍隊數量由![]() 海軍入侵上限影響。入侵上限由海軍科技中的“運輸”分支影響。海軍入侵上限的基礎值是0 ,這意味著玩家需要先研究'運輸船'科技才能把部隊分配到海軍入侵命令。
海軍入侵上限影響。入侵上限由海軍科技中的“運輸”分支影響。海軍入侵上限的基礎值是0 ,這意味著玩家需要先研究'運輸船'科技才能把部隊分配到海軍入侵命令。
| 年份 | 科技 | |
|---|---|---|
| 1922 | +10 | |
| 1940 | +40 | |
| 1944 | +100 |
當超過入侵上限數量的部隊被分配至一個海軍入侵命令時將不會有部隊被分配至該命令,顯示入侵命令的箭頭會出現但會顯示“無運輸部隊”和“0運輸船”,被分配到此命令的軍隊旁會出現一個! 紅色驚嘆號 以顯示他們沒被分配至任何命令。
一個國家的入侵上限是由部隊數量計算而不是部隊戰鬥寛度或重量決定,因此你能用更強的部隊來執行大規模海軍入侵。
準備時間
海軍入侵需要時間準備,準備時間由運輸科技和部隊輸量決定。如果玩家擁有第一級的運輸科技(運輸船), 一個部隊將會花上7天去準備而10個部隊將花費70天,而擁有登陸艇科技(1940)將能把準備時間減半。
無論部隊是否到達開始入侵的港口計劃都會開始準備。
玩家也可以由多個港口計劃入侵同一個沿海省份,反而逆之。
運輸船
你需要足夠運輸船來運輸部隊到陸地無法到達的地區。運輸一個部隊所需的運輸船數量由重量決定(數值如有小數點將會四舍五入),相關科技將會減少所需運輸船.
| 重量 | 0.1 | 0.5 | 0.7 | 1.0 | 1.2 | 1.5 | 1.7 |
|---|---|---|---|---|---|---|---|
| 營 |
|
|
|
|
|
|
|
海軍情報獲取效率
如果玩家要獲得制海權,就要至少有30%的海軍情報。
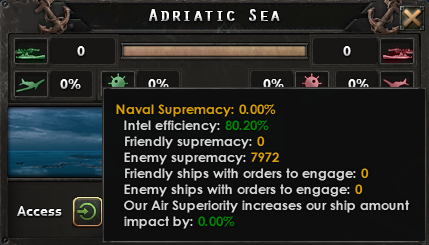
The actual value of naval intel efficiency of a seazone can be seen in the seazone property window, that you get when you click a seazone. You have to hover with the mouse over the naval supremacy bar. Alternatively you can see it, when you hover with your mouse over a seazone in the strategic navy map mode (accessible with the F2 button).
The naval intel efficiency of a seazone is calculated from the intel you have from nations you are at war with and that have ships in that seazone. If you are not at war, you have 100% naval intel efficiency everywhere. If you are at war with one country, you have 100% naval intel efficiency in all seazones in which this country has no ships assigned (the value Enemy supremacy is 0). In the seazones in which the country has ships assigned (Enemy supremacy > 0), the naval intel efficiency is the intel you have of that country. If you are at war with more countries, and more than one of these countries have ships in one seazone, the naval intel efficiency, is weighted towards the country that has more naval supremacy in that seazone.
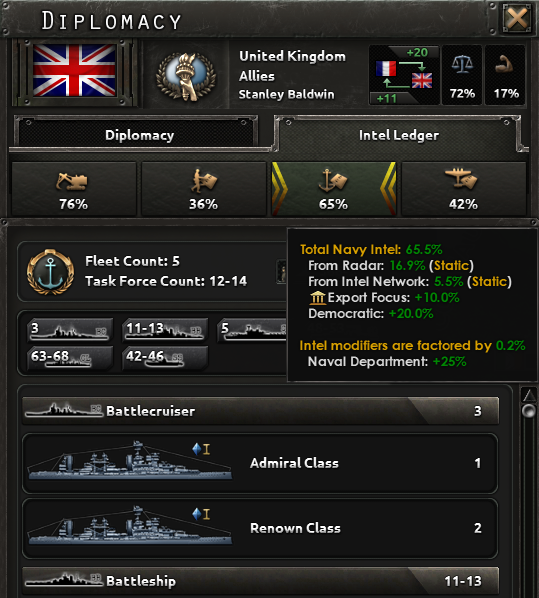
With the DLC ![]() La Résistance, the intel you have of a country, can be seen in the intel ledger of that country. When you hover with the mouse over the naval section of the intel ledger, you see how the navy intel is calculated.
La Résistance, the intel you have of a country, can be seen in the intel ledger of that country. When you hover with the mouse over the naval section of the intel ledger, you see how the navy intel is calculated.
There are several factors that contribute to naval intel efficiency. The naval intel efficiency against a specific enemy country, expressed as a percentage between 0 and 100, is the sum of each of the following factors:
Common factors on naval intel efficiency: (With and without La Résistance)
- Enemy Ideology (Democratic: 20%, Non aligned: 20%, Communist: 12.5%, Fascist: 10%)
- Enemy Trade law (Free trade: 20%, Export focus: 10%, Limited exports: 5%, Closed economy: 0%)
- Radar coverage (Radars that cover any seazone with enemy ships on missions, can provide up to 20% naval intel efficiency. Naval intel gathered per radar is only one value per country, not per seazone. Naval intel about the UK gathered per radar that covers the english channel can provide naval intel efficiency for a naval invasion in the Mediterranean Sea.)
- Fighting the enemy navy (Naval intel gained from naval battles decays by around -0.2%/week.)
Factors on naval intel efficiency only with the DLC ![]() La Résistance:
La Résistance:
- Spy networks (up to 40%)
- Operations (Infiltrate navy 10%)
- Decrypted enemy ciphers (passive bonus 10% and 30 days bonus 50%)
- Intel from faction members (30% of the intel difference)
- Captured enemy operatives.
The Naval Department upgrade to Intelligence agency boosts the naval intel efficiency by +25% of its total value, i.e. it is multiplied by 1.25.
Factors on naval intel efficiency only without the DLC La Résistance:
- Own Decryption level and enemy Encryption level
Own Decryption level 0 1 2 3 Enemy Encryption level 0 0% 30% 45% 60% 1 0% 15% 22.5% 30% 2 0% 10% 15% 20% 3 0% 7.5% 11.25% 15%
Example with the DLC ![]() La Résistance:
La Résistance:
As illustrated by the picture opposite: Democratic ideology (20%), Export Focus trade law (10%), Radar coverage (16.9%) and Spy network (5.5%) adding up to 52.4%, then multiplied by 1.25 from the Naval Department, give the total naval intel efficiency of 65.5% against this particular instance of UK.
Example without the DLC La Résistance:
If you don't use the DLC La Résistance and want to naval invade a fascist country (10%) that has closed economy (0%) and has researched Encryption level 3 and you have Decryption Level 3 (15%) and have no radars that cover any enemy territory: You get a naval intel efficiency of 25% and need to fight their navy to be able to get over the needed 30% naval intel efficiency.
Strategies if it's not possible to get 30% naval intel efficiency:
If there is nothing that contributes to naval supremacy in a seazone (Enemy supremacy is 0), you get naval intel efficiency 100%. A strategy is to finish planning of a naval invasion, send your ships out to get naval supremacy and start the invasion, even if you do not have enough naval intel efficiency. If the enemy is changing orders of fleets you might get 100% naval intel efficiency for a moment. That short moment is sufficient to start the naval invasion.
制海權
|
|
这部分内容可能已不适合当前版本,最后更新于1.9。 |
To execute a naval invasion, a country requires more than 50% naval supremacy (also called 'naval superiority' in some tooltips) in all strategic regions (sea zones) in which the divisions will need to traverse the sea en-route to their destination. These are the regions the arrow of the naval invasion battle plan passes through.
To be able to get naval supremacy, you have to have at least 30% naval intel efficiency.
Naval supremacy of a navy depends on what type of mission it is running, how effective it is on the region, how many ships it has and how large they are. Naval supremacy in a strategic region (sea zone) is the sum of naval supremacy of the taskforces assigned to it.
Naval supremacy by naval missions: [1]
| Mission | Naval supremacy |
|---|---|
| 100% | |
| 100% | |
| 100% | |
| 50% | |
| 50% | |
| 30% | |
| 30% | |
| 0% | |
| 0% |
Larger ships contribute more to naval supremacy. For example the italian early battleship RN Andrea Doria provides 356 naval supremacy on strike force mission. A single Curatone Class italian early destroyer provides 117 naval supremacy on strike force mission. Naval supremacy per ship is calculated as:
- Naval supremacy of ship = 100.0 + 0.005 * ship production cost in industrial capacity (IC) + 0.05 * ship manpower
Task forces with Do Not Engage order do not contribute to naval supremacy.
Air superiority and Minelaying provide a bonus for naval supremacy. Maximum possible bonus from air superiority is +100% to the ship amount, making each ship count for two. It is achieved when air superiority is 100% and there are enough planes to cover 100% of the sea region.
Naval supremacy is only required for a short moment to launch the prepared invasion. After that the invasion will proceed even without sufficient supremacy. Once the naval invasion has been properly planned, naval supremacy and naval intel efficiency has been attained, and sufficient convoys are gathered, the plan may be activated.
海軍入侵途中
正在使用運輸船入侵中的部隊和普通運輸船一樣都能被敵方轟炸機和海軍攔截并攻擊,請利用海軍护航來保護他們,這樣至少能讓對方集結一定力量的艦隊去攔截你的入侵艦隊.
當入侵方的部隊到達海岸并開始登陸始,被入侵方在右方會有一個提醒他/她的圖標和聲音,給對方一個短暫的時間去集結部隊防守入侵.
登陸速度被科技所影響,而且會被對運輸船的攻擊大幅拖延.
登陸作戰
如果一個有部隊在將要被登陸的省份内,一場登陸戰將會開始.因爲需要從運輸船上卸下部隊,所以他們會變的十分粹弱并承受巨大的減益.海軍陸戰隊是一個專門被用來進行登陸作戰的部隊,因此他們受到的登陸懲罰將會大幅減少.
登陸后
確保登陸部隊占領了一個城市省份或者一個帶有港口的省份,不然他們會缺乏補給,登陸后部隊自身的補給能保證72小時内不會獲得缺乏給補的狀態(入侵者特質能確保登陸部隊能有更多的自身補給)
空降
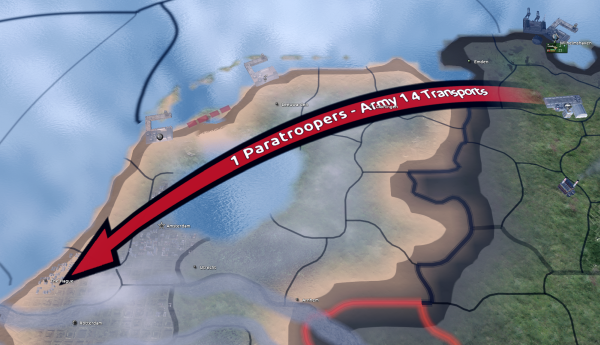
![]() 空降是指傘兵由空中跳傘進入敵方領土的行爲.空降計劃祇能被傘兵和其支援連執行.含有無法空降的營會導致整該部隊無法被空降,通常大多數的營都無法被空降;玩家能在單位設計面板里能看到該類的部隊是否能被空降
空降是指傘兵由空中跳傘進入敵方領土的行爲.空降計劃祇能被傘兵和其支援連執行.含有無法空降的營會導致整該部隊無法被空降,通常大多數的營都無法被空降;玩家能在單位設計面板里能看到該類的部隊是否能被空降
一個空降計劃必須要在一個擁有運輸機的機場開始計劃.確保運輸機的數量等於或大於部隊重量,以及在要在機場到空降的地區擁有70%的制空權才能空降你的部隊.如果目標機場的飛機數量大於上限空降計劃將不會被執行.
雖然鋼4里有空中補給,但還是建議玩家應該盡快招到一個大城市,一個擁有港口的省份或和前綫連結的省份之類的補給點以防止部隊出現缺乏補給的負面效果.鑒於補給點通常是被嚴密防守的,玩家應在一個補給點空降傘兵不久之后開始進攻該補給點.擁有唤醒勇虎DLC的玩家可以用運輸機來爲傘兵(或者被包圍的其他部隊)提供空中補給以此讓他們能長時間作戰.利用傘兵空降進攻會令單位承受巨大負面效果,如果該傘兵部隊空降的省份旁沒有友軍省份能的話該部隊將在進攻失敗時被摧毀.
如果你擁有一個有空中優勢的空域但還是沒法空降的話,也許是你要空降的目標在你的運輸機的最大飛行範圍之外,這會導致你無發空降.大致上可以里解爲這區域里有一個機場如果佈置了運輸機就能到達該目標地點,但你運輸機所在的機場的位置并不能夠到該目標地點.德國到英國南部是個很令人討厭的例子,但在比如南美和太平洋之類的地方都會發生.
Fortunately, you can get around this broken game mechanic by, well, breaking it further. When your para drop order appears on the Air map screen (same place where you assign Air Superiority and Ground Support missions), left-click the order's circular icon (probably looks blank), then right-click reassign your order to an air zone whose central node is closer to your airfield (this will usually, but not always, be the air zone your airfield is located in).
AI永遠不會使用空降計劃.
制空权
和海軍入侵一樣,空降計劃需要70%的當前空域制空權.制空權通常由分配戰鬥機至空域獲得,但非海軍轟炸機和進空支援機都對奪去制空權有幫助.
運輸機
和海軍入侵需要運輸機一樣,空降計劃需要運輸機才能被執行. 和其他游戲内的飛機相反,一個運輸機并不代表一架運輸機,而是一群被需要用來運輸部隊的飛機群.
The amount of transport planes required depends on the weight of the divisions to be transported. Paratroopers battalions weigh 0.5 and paratroop support companies 0.1. One transport plane has a carrying capacity of 2.0, and so could carry a division of 4 para battalions, or 3 para battalions with several support companies. If the air drop order planes total too little carrying capacity for the paratroops assigned, the transports will make several trips to ferry the paratroops, exposing them to more enemy attacks and causing the troops to arrive in separate waves.
Divisions need to be in a province with an airfield with transport planes in order to be able to execute the paradrop.
前綫與進攻綫
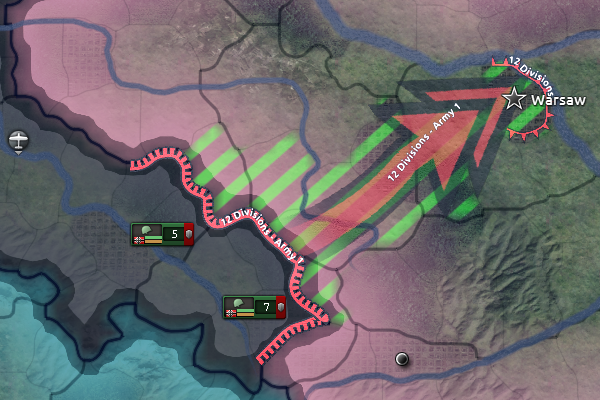
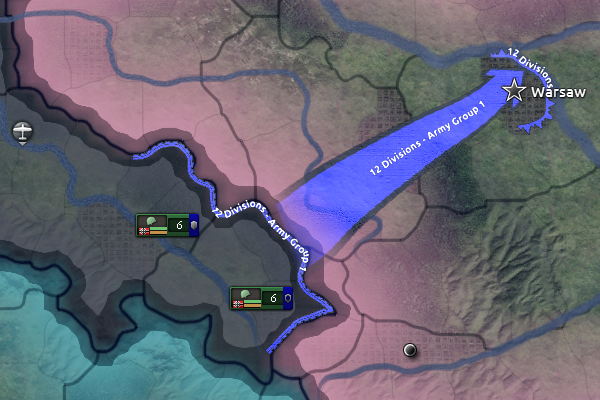
![]() A Front Line is the starting point of attacks into enemy territory. A player can either assign a whole country's border as a front line by clicking on the border or a player can assign a part of a country's border as a front line by holding the right mouse button and dragging the mouse over the provinces the player wants to belong to the front line deployment area. The AI will then move all the divisions into the position that the commander assigns to that front line. They are assigned either by having them selected when the front line button is clicked or added later by selecting them and Control-Clicking on that line. A player can also create several unconnected front lines and assign divisions between them, which may be particularly useful for a field marshal who may command an unlimited amount of divisions conducting various operations in different locations around the world. Divisions that are stationed at a front line that borders a non-ally will receive a planning bonus for their pre-attack preparation time. Front lines can only be positioned at a border, and the front line of battle between opposing forces counts as a border for this purpose.
A Front Line is the starting point of attacks into enemy territory. A player can either assign a whole country's border as a front line by clicking on the border or a player can assign a part of a country's border as a front line by holding the right mouse button and dragging the mouse over the provinces the player wants to belong to the front line deployment area. The AI will then move all the divisions into the position that the commander assigns to that front line. They are assigned either by having them selected when the front line button is clicked or added later by selecting them and Control-Clicking on that line. A player can also create several unconnected front lines and assign divisions between them, which may be particularly useful for a field marshal who may command an unlimited amount of divisions conducting various operations in different locations around the world. Divisions that are stationed at a front line that borders a non-ally will receive a planning bonus for their pre-attack preparation time. Front lines can only be positioned at a border, and the front line of battle between opposing forces counts as a border for this purpose.
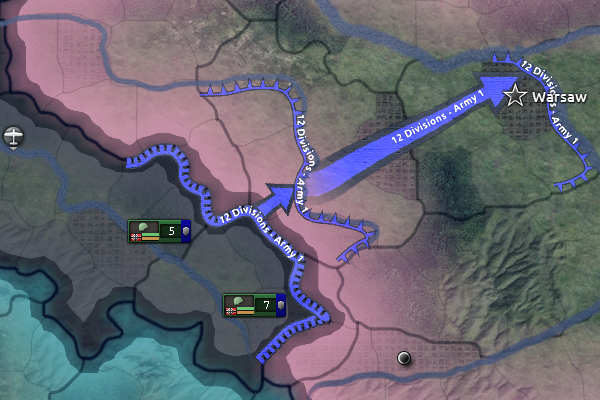
![]() An Offensive Line is a line that a player draws through enemy provinces that contain objectives for the assigned army units to move to and capture. From a front line, or from another offensive line, a player can draw one or several offensive lines or arrows that tell the AI how the player wants the selected plan's divisions to advance from the front line. The width and arc of the offensive line can be adjusted as described on the tooltip. If the mouse cursor is dragged over the offensive line or arrow the game will show the exact visualisation of how the AI will advance the divisions, step for step. ALT for edit mode and TAB to shift the arrow's base can be useful to direct the main effort.
An Offensive Line is a line that a player draws through enemy provinces that contain objectives for the assigned army units to move to and capture. From a front line, or from another offensive line, a player can draw one or several offensive lines or arrows that tell the AI how the player wants the selected plan's divisions to advance from the front line. The width and arc of the offensive line can be adjusted as described on the tooltip. If the mouse cursor is dragged over the offensive line or arrow the game will show the exact visualisation of how the AI will advance the divisions, step for step. ALT for edit mode and TAB to shift the arrow's base can be useful to direct the main effort.
![]() The order to execute battle plans is given with the button above the commander portrait, along with a tooltip that provides information and advice from the staff regarding the battle plan. The AI then executes the battle plan until the troops reach their offensive line which has then become the new front line. If that front line has offensive line orders beyond it then the execute button has to be pressed again to resume the advance from the new front line. Pausing to rest, resupply, refit, regroup, and coordinate further plans was common between phases of a major offensive. This is also a good time to detach troops to consolidate control over occupied territory, which usually involves smaller divisions that specialize in discouraging unrest. The Garrison Area battle plan order is one used in such a situation.
The order to execute battle plans is given with the button above the commander portrait, along with a tooltip that provides information and advice from the staff regarding the battle plan. The AI then executes the battle plan until the troops reach their offensive line which has then become the new front line. If that front line has offensive line orders beyond it then the execute button has to be pressed again to resume the advance from the new front line. Pausing to rest, resupply, refit, regroup, and coordinate further plans was common between phases of a major offensive. This is also a good time to detach troops to consolidate control over occupied territory, which usually involves smaller divisions that specialize in discouraging unrest. The Garrison Area battle plan order is one used in such a situation.
更多關於前綫與進攻綫的例子
More examples for front line and offensive line
穿插线
|
|
只适用于DLC共赴胜利激活时。 |
![]() The spearhead order starts from a front line and can be used alongside or instead of the Offensive Line within an army. Unlike the normal battle plan that spreads out to cover its flanks and adjusts to circumstances, spearheads advance in a narrow path one province wide to their objective, exactly as it was when first defined. This makes them suitable for blitzkrieg-style armored penetrations that can capture a specific goal or work with another spearhead pincer to encircle enemy cities or armies in pockets, sealed in a ring of steel by the mobile and regular infantry divisions following behind. Encircled armies can thus be annihilated, as routed divisions which lack friendly territory to retreat to are destroyed.
The spearhead order starts from a front line and can be used alongside or instead of the Offensive Line within an army. Unlike the normal battle plan that spreads out to cover its flanks and adjusts to circumstances, spearheads advance in a narrow path one province wide to their objective, exactly as it was when first defined. This makes them suitable for blitzkrieg-style armored penetrations that can capture a specific goal or work with another spearhead pincer to encircle enemy cities or armies in pockets, sealed in a ring of steel by the mobile and regular infantry divisions following behind. Encircled armies can thus be annihilated, as routed divisions which lack friendly territory to retreat to are destroyed.
Spearhead (shortcut 'SHIFT + X') may be used only through territory past the attacking army's front line or territory assigned to a naval invasion (tanks rolling off the landing craft into battle). Spearheads follow the exact paths traced on the map by right-clicking and dragging the mouse through successive provinces. This may enable the attacking forces to plan a path that bypasses forts, cities, or other undesirable terrain in order to maintain their momentum.
防守綫
![]() The player can draw fallback lines in controlled territory, and that will tell the AI upon order execution to move and deploy its divisions behind the fallback line in the same manner as with a front line, hold the line against enemy assaults, and counter-attack to restore the position if the line is broken. Unlike front lines, divisions stationed at fallback lines do not receive a planning bonus; however, divisions that are stationed a long time in a province can accumulate an entrenchment bonus while remaining in that position.
The player can draw fallback lines in controlled territory, and that will tell the AI upon order execution to move and deploy its divisions behind the fallback line in the same manner as with a front line, hold the line against enemy assaults, and counter-attack to restore the position if the line is broken. Unlike front lines, divisions stationed at fallback lines do not receive a planning bonus; however, divisions that are stationed a long time in a province can accumulate an entrenchment bonus while remaining in that position.
區域防衛
![]() Defense Area assigns the entire army to guard an area rather than a front line. It is mainly useful for divisions on antipartisan duties or to protect against paratroopers. As the divisions are spread out over one or more states rather than concentrated in a position for defense, this posture is ill-suited near the front line. If part of the area is lost to the enemy, then the garrison units will automatically attempt to recover the lost territory.
Defense Area assigns the entire army to guard an area rather than a front line. It is mainly useful for divisions on antipartisan duties or to protect against paratroopers. As the divisions are spread out over one or more states rather than concentrated in a position for defense, this posture is ill-suited near the front line. If part of the area is lost to the enemy, then the garrison units will automatically attempt to recover the lost territory.
The defense command has multiple subsections (see graphic):
- Protect Victory Points
- Guard Ports
- Guard Coast
- Protect Airbases
- Attempt to Lower Resistance
- Guard Forts
The player can choose which of these he wishes to guard and the UI will tell the player how many divisions the AI considers necessary to satisfy the command. The garrison area order triples the limit of units under a commander to 72 without incurring a debuff. Reducing resistance is best accomplished with an army of security divisions. 2-6 Cavalry battalions plus Military Police make effective security divisions, and require only minimum weapons and training.
A very different type of garrison division is a static division intended for positional defense - its purpose is not to do damage but to entrench and hold as long as possible against enemy attack to provide time for relief to arrive. ORG, DEF, and entrenchment are important, as is piercing enemy armor. This division can be trained infantry with basic weapons, Engineers for defense, and a battalion or company of AA guns (which help against air attack, can pierce light armor, and don't need tungsten to make) or AT guns. It will be fighting alone, so combat width is not important.
計劃加成
|
|
这部分内容可能已不适合当前版本,最后更新于1.9。 |
When a division is at the starting position of an offensive battle plan (i.e. a battle plan containing at least one Offensive Line or Spearhead order) and is neither moving or fighting, it will accumulate a planning bonus at the start of each day, expressed as a percentage, until a maximum planning bonus is reached. This confers greater combat performance for the division.
The max planning bonus for each division (initially capped at 30%), or the rate of daily planning bonus accumulation, can be increased by certain Land doctrine choices and National Spirits. The base daily gain is 2%, so it will take e.g. 15 days to accumulate to the 30% cap. Using a general will also add both to the max planning bonus and the rate of daily planning bonus accumulation. Each point of a general's planning rating will contribute +2% of max planning bonus, and +5% to the daily planning bonus accumulation. However, the +5% to the daily planning bonus is multiplicative to the 2% daily base rate. So for example, when using a general with a planning rating of 4, he will add +8% to the max planning bonus (so 30% + 8% = 38%, assuming no other bonuses), and the daily planning bonus accumulation will be 2.4% (2% * (1 + (4 * 5% = 20%)) = 2.4%). Continuing the example, it will now take 16 days to complete the full planning bonus (38% / 2.4% = 15.8 days).
When a division with a planning bonus is moving or fighting, it will lose some of its planning bonus each day. The planning bonus for a division will decay slowly if the division is being automatically managed by the battle plan AI. If a division is manually commanded by the human player, the planning bonus will decay at a considerably faster rate.
戰術
Since achieving the maximum planning bonus will take a number of days, it may be worthwhile to prepare battle plans during peacetime, so that each division will have a full planning bonus upon the outbreak of war.
If the player wishes to minimise the rate of planning bonus decay, it may be helpful to prepare a complex battle plan containing multiple orders. This can enable divisions to achieve their objectives without requiring manual commands from the player.[2]
Alternatively, the human player can micromanage their divisions, to achieve finer control or the ability to react to changing circumstances. This presents a tradeoff, as planning bonus will be lost more quickly when manual commands are issued.
微操與戰鬥計劃; 支援攻擊
Divisions that belong to a battle plan and receive a manual order will revert back to AI control after implementing the order.
Once combat is joined, the player may select an unengaged division and then Ctrl+right click (or Ctrl+alt+right click) on the combat icon to make the selected division join in a support attack. This allows the division to assist in the attack without automatically advancing the division into the enemy-occupied area upon victory. The battle plan AI may automatically order such a support attack, as well.
戰鬥計劃與盟友
Players can see their allies' battle plans (an option that can be toggled on and off in the lower right corner of the screen). This may help in multiplayer to coordinate with allies and in single player to understand what the AI is doing because AI countries create their own battle plans.
| 政策 | 意识形态 • 阵营 • 国策 • 内阁 • 政府 • 傀儡国 • 外交 • 全球紧张度 • 内战 • 占领区 • 情报机构 |
| 生产 | 贸易 • 生产 • 建设 • 装备 • 燃料 |
| 科研与科技 | 科研 • 步兵科技 • 辅助部队(支援连)科技 • 装甲车辆科技 • 火炮科技 • 陆军学说 • 海军科技 • 海军学说 • 空军科技 • 空军学说 • 工程学科技 • 工业科技 |
| 军事与战争 | 战争 • 陆军单位 • 陆战 • 编制设计 • Army planner • 集团军 • 指挥官 • 作战计划 • 战术 • 海军单位 • 海战 • 空军单位 • 空战 • 经验 • 损耗与事故 • 后勤 • 人力 • 核弹 |
| 地图 | 地图 • 省份 • 地形 • 气候 • 地区 |
| 事件与决议 | 事件 • 决议 |
- ↑ Defines: NNavy.MISSION_SUPREMACY_RATIOS
- ↑ For an example of this, see Zwirbaum's battle plan tutorial on Youtube

