一场海军战斗会由两只特遣舰队在一个特定省份展开,其中一方是攻击者。这种情况通常发生在一次侦察结束或者与敌对舰队进入了同一个省份。由空军联队发起的海军轰炸和港口袭击会触发一场立即解决的海战。否则,战斗将持续到一方完全逃脱或被摧毁。防御方总是全速投入战斗,而攻击方则可能会根据情况而降低效率。
在战斗中,战舰可以独立行动,运输船队通常是抽象的,作为单独的舰船出现。
布局
- 屏卫组: 由屏卫舰组成,从鱼雷的攻击中屏卫战列线和航母群。
- 战列线: 由除了航母的主力舰组成。除了提供强大的火力外,这些舰艇还对航母群进行鱼雷掩护。
- 航母群: 由能远程打击的航母组成。如果有运输船队在场,他们也会出现在这一区域内。* 潜艇狼群:由潜艇组成, 如果对鱼雷防护的屏卫效率不足的话,他们可以威胁到敌方的战列线和航母群。
屏卫效率
| File:Ambox outdated info.png | 这部分内容可能已不适合当前版本,最后更新于1.9。 |
屏卫舰和其他舰船的比例被称为’’屏卫效率’’. 在索敌良好的情况下, 每艘主力舰搭配3艘屏卫舰就可以达到100%的屏卫效率。不好的索敌会对屏卫效率造成惩罚,会增加达到100%屏卫效率的要求。高屏卫效率可以防止敌方鱼雷攻击战列线和航母群,并且提高这些战斗群的命中率(高达 +40%)和撤退速度(高达 +20%)。
能搭载舰载机的主力舰和运输船的的比率被称为 舰载机屏卫效率。在良好索敌的情况下, 当比值为1时,舰载机屏卫效率可以达到100%。不好的索敌会极大的影响舰载机屏卫效率。 会增加达到100%舰载机屏卫效率的要求。更高的舰载机屏卫效率会进一步防止敌方鱼雷攻击航母群(减少堆叠)。它还提高了航母的出击效率(高达 +10%),提高了航母和护航队的撤退速度(高达 +20%)。、
武器CD
除鱼雷外的所有武器都能每小时发射一次,鱼雷通常每4小时发射一次(通过将领的装填操练专家特质,可以加快到3小时一次)
选择目标
每一艘舰船都拥有攻击性武器(即除了航空母舰和运输船队) 和有着各自冷却时间的武器可以在每个战斗小时独立攻击三艘敌方舰船;一个是深水炸弹/轻武器,一个是鱼雷,一个是重炮。根据武器类型和索敌,只有特定的敌方编队可以成为攻击目标。
- 深水炸弹:唯一一种可以攻击潜艇的武器类型,而且只有在潜艇被暴露的情况下(见下文)* 轻型火炮: 只能攻击最近的敌人
- 重型火炮:只能攻击两个敌人
- 鱼雷: 鱼雷攻击目标的概率是100%减去敌方的屏卫效率。如果要瞄准航母群中的舰船(包括护航编队),它需要通过额外的检定,即100%减去敌方航母的舰载机屏卫效率。
当设定为高风险交战规则时,潜艇只会瞄准屏卫舰。它们只会在设定为中等风险或更高风险的情况下瞄准主力舰。
在剩余的有效目标中,舰船会通过加权随机选择选择一个目标。如果开火舰船不会逃跑的话,目标选择的权重如下 (括号内的数字表示轻型火炮)[1]:
- 主力舰: 30 (2)
- 屏卫舰: 3 (6)
- 潜艇: 4
- 航母: 15 (1)
- 潜艇vs运输船队: 600 (40)
- 非潜艇 vs运输船队: 60 (4)
如果目标缺少生命值,则权重最多可获得+100%的加值。如果敌人逃跑了,权重减轻50%。如果敌人正在积极战斗(即不待机),将获得+50%的加成。
当开火舰船正在逃跑时,权重是相似的,但只考虑积极战斗的目标的话,最高权重的目标总是会被选择,而不是随机抽选。
潜艇
潜艇在隐蔽时完全不会受到攻击。这由眼睛划一个斜杠的符号来表示。被发现的潜艇会设置一个冷却时间,之后潜艇将再次隐藏(除非冷却时间得到刷新)。
有三种情况能发现潜艇:
- 如果潜艇在开始战斗时处于防御方,它将在最初16个小时内处于可见状态。这种情况通常发生在其特遣部队被敌军巡逻队发现时。
- 如果敌方的特遣舰队的对潜效率超过0,那便有3.5%的机会在潜艇攻击的 20小时内处于可见状态。潜艇的可见度会增加被发现的几率,而不好的阵位会增加高达 200%的可见度效果,它可以通过鱼雷暴露几率 的修正(电动鱼雷技术,各种海军学说,将领的猎杀潜航特质)来减少。计算可见度的组合公式是 [math]\displaystyle{ (100% + \texttt{鱼雷被发现修正}) * 3.5% * \frac{\text{水下可见度}}{100} * (300% - 2 * \text{阵位}) }[/math]
- 每一个战斗小时中潜艇都有可能被敌人的对潜探测(取决于所有敌舰的平均值)而处于可见状态20 个小时。公式为: [math]\displaystyle{ ((\frac{\text{水下可见度}}{100} * (300% - 2 * \text{阵位}) + \frac{\text{敌方对潜探测}}{100}) * 11)^3 / 100000 }[/math]
命中率
基础的命中率是10%, 深水炸弹的命中率为 11% 如果开火舰船缺乏人力和组织度的话, 人力不足的命中率减成最高会达到 -25% 而组织度不足的命中率减成最高会达到 -50%。
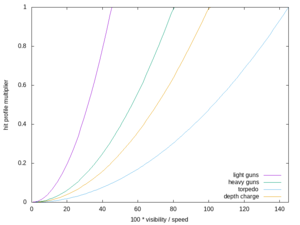
另一个修正因素是武器打击面和目标剖面的比值。 小型,灵活的舰船更难被击中,特别是大炮打小船时。 舰船的命中剖面是其水面/水下可见度乘以100再除以舰船的速度。潜艇使用它们的水下可见度,即使是在潜艇被发现时。运输船队的命中剖面总是120。上述剖面值除以武器的打击面值后(轻型火炮: 45,重型火炮: 80, 鱼雷:145,深水炸弹:100)再平方,便得到了右方的修正。它会影响命中率,但不能增加命中率。
命中率也会被不好的坏天气,夜晚,索敌修正,以及海军上将的水平,后勤和计划技能所影响。
![]() 将领的鱼雷专家和驱逐舰领袖特质可以增加鱼雷的命中率。
Torpedo Expert and Destroyer Leader traits can increase the hit chance for torpedoes.
将领的鱼雷专家和驱逐舰领袖特质可以增加鱼雷的命中率。
Torpedo Expert and Destroyer Leader traits can increase the hit chance for torpedoes.
而在实际游戏中,增加了1%的速度相当于增加舰船的有效生命1.7%。无论你的舰船水面/水下可见度如何,也不管舰船被什么武器瞄准,这种增加都是适用的。
命中率始终至少为0.05%[2]。
如果命中率没有造成命中,目标不会受到影响。
穿甲
如果武器不能穿透敌人的装甲,伤害将根据它们之间的比例减少:
伤害减少值 = -90% * (100% - <武器的穿甲深度> / <敌方装甲厚度>)
如果武器的穿甲深度高于敌人的装甲厚度,其攻击会增加致命一击的几率(参见 致命一击). 鱼雷攻击无视装甲。
伤害输出
The respective weapon type damage of the ship can be modified by doctrines, the naval terrain, the weather, pride of the fleet if present, and the admiral's skills and traits. Bad positioning can cause a penalty of up to 50%. The Defense modifier of the enemy admiral's skill level will also reduce the damage.
If the weapon can not pierce the enemy armor, damage is reduced by up to 90%, scaling with the ratio between the two.
The damage gets randomized by ±15%.
Damage is applied against both the target's HP and organization, but organization damage will be relatively low while the ship's HP are close to full.
致命一击
A critical hit is a particularly devastating hit against the target which can also damage some of its critical components. The resulting penalties can only be removed by repairing the ship.
The chance for a torpedo to score a critical hit is 20%. For other weapon types the base chance is 10% but also depends on whether the armor can be pierced (doubling the chance) and the target's reliability (scaling down to 0% at 100% reliability).
![]() The Marksman and Chief Engineer traits can respectively increase and lower critical hit chances, irrespective of weapon type.
The Marksman and Chief Engineer traits can respectively increase and lower critical hit chances, irrespective of weapon type.
If a critical hit does occur, it potentially affects one of the critical parts on the ship. The chance for this is 10%, inversely scaled by reliability (e.g. at 25% reliability the chance increases to 40%). The effect depends on the specific part being damaged. For example if the ammo storage is hit, the damage gets massively increased, while a hit to the rudder does only minor damage but cripples the retreat speed of the ship.
Otherwise a regular critical occurs without damaging a particular part. The damage bonus ranges from +100% (at 100% reliability) and +600% (at 0% reliability). For torpedoes the bonus does not depend on reliability and is always +100%.
Every 8 hours (00:00, 08:00, 16:00) planes can sortie in the battle.
The number of external planes is limited to: <sum of all enemy ships' current HP> * 0.05 * (1 + 0.2 * <combat days>). But at least 20 planes can always join. Number of planes eligible for joining naval combat is total planes assigned on Naval Strike mission multiplied by Mission Efficiency.
Target selection
The naval strike target is randomly selected from a weighted distribution. The base weight is each ship's maximum HP. This gets scaled depending on ship type:
- revealed submarine: x10
- capital ship: x50
- carrier: x200
Damaged ships get a linearly increasing weight up to +500% at 0% HP. If a ship's anti air attack is below 5, the weight is increased by 5 * (5 - <ship/convoy AA>). For example convoys have only 0.2 anti air attack, increasing their score by 24.
Ship AA defense
When a ship gets targeted by an air wing, it will try to shoot back. Against non-kamikaze wings the ship's chance to shoot back is (90%+50%*(90% - 1%*<wing's agility>)) * 20%. The chance never goes lower than 0.2%.
If the attacker performs a kamikaze attack, the ship can always shoot back and its AA attack gets increased by 2. The highest possible number of planes that can be shot down is 1% of planes times the ship's AA attack, capped at 100%. The effective number of planes shot down is a random number between 0 and this maximum. The losses are increased to 400% for kamikaze strikes.
Attack
If any planes remain after the ship shot at them, they perform the naval strike. If they are based on a carrier that takes part in the battle, their damage is increased to 500%. The ratio of planes that actually hit the ship is <naval targeting>/10 * 30% (capped between 0% and 100%). It does not depend on the maneuverability of the ship.
The ship's AA damage reduction further reduces the damage dealt: 0.15 * (<ship AA (0 for convoy)> + 20% * <all ships fighting on same side AA>)^0.2
<ship AA> is 0 for convoys but convoy AA is included in <all ships fighting on same side>. The damage reduction can not exceed 50%.
Critical hits are calculated the same as a regular ship gun hit that pierces armor.
If the naval battle was a port strike, the naval base gets damaged proportionately to the damage dealt against the ship.
Carrier stacking penalty
Each carrier exceeding 4 per side incurs a 20% penalty, up to 80%. The penalty reduces the number of carrier wings that can operate.
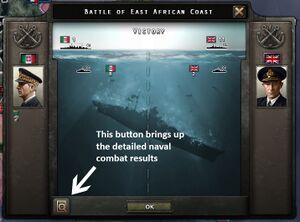
It is possible to get detailed and valuable information on the impact of various elements of the player's fleet during a naval combat, once that combat has finished. After bringing up the naval combat results screen, access the detailed information by pressing the detailed naval combat results button, indicated in the picture on the left. This button acts like a toggle, so once it has been pressed in the current session, the naval combat results will automatically display the detailed results unless the detailed naval combat results button is pressed again.
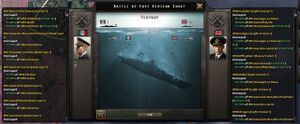
Once it has been pressed, it will bring up a column of information on either side of the summary naval combat results window, showing the impact of each unit or air wing (both carrier or land-based) on the battle - see the example to the right. In this case, the battle didn't include an air component, but the player can see from the sample results screen shown below that for the Italians, the heavy cruiser Marco Polo delivered the final hits to the British destroyers Wishart and Wrestler, but it was assisted in sinking them by a number of other Italian ships, including Giuseppe La Masa, Giacinto Carini and Castelfidardo. On the British side, the heavy cruiser Effingham finished off two enemy destroyers (Curtatone and Castelfidardo) but the light cruiser Caledon did almost as much damage (only delivering the final hit on one enemy ship).
As will often be the case, in this example there is more information available in the detailed results than can fit on-screen in the columns. To view the performance of the rest of the vessels involved in an encounter where the detailed results won't all fit on screen at one time, use the scrollbars on the side of the detailed naval results column.
Carrier capable aircraft
| File:Ambox outdated info.png | 这部分内容可能已不适合当前版本,最后更新于1.5。 |
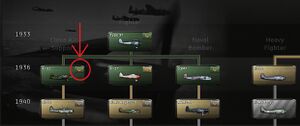
In order to be able to base aircraft on an aircraft carrier, carrier capable models must be produced. To do this, first the land based version of an aircraft will be researched, then one must research the carrier capable version by clicking the aircraft carrier button on the aircraft type in the air research tab.
This can only be done for Fighters, Close Air Support and Naval Bombers. The carrier capable version has a different model name than the land based version, as well as different artwork and different stats. If one doesn't intend to use aircraft carriers, then one does not need to research carrier capable planes.
When a new carrier is produced, the planes that will originally be based on it are produced as part of the carrier production line in the naval section using dockyards. It will produce the most up-to-date models researched. From the carrier production line one can change the types of planes that will be produced and deployed with the new carrier when it is launched. If there is need to replace these, then one will need to set-up a new aircraft production line using military factories, and select the appropriate carrier capable model.
When an aircraft carrier is part of a fleet which is on patrol in one or more regions, then the wings based on it are shown as on a carrier mission. They will operate as a Carrier Air Group and automatically take part in any naval combat if the fleet engages or is engaged by the enemy, and the carrier is within range. There is no need to give them any specific orders.
If one wishes to use one's carriers as a floating air base, and use the wings to operate standard air missions, then they will no longer operate automatically as a Carrier Air Group. If the carrier fleet is engaged by the enemy it may not have air cover. The player should be careful to make sure that it is properly protected. One might place a fighter wing on an interception mission in the region where the carrier fleet is located, but send a bomber wing to target an adjoining region, for example to support an amphibious landing.


