小 (傻狗本狗~移动页面Naval battle至海军战斗) |
(修复math) |
||
| 第46行: | 第46行: | ||
There are three circumstances that reveal submarines: | There are three circumstances that reveal submarines: | ||
* If the submarine starts the battle on the defending side, it will be initially revealed for {{hover|NNavy.SUBMARINE_REVEALED_TIMEOUT|16}} hours. This typically happens when its task force gets spotted by enemy patrols. | * If the submarine starts the battle on the defending side, it will be initially revealed for {{hover|NNavy.SUBMARINE_REVEALED_TIMEOUT|16}} hours. This typically happens when its task force gets spotted by enemy patrols. | ||
* If the enemy task force has any sub detection greater than zero, there is a {{hover|NNavy.SUBMARINE_BASE_TORPEDO_REVEAL_CHANCE|3.5%}} chance of revealing the submarine for {{hover|NNavy.SUBMARINE_HIDE_TIMEOUT|20}} hours every time it attacks. The submarine's visibility increases the chance and bad positioning increases the visibility effect by up to {{hover|NNavy.SUBMARINE_REVEAL_ON_MINIMUM_POSITIONING|200%}}. It can be reduced with the {{hover|naval_torpedo_reveal_chance_factor|Torpedo reveal chance modifier}} (Electric torpedo technology, various naval doctrines, Silent hunter admiral trait). The combined formula is <math display="inline">(100% + \texttt{naval}\_\texttt{torpedo}\_\texttt{reveal}\_\texttt{chance}\_\texttt{factor}) * 3.5% * \frac{\text{sub visibility}}{100} * (300% - 2 * \text{positioning})</math> | * If the enemy task force has any sub detection greater than zero, there is a {{hover|NNavy.SUBMARINE_BASE_TORPEDO_REVEAL_CHANCE|3.5%}} chance of revealing the submarine for {{hover|NNavy.SUBMARINE_HIDE_TIMEOUT|20}} hours every time it attacks. The submarine's visibility increases the chance and bad positioning increases the visibility effect by up to {{hover|NNavy.SUBMARINE_REVEAL_ON_MINIMUM_POSITIONING|200%}}. It can be reduced with the {{hover|naval_torpedo_reveal_chance_factor|Torpedo reveal chance modifier}} (Electric torpedo technology, various naval doctrines, Silent hunter admiral trait). The combined formula is <math display="inline">(100\% + \texttt{naval}\_\texttt{torpedo}\_\texttt{reveal}\_\texttt{chance}\_\texttt{factor}) * 3.5\% * \frac{\text{sub visibility}}{100} * (300\% - 2 * \text{positioning})</math> | ||
* Every combat hour there is a chance for the submarine to get revealed for {{hover|NNavy.SUBMARINE_HIDE_TIMEOUT|20}} hours passively by the enemy's sub detection (averaged across all enemy ships): <math display="inline">((\frac{\text{sub visibility}}{100} * (300% - 2 * \text{positioning}) + \frac{\text{enemy sub detection}}{100}) * 11)^3 / 100000</math> | * Every combat hour there is a chance for the submarine to get revealed for {{hover|NNavy.SUBMARINE_HIDE_TIMEOUT|20}} hours passively by the enemy's sub detection (averaged across all enemy ships): <math display="inline">((\frac{\text{sub visibility}}{100} * (300\% - 2 * \text{positioning}) + \frac{\text{enemy sub detection}}{100}) * 11)^3 / 100000</math> | ||
== Hit chance == | == Hit chance == | ||
2020年10月12日 (一) 03:49的版本
A naval battle gets initiated on a specific province between two task forces, one of them being the attacker. This usually happens after a spotting process is complete or opposing fleets move onto the same province. Naval and port strikes by air wings trigger a naval battle that resolves instantly. Otherwise the battle lasts until one side is fully escaped or destroyed. The defender always joins the battle with full efficiency while the attacker may have a reduced efficiency depending on circumstances.
Inside of battles ships can behave independently and convoys, which are normally abstracted, are also present as individual ships.
Layout
- Screening group: Consists of screen ships, which screen the battle-line and carrier group from torpedoes.
- Battle-line: Consists of capital ships except for carriers. Aside from providing heavy firepower, these ships screen the carrier group from torpedoes.
- Carrier group: Consists of carriers which can strike at long range. If any convoys are present, they will also appear in this area.
- Submarine wolfpack: Consists of submarines, which may threaten the enemy battle-line and carrier group if they are insufficiently screened from torpedoes.
Screening efficiency
| File:Ambox outdated info.png | 这部分内容可能已不适合当前版本,最后更新于1.9。 |
The ratio of screen ships and other ships is the screening ratio. With good positioning, 100% screening efficiency may be reached when the ratio is 3 screens per capital ship/carrier. Bad positioning applies a penalty to screening efficiency, which may increase the screening ratio required to achieve 100% efficiency. High screening efficiency prevents enemy torpedo attacks against the battle-line and carrier group, and confers increased hit chance (up to +40%) and retreat speed (up to +20%) upon all ships in those groups.
The ratio of capital ships to carriers and convoys is the carrier screening ratio. With good positioning, 100% carrier screening efficiency may be reached when the ratio is 1. Bad positioning applies a penalty to carrier screening efficiency, which may increase the carrier screening ratio required to achieve 100% efficiency. High carrier screening efficiency further prevents enemy torpedo attacks against the carrier group (stacking diminishingly). It also provides increased sortie efficiency (up to +10%) to carriers and increased retreat speed (up to +20%) for both carriers and convoys.
Weapon cooldown
All weapons except torpedoes can fire every hour. Torpedoes normally fire every 4 hours (![]() this can be reduced to 3 with the Drill Master trait).
this can be reduced to 3 with the Drill Master trait).
Target selection
Each ship with offensive weapons (i.e. not carriers and convoys) and the respective weapons off cooldown can target three enemy ships independently per combat hour; one with its depth charges/light weapons, one with torpedoes, and one with heavy guns. Depending on weapon type and enemy screening, only certain enemy groups can be targeted.
- Depth charges: the only weapon type that can target submarines, and only if they are revealed (see below)
- Light guns: can only target the closest non-empty group
- Heavy guns: can target the first two non-empty groups
- Torpedoes: the probability that a torpedo can target ships past the screening group is 100% minus the enemy screening efficiency. To target ships in the carrier group (including convoys) it needs to pass an additional check of 100% minus the enemy carrier screening efficiency.
Submarines will only target screens when set to High risk engagement rule. They will only target capitals when set to Medium risk or higher.
Out of the remaining valid targets one is chosen by weighted random selection. If the firing ship is not currently running away, the enemies are weighted as follows (numbers in parenthesis for light guns)[1]:
- capitals: 30 (2)
- screen: 3 (6)
- submarine: 4
- carriers: 15 (1)
- submarine vs convoy: 600 (40)
- non-sub vs convoy: 60 (4)
If the target is lacking HP, up to +100% bonus are applied to the weight. If the enemy is escaping, the weight is reduced by 50%. If the enemy is actively fighting (i.e. not waiting), a +50% bonus is applied.
The weighting is similar when the firing ship is escaping but only considers targets that are actively fighting and always chooses the highest scoring target without randomization.
Submarines
Submarines are completely immune to being targeted while they are hidden. This is indicated by the crossed-out eye symbol. Revealing a submarine sets a cooldown after which the submarine will hide again (unless the cooldown gets refreshed).
There are three circumstances that reveal submarines:
- If the submarine starts the battle on the defending side, it will be initially revealed for 16 hours. This typically happens when its task force gets spotted by enemy patrols.
- If the enemy task force has any sub detection greater than zero, there is a 3.5% chance of revealing the submarine for 20 hours every time it attacks. The submarine's visibility increases the chance and bad positioning increases the visibility effect by up to 200%. It can be reduced with the Torpedo reveal chance modifier (Electric torpedo technology, various naval doctrines, Silent hunter admiral trait). The combined formula is [math]\displaystyle{ (100\% + \texttt{naval}\_\texttt{torpedo}\_\texttt{reveal}\_\texttt{chance}\_\texttt{factor}) * 3.5\% * \frac{\text{sub visibility}}{100} * (300\% - 2 * \text{positioning}) }[/math]
- Every combat hour there is a chance for the submarine to get revealed for 20 hours passively by the enemy's sub detection (averaged across all enemy ships): [math]\displaystyle{ ((\frac{\text{sub visibility}}{100} * (300\% - 2 * \text{positioning}) + \frac{\text{enemy sub detection}}{100}) * 11)^3 / 100000 }[/math]
Hit chance
The base hit chance is 10%, 11% for depth charges. If the firing ship is lacking manpower or organization, the chance is reduced by up to -25% and -50% respectively.
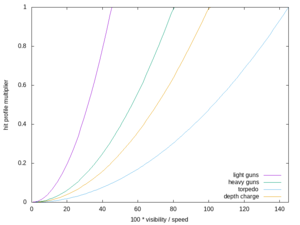
Another factor is the guns hit profile compared to the target's profile. Small, agile ships are harder to hit, especially for bigger and slower guns. The hit profile of a ship is its surface/sub visibility multiplied by 100 and divided by its speed. Subs use their sub visibility, even when revealed. The hit profile of convoys is always 120. This profile is divided by the gun's hit profile (light: 45, heavy: 80, torpedo: 145, depth charge: 100) and then squared. It factors into the hit chance but can not increase it.
The hit chance can also be influenced by bad weather, night, screening bonuses, and the ship's admiral's level, logistics and planning skills.
![]() Torpedo Expert and Destroyer Leader traits can increase the hit chance for torpedoes.
Torpedo Expert and Destroyer Leader traits can increase the hit chance for torpedoes.
In practical terms, a 1% speed increase is the equivalence of increasing your ship's effective hp by 1.7%. This increase applies across the board regardless of your ship's sub/surface visibility or what weapon is being used against it.
The hit chance is always at least .05%[2].
If the hit chance does not result in a hit, the target remains unaffected.
Armor piercing
If a weapon can not pierce the enemy's armor, damage is reduced according to the ratio between them:
damage reduction = -90% * (100% - <weapon's armor piercing> / <enemy's armor>)
If the piercing value of the weapon is higher than the enemy's armor, it increases the chance of critical hits (see #critical hit). Torpedoes ignore armor.
Outgoing damage
The respective weapon type damage of the ship can be modified by doctrines, the naval terrain, the weather, pride of the fleet if present, and the admiral's skills and traits. Bad positioning can cause a penalty of up to 50%. The Defense modifier of the enemy admiral's skill level will also reduce the damage.
If the weapon can not pierce the enemy armor, damage is reduced by up to 90%, scaling with the ratio between the two.
The damage gets randomized by ±15%.
Damage is applied against both the target's HP and organization, but organization damage will be relatively low while the ship's HP are close to full.
Critical hit
A critical hit is a particularly devastating hit against the target which can also damage some of its critical components. The resulting penalties can only be removed by repairing the ship.
The chance for a torpedo to score a critical hit is 20%. For other weapon types the base chance is 10% but also depends on whether the armor can be pierced (doubling the chance) and the target's reliability (scaling down to 0% at 100% reliability).
![]() The Marksman and Chief Engineer traits can respectively increase and lower critical hit chances, irrespective of weapon type.
The Marksman and Chief Engineer traits can respectively increase and lower critical hit chances, irrespective of weapon type.
If a critical hit does occur, it potentially affects one of the critical parts on the ship. The chance for this is 10%, inversely scaled by reliability (e.g. at 25% reliability the chance increases to 40%). The effect depends on the specific part being damaged. For example if the ammo storage is hit, the damage gets massively increased, while a hit to the rudder does only minor damage but cripples the retreat speed of the ship.
Otherwise a regular critical occurs without damaging a particular part. The damage bonus ranges from +100% (at 100% reliability) and +600% (at 0% reliability). For torpedoes the bonus does not depend on reliability and is always +100%.
Every 8 hours (00:00, 08:00, 16:00) planes can sortie in the battle.
The number of external planes is limited to: <sum of all enemy ships' current HP> * 0.05 * (1 + 0.2 * <combat days>). But at least 20 planes can always join. Number of planes eligible for joining naval combat is total planes assigned on Naval Strike mission multiplied by Mission Efficiency.
Target selection
The naval strike target is randomly selected from a weighted distribution. The base weight is each ship's maximum HP. This gets scaled depending on ship type:
- revealed submarine: x10
- capital ship: x50
- carrier: x200
Damaged ships get a linearly increasing weight up to +500% at 0% HP. If a ship's anti air attack is below 5, the weight is increased by 5 * (5 - <ship/convoy AA>). For example convoys have only 0.2 anti air attack, increasing their score by 24.
Ship AA defense
When a ship gets targeted by an air wing, it will try to shoot back. Against non-kamikaze wings the ship's chance to shoot back is (90%+50%*(90% - 1%*<wing's agility>)) * 20%. The chance never goes lower than 0.2%.
If the attacker performs a kamikaze attack, the ship can always shoot back and its AA attack gets increased by 2. The highest possible number of planes that can be shot down is 1% of planes times the ship's AA attack, capped at 100%. The effective number of planes shot down is a random number between 0 and this maximum. The losses are increased to 400% for kamikaze strikes.
Attack
If any planes remain after the ship shot at them, they perform the naval strike. If they are based on a carrier that takes part in the battle, their damage is increased to 500%. The ratio of planes that actually hit the ship is <naval targeting>/10 * 30% (capped between 0% and 100%). It does not depend on the maneuverability of the ship.
The ship's AA damage reduction further reduces the damage dealt: 0.15 * (<ship AA (0 for convoy)> + 20% * <all ships fighting on same side AA>)^0.2
<ship AA> is 0 for convoys but convoy AA is included in <all ships fighting on same side>. The damage reduction can not exceed 50%.
Critical hits are calculated the same as a regular ship gun hit that pierces armor.
If the naval battle was a port strike, the naval base gets damaged proportionately to the damage dealt against the ship.
Carrier stacking penalty
Each carrier exceeding 4 per side incurs a 20% penalty, up to 80%. The penalty reduces the number of carrier wings that can operate.
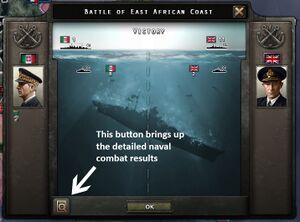
It is possible to get detailed and valuable information on the impact of various elements of the player's fleet during a naval combat, once that combat has finished. After bringing up the naval combat results screen, access the detailed information by pressing the detailed naval combat results button, indicated in the picture on the left. This button acts like a toggle, so once it has been pressed in the current session, the naval combat results will automatically display the detailed results unless the detailed naval combat results button is pressed again.
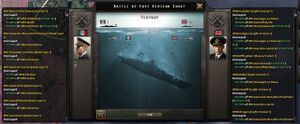
Once it has been pressed, it will bring up a column of information on either side of the summary naval combat results window, showing the impact of each unit or air wing (both carrier or land-based) on the battle - see the example to the right. In this case, the battle didn't include an air component, but the player can see from the sample results screen shown below that for the Italians, the heavy cruiser Marco Polo delivered the final hits to the British destroyers Wishart and Wrestler, but it was assisted in sinking them by a number of other Italian ships, including Giuseppe La Masa, Giacinto Carini and Castelfidardo. On the British side, the heavy cruiser Effingham finished off two enemy destroyers (Curtatone and Castelfidardo) but the light cruiser Caledon did almost as much damage (only delivering the final hit on one enemy ship).
As will often be the case, in this example there is more information available in the detailed results than can fit on-screen in the columns. To view the performance of the rest of the vessels involved in an encounter where the detailed results won't all fit on screen at one time, use the scrollbars on the side of the detailed naval results column.
Carrier capable aircraft
| File:Ambox outdated info.png | 这部分内容可能已不适合当前版本,最后更新于1.5。 |
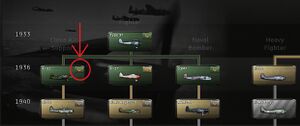
In order to be able to base aircraft on an aircraft carrier, carrier capable models must be produced. To do this, first the land based version of an aircraft will be researched, then one must research the carrier capable version by clicking the aircraft carrier button on the aircraft type in the air research tab.
This can only be done for Fighters, Close Air Support and Naval Bombers. The carrier capable version has a different model name than the land based version, as well as different artwork and different stats. If one doesn't intend to use aircraft carriers, then one does not need to research carrier capable planes.
When a new carrier is produced, the planes that will originally be based on it are produced as part of the carrier production line in the naval section using dockyards. It will produce the most up-to-date models researched. From the carrier production line one can change the types of planes that will be produced and deployed with the new carrier when it is launched. If there is need to replace these, then one will need to set-up a new aircraft production line using military factories, and select the appropriate carrier capable model.
When an aircraft carrier is part of a fleet which is on patrol in one or more regions, then the wings based on it are shown as on a carrier mission. They will operate as a Carrier Air Group and automatically take part in any naval combat if the fleet engages or is engaged by the enemy, and the carrier is within range. There is no need to give them any specific orders.
If one wishes to use one's carriers as a floating air base, and use the wings to operate standard air missions, then they will no longer operate automatically as a Carrier Air Group. If the carrier fleet is engaged by the enemy it may not have air cover. The player should be careful to make sure that it is properly protected. One might place a fighter wing on an interception mission in the region where the carrier fleet is located, but send a bomber wing to target an adjoining region, for example to support an amphibious landing.


